SRAM Guide RSC brakes sit in an interesting middle ground: enough power for hard trail riding, but still tuned for control, modulation, and a lever feel you can actually set up to suit your hands. In this guide, I focus on the parts that matter in real workshop use: lever setup, bleeding, pad choice, contamination, and the faults that usually explain a bad feel long before the caliper itself is to blame.
The settings and service points that make the biggest difference
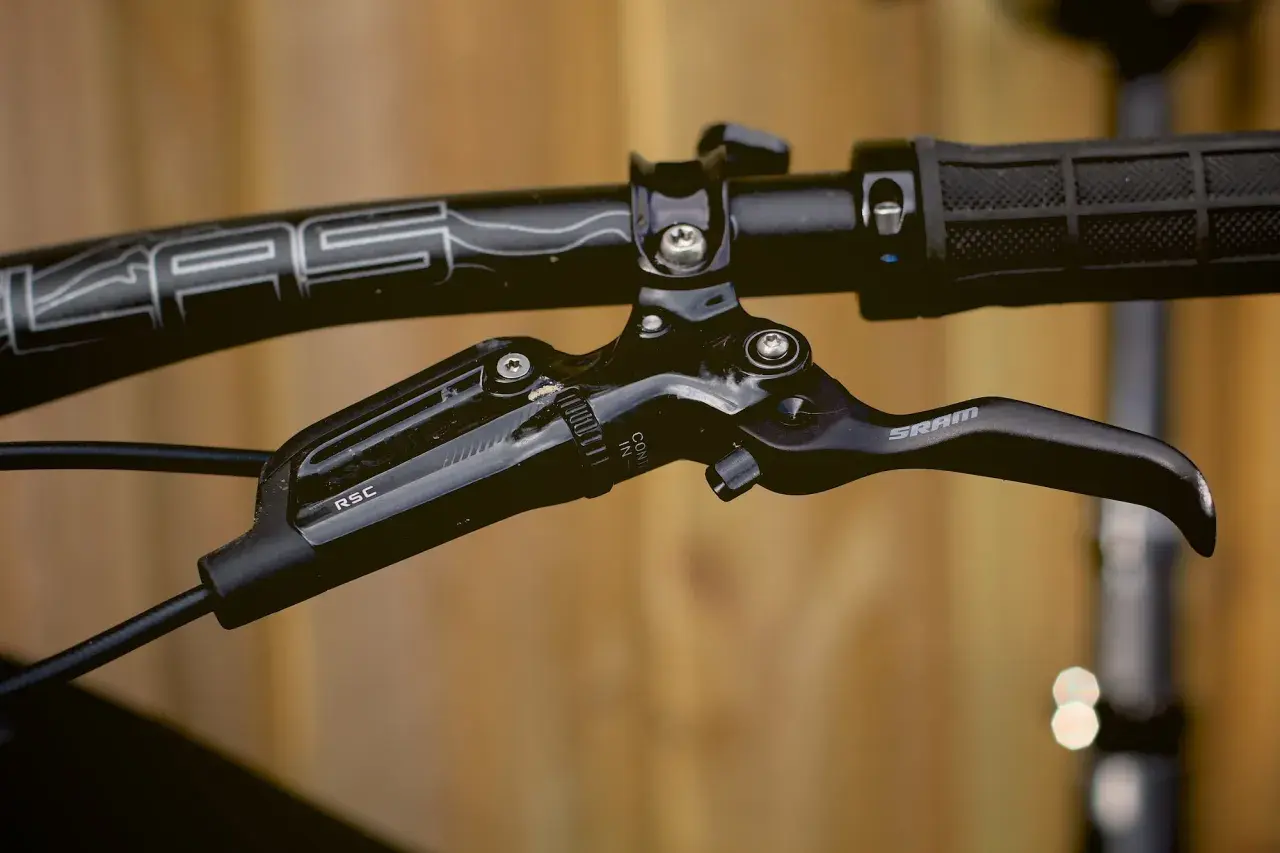
- SRAM lists the brake as a hydraulic MTB lever with tool-free reach adjust, contact adjust, a forged aluminium blade, a lever pivot bearing, and DOT 5.1 fluid.
- Reach sets hand position; contact point sets where the bite starts. Those are separate adjustments and they solve different problems.
- DOT fluid is mandatory. Keep mineral oil, DOT 5, and contaminated tools away from the system.
- The Guide/G2 pad family is the correct pad shape, and pad condition matters even more in wet UK riding.
- If the lever feel changes suddenly, I check pads, rotor cleanliness, and leaks before I touch the adjusters.
Why this brake still makes sense on a trail bike
On paper, the Guide RSC is no longer the newest brake in SRAM’s catalogue, but that does not make it irrelevant. It is still a well-balanced hydraulic trail brake with a forged lever blade, tool-free reach adjust, contact point adjust, and a lever pivot bearing that keeps the action smooth. That combination is why so many riders still like it: the brake feels tunable rather than binary.
What I notice most on the trail is the modulation. SwingLink, SRAM’s cam system, helps the lever build power in a controlled way instead of giving you an abrupt on-off hit. That is useful on steep, slippery British descents where traction changes every few metres. The trade-off is simple: if you ride long, fast alpine-style terrain or a very heavy bike, rotor size, pad condition, and bleed quality matter more than they do on a lighter trail setup.
I would describe it as a brake for riders who want confidence and fine control, not just raw bite. Once you understand that, the setup decisions start to make a lot more sense.
That leads straight into the lever setup, because a lot of “bad brake” complaints are really just bad ergonomics.
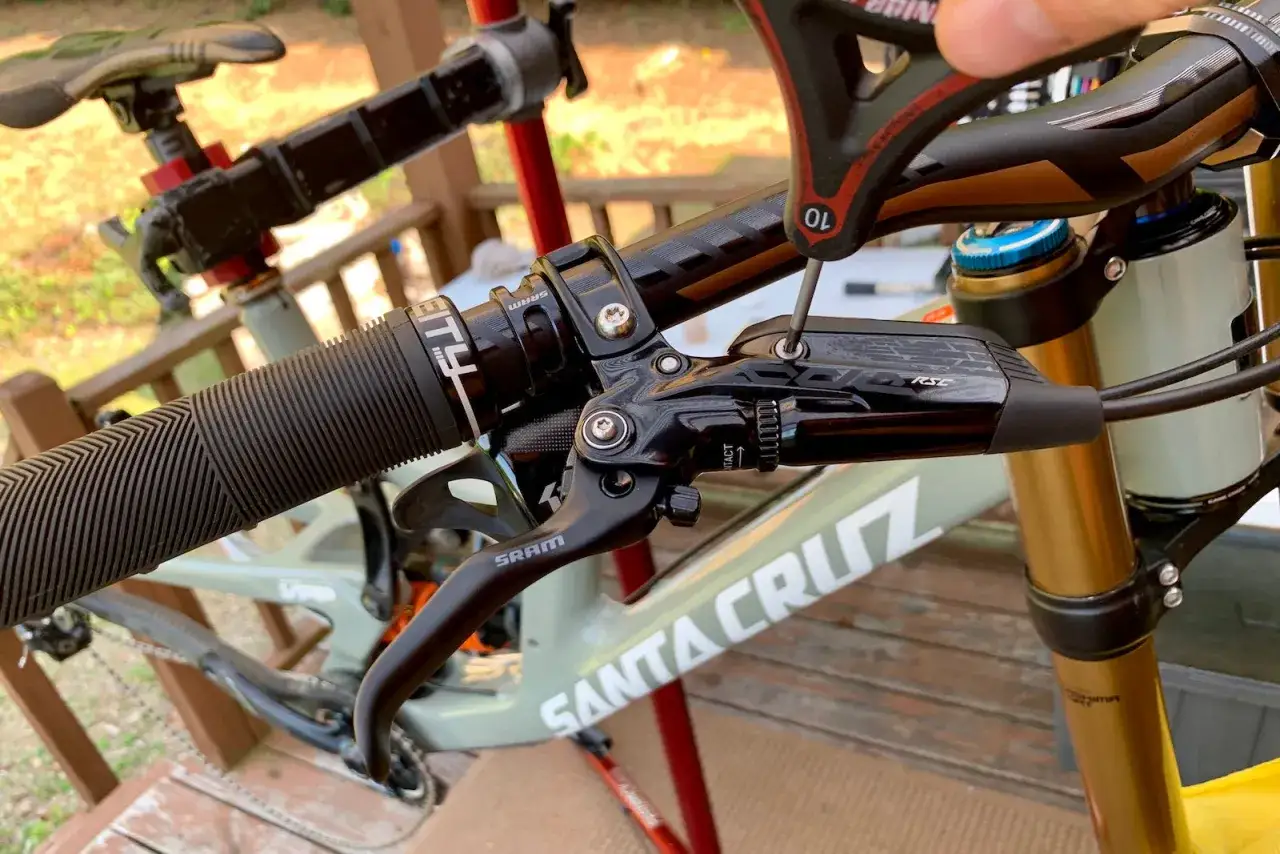
Set the lever before you reach for the bleed kit
I almost always start with lever position before I touch fluid. If the lever sits too far out, too low, or at the wrong angle, the brake feels vague even when the hydraulics are perfect. Reach adjust changes how far the lever sits from the bar; contact point adjust changes where the pads begin to bite. They are not interchangeable.
| Adjustment | What it changes | What I use it for | Common mistake |
|---|---|---|---|
| Reach adjust | Distance from the bar to the lever blade | One-finger control and a relaxed wrist position | Trying to use it to hide a poor lever angle |
| Contact point adjust | Where pad engagement begins in the stroke | Matching bite feel between front and rear | Using it to mask air in the system |
| Lever angle | How your index finger tracks the blade | Keeping the wrist neutral in attack position | Setting the lever too flat and forcing the wrist down |
My rule is boring but effective: first set the lever angle, then set reach, then fine-tune contact point only after the pads and caliper are in good shape. If the bite point still wanders after that, the problem is probably hydraulic, not ergonomic.
In practice, this order saves time. It stops people from chasing the wrong adjustment when the real issue is a bleed, worn pads, or contamination.
Bleeding the system without making a mess
The Guide RSC uses DOT 5.1 fluid, and SRAM’s manual is clear about not mixing in mineral oil or DOT 5. If the system has been contaminated, you are not dealing with a quick top-up. The correct repair is to flush the parts, replace the seals or hose as needed, and rebuild it properly. DOT fluid also strips paint quickly, so I always protect the frame and wipe spills immediately.
- Remove the wheel and pads, then insert the bleed block before any fluid work starts.
- Cover the frame, rotor area, and work surface so DOT fluid cannot reach paint or pad material.
- Follow SRAM’s bleed procedure in the correct order and keep the system free of air.
- Only refit the pads after the bleed is complete and the caliper is clean.
- Torque the hardware correctly: SRAM’s manual lists 4.4-5.4 N·m for the banjo bolt and 8 N·m for the compression nut where applicable.
That last point matters more than many home mechanics think. Over-tightening can damage fittings, and under-tightening can leave you with a slow leak that looks like a mystery bite-point problem three rides later.
If you are doing this at home in the UK, I would budget roughly £18-£25 for a basic SRAM-compatible bleed kit and about £25 per brake for a workshop bleed. The professional kit is much more expensive, so it only makes sense if you are servicing multiple DOT brakes or bleeding them regularly.
Once the hydraulic side is clean, the next place I look is the pad and rotor setup, because British mud will expose weak choices very quickly.
Choose pads and rotors for the weather you actually ride in
SRAM’s pad guide groups Guide, G2 and Trail calipers into the same brake pad family, which is handy because it removes guesswork when you are replacing consumables. If you are unsure which exact caliper version you own, check the 11-digit serial number laser-etched under the rear caliper. If it is hidden under grime, wipe the caliper clean with a dry cloth first.
| Pad type | Feel | Best use | Trade-off |
|---|---|---|---|
| Organic | Quiet, smooth, good initial bite | Mixed trail riding and wetter UK conditions where modulation matters | Usually wears faster in abrasive mud and grit |
| Sintered / metallic | Louder, harder wearing, strong when hot | Long descents, winter grit, and riders who chew through pads fast | Can feel noisier and less refined at low speed |
SRAM’s own pad guide also recommends matching the rotor to the pad compound when you change compound type, so I would not treat that swap as cosmetic. In other words, if you move from organic to sintered, plan the job properly instead of just changing the pads and hoping for the best.
Contamination is the real enemy here. Keep chain lube, fork oil, brake cleaner overspray, and DOT fluid away from the rotor and pad faces. If a pad is soaked, I replace it rather than trying to rescue it. On the trail, a contaminated pad is noisy, weak, and inconsistent, which is exactly what you do not want on loose or wet ground.
After a pad or rotor change, bed the brakes in again before judging power. A fresh setup can feel disappointing for the first few hard stops, and that is normal.
Even with the right pads, a brake that feels wrong usually tells you something specific, and the symptom is often more useful than the guess.
What the common faults are really telling you
| Symptom | Likely cause | First thing I check |
|---|---|---|
| Lever feels soft or comes too close to the bar | Air in the system or a leak | Bleed quality, hose fittings, lever and caliper seepage |
| Bite point drifts on long descents | Heat, pad wear, contamination, or trapped air | Pad thickness, rotor condition, and whether the brake was bled properly |
| Squeal or howl | Contamination, glazing, or poor pad alignment | Clean the rotor with isopropyl alcohol and inspect the pads |
| Drag after releasing the lever | Pistons not returning cleanly or caliper misalignment | Piston movement, caliper centring, and fluid overfill |
| Front and rear feel different | Unequal pad wear or mismatched contact point settings | Pad wear, then lever setup after the hydraulics are confirmed healthy |
The mistake I see most often is trying to tune out a hydraulic problem with the contact point adjuster. That rarely works for long. If the system has air, the lever may feel acceptable for one ride and wrong again the next. If the pads are contaminated, no amount of adjuster fiddling will give you a clean bite.
When one side of the bike feels different from the other, I treat that as a clue, not a coincidence. It usually points to pad wear, bleed quality, or a caliper that needs cleaning before it points to anything more serious.
That is why I prefer a simple maintenance rhythm over reactive fixes.
The checks I would make before the next ride
If I had five minutes before a ride, I would do the same short list every time: check lever feel, inspect pad thickness, wipe the rotors, and look for any sign of fluid around the lever, hose, or caliper. If the brake has just been bled or fitted with fresh pads, I would also do a proper bed-in with several firm stops before trusting it on a descent.
- Make sure both levers return cleanly and feel the same from the first pull.
- Confirm the lever angle still suits one-finger braking in attack position.
- Inspect the pads for wear and the rotors for oil, glaze, or heavy scoring.
- Check hose fittings and the banjo area for any dampness or residue.
- Re-bleed sooner rather than later if the bite point starts to wander.
SRAM still keeps the Guide RSC manuals, pad charts, and bleed instructions in its service hub, which is helpful because there is no reason to guess at parts or procedures when the serial number is available. My own rule is simple: if the brake still feels inconsistent after a proper bleed, clean pads, and clean rotor, I stop adjusting and start inspecting for a mechanical fault. That is usually the fastest way to get the brake back to behaving like it should.