For most MTB hydraulic brakes, the answer is smaller than people expect: you usually need only a modest amount of fluid to restore lever feel, but you should still have extra on the bench. The real answer to how much brake fluid to bleed brakes depends on the brake brand, hose length, and whether you are doing a quick lever bleed or a full flush. On an off-road bike, that distinction matters because a soft lever on a steep descent is more than an inconvenience.
The practical answer is usually 20 to 50 ml per brake, with 100 ml as the safest home-mechanic bottle
- Routine bleed: plan on about 20 to 40 ml per brake.
- Quick top-off or lever bleed: 10 to 20 ml may be enough.
- Full flush or hose shortening: 40 to 100 ml per brake is a realistic range.
- For one bike at home: a 100 ml bottle is usually the smartest buy.
- For several bikes or frequent servicing: 250 ml or more makes sense, especially for mineral oil systems.
- Never mix fluids: mineral oil and DOT fluid are not interchangeable.
The amount I would keep ready
If I were doing a normal garage bleed on a mountain bike, I would start with 30 to 50 ml per brake. That is usually enough for a proper routine bleed, and it gives me room to chase out bubbles if the lever still feels a bit vague after the first pass. For a simple lever top-off, I often need less than that; for a hose swap, new build, or badly spongy brake, I want a bigger reserve on the bench.
The key point is that you are not always “using up” a whole bottle. A bleed involves moving fluid through the system, purging air, and sometimes repeating the process once or twice. That is why a 100 ml bottle is the safest minimum for most home mechanics, even though a single bleed may consume only a fraction of it.
What changes the number on different bikes
There is no single fixed volume because brake systems do not all behave the same. Some are compact and easy to purge, while others have longer hoses, larger calipers, or awkward lever angles that trap air more readily. I look at the following factors before I decide how much to have ready:
- Brake brand and fluid type: some systems use mineral oil, others use DOT fluid, and the bleeding style is not identical.
- Hose length: long enduro or e-MTB hoses usually need more working fluid than a short XC setup.
- Type of job: a lever bleed uses less than a full flush after a hose cut or bar swap.
- Caliper design: a 4-piston caliper can take a little more coaxing than a simpler 2-piston unit.
- How much air entered the system: a small lever feel correction is one thing; a completely open line is another.
I also treat the bleed block as part of the equation. If the pistons are held in the right place and the lever is positioned correctly, I waste less fluid and spend less time chasing bubbles. That leads straight into the working ranges I actually use at the bench.
A practical guide for common bleed jobs
When I plan a bleed, I think in ranges rather than exact millilitres. The table below is how I would budget fluid for typical mountain bike work.
| Bleed job | Typical fluid per brake | What I would prepare |
|---|---|---|
| Quick lever bleed or top-off | 10 to 20 ml | A small syringe load, plus a little reserve in case the lever still feels soft |
| Routine maintenance bleed | 20 to 40 ml | About 50 ml ready on the bench |
| Full flush on one brake | 40 to 60 ml | At least 75 ml ready, especially if you want to repeat the cycle |
| Hose shortening or new installation | 60 to 100 ml | 100 ml or more, because you may need extra passes to clear air |
| Very spongy or neglected system | Up to 100 ml or a bit more | Keep 100 to 150 ml available so you do not run short halfway through |
That is the practical part most riders want: you usually do not need a huge volume, but you do need enough spare fluid to work calmly. If I am bleeding both brakes on the same bike, I still prefer to work from one full bottle rather than trying to squeeze a job out of a nearly empty container.
Mineral oil and DOT fluid need different habits
Brake fluid choice changes the answer as much as volume does. In mountain biking, mineral oil systems and DOT systems behave differently in storage, cleaning, and service intervals, so I never talk about “brake fluid” as if it were one thing.
| System type | What it usually uses | Practical buying advice |
|---|---|---|
| Mineral oil brakes | Mineral oil | A 100 ml bottle is a solid home-mechanic size; 250 ml makes sense if you service bikes often |
| DOT brakes | DOT 4 or DOT 5.1 | Smaller bottles are usually smarter because opened DOT fluid should not sit around forever |
Never mix mineral oil and DOT fluid. They are not interchangeable, and the wrong fluid can damage seals and create a much bigger job than a simple bleed. I also would not use DOT 5 silicone in a bicycle brake system; that is a different chemistry altogether and not the same thing as DOT 4 or DOT 5.1.
For most UK riders servicing MTB brakes at home, the decision is usually simple: mineral oil systems are easy to keep on the shelf, while DOT systems reward buying only as much as you need. That matters because the next mistake is not usually “too little fluid” but “too much mess.”
How to avoid using too much or too little
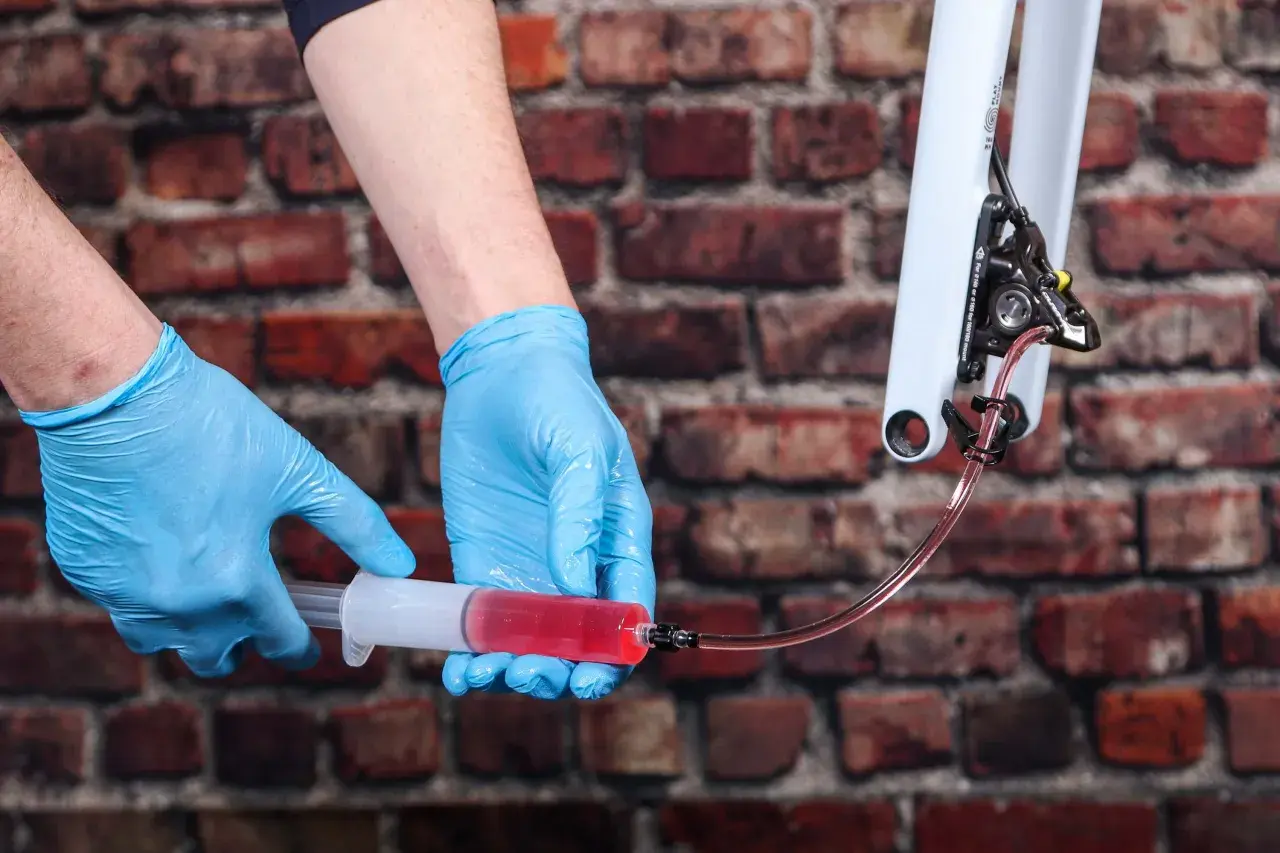
Most bad bleeds are not caused by a magical lack of fluid. They come from rushing, the wrong angle, or pumping air back into the system after you have already pushed it out. I keep the process boring on purpose.
- Fill the syringe partway, not to the brim: about 2/3 to 3/4 full gives you working space for bubbles and movement.
- Keep the lever and caliper positioned correctly: the right angle helps air rise out instead of hiding in the system.
- Use a bleed block: it keeps the pistons where they should be and stops you wasting fluid through excess piston movement.
- Move the fluid slowly: fast pumping makes tiny bubbles that are annoying to remove later.
- Watch the lever feel, not just the bottle level: if the lever firms up cleanly and stays consistent, you are close.
There are also two signs that tell me I should stop and reassess. If the lever still feels spongy after a normal bleed, I look for trapped air or a bad setup angle before I pour in more fluid. If the brake starts dragging after I have finished, I suspect overfilling or a piston issue, not a shortage of fluid.
What I would keep ready before a bleed
If I were setting up a home bleed for a trail bike, I would keep the following on the bench before opening anything:
- A 100 ml bottle of the correct brake fluid.
- Two clean syringes or a proper bleed kit.
- The correct bleed block or pad spacer for the brake model.
- Nitrile gloves and lint-free cloths.
- Brake-safe cleaner for the work area, keeping it off pads and rotors.