Fox's DPX2 is a rear shock that makes sense when you want a bike to climb efficiently without losing composure when the trail turns rough. I see it as a practical, support-first air shock rather than a pure downhill unit: light enough for trail bikes, but still adjustable enough to matter on real terrain. This guide breaks down how it works, how to set it up properly, where it sits in Fox's current lineup, and what I would check before trusting one on a bike.
Key points to know before you start tuning
- It is an air shock with a strong trail/all-mountain bias, built around an EVOL air sleeve and a 3-position lever.
- Sag should land around 25 to 30% of total shock travel; that is the first setting that really matters.
- The best setup usually starts with pressure, then rebound, then compression, and only then volume spacers.
- Volume spacers change mid-stroke support and bottom-out resistance, not sag.
- In 2026, it makes the most sense on an existing bike or in the used market, while FLOAT X and FLOAT X2 are the current comparison points.
What the DPX2 was built to solve
I think the easiest way to understand this shock is to strip away the branding and look at the job it was asked to do. Fox introduced the modern DPX2 as an all-new rear shock for MY18, replacing the older FLOAT X generation and giving trail riders a lighter chassis with more useful control than a basic open-piston air shock. It was aimed at bikes that need climbing efficiency, but also enough support to stay calm on steeper, rougher descents.
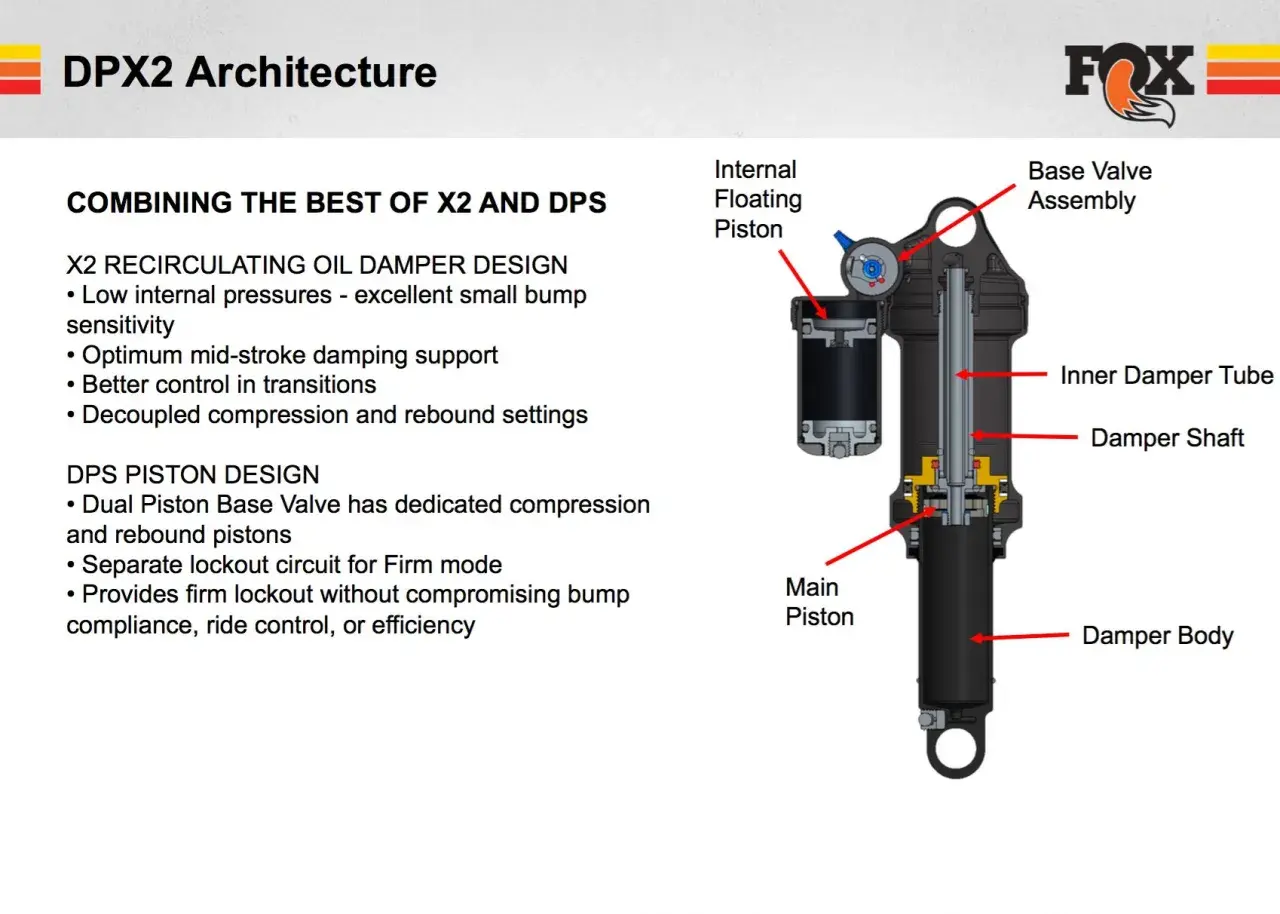
The key piece of hardware is the EVOL air sleeve. In plain English, that means the shock uses an integrated negative air chamber to reduce breakaway force and make the first part of the travel easier to use. The result is better small-bump sensitivity, plus a more progressive feel deeper in the stroke. That is why the DPX2 can feel efficient without becoming harsh. It gives you a bike that sits in the travel more intelligently instead of just bouncing between too soft and too firm.
That basic layout explains why so many riders liked it on trail and all-mountain bikes, but the real value shows up once you start tuning it for a specific frame and riding style. And that is where the feel on the trail starts to matter.
How it behaves on the trail
My read on the DPX2 is simple: it is not trying to be the most adjustable shock in the Fox range, and that is part of the appeal. It gives you a clear set of tools, not a complicated dashboard. On non-remote versions, the 3-position lever gives you Open, Medium and Firm, which maps cleanly to rough descents, rolling terrain and smooth climbing. On Factory and Performance Elite non-remote shocks, there is also an Open-mode adjuster, which lets you fine-tune the Open setting without making the shock feel vague.
| Setting | What it is for | What I expect to feel |
|---|---|---|
| Open | Rough descents and technical trail | More active rear end, better grip, less pedal-platform feel |
| Medium | Undulating terrain and mixed riding | A useful middle ground when you want support without shutting the shock down |
| Firm | Smoother climbing and sprinting | Maximum support for seated efforts, but not a setting I would leave on for rough ground |
| Open-mode adjust 1 to 3 | Fine tuning the Open setting on compatible versions | 1 feels more plush, 3 feels firmer |
Rebound matters just as much. Fox is clear that rebound depends on air pressure: the more pressure you run, the more rebound damping you usually need. That is one reason people struggle with this shock when they tune it by ear instead of by process. If the rear end feels busy and skips across repeated hits, rebound is often too fast. If it feels glued down and slow to recover, rebound is too slow. I would rather make one change at a time than chase a perfect feel with three dials moving at once.
There is also a compression adjust on some versions, and that is useful for riders who know the difference between support and harshness. Compression damping resists movement from rider weight shifts and slow inputs, so it can tighten the bike up on climbs or in flatter terrain. Push it too far, though, and you lose the very traction the shock was designed to preserve. That trade-off is the real personality of the DPX2: plenty of control, but not endless adjustability. The next step is getting the setup right so that personality works with your frame instead of against it.
Setting it up without wasting a ride
If I had one rule for this shock, it would be this: set sag first, then worry about everything else. Fox recommends a sag target of 25 to 30% of total shock travel. That range is broad enough to suit different frames and riders, but narrow enough to give you a real starting point. The manual also suggests beginning with the lever in Open mode, setting air pressure as a rough starting point, cycling the shock through part of its travel several times to equalise the chambers, and then fine-tuning from there.
For a practical setup, I would treat the body-weight-in-pounds suggestion as only a starting estimate, especially if you think in kilograms. It gets you into the right zone, but the frame kinematics, riding kit and terrain will decide the final pressure. Fox also caps the shock at 350 psi, so do not keep pumping air into it if the bike feels wrong. If you are already near the limit, the answer is probably tuning, not more pressure.
| Shock travel | 25% sag | 30% sag |
|---|---|---|
| 25 mm | 6 mm | 7 mm |
| 32 mm | 8 mm | 10 mm |
| 38 mm | 10 mm | 11 mm |
| 44 mm | 11 mm | 13 mm |
| 51 mm | 13 mm | 15 mm |
| 57 mm | 14 mm | 17 mm |
| 63 mm | 16 mm | 19 mm |
| 76 mm | 19 mm | 23 mm |
Once sag is right, I would tune in this order: rebound, then lever position, then volume spacers. Volume spacers are the blunt but effective part of the setup because they change mid-stroke support and bottom-out resistance. If the shock uses travel too easily even with sag set correctly, add a spacer. If it never reaches useful travel, take support away. That is a much better approach than just overinflating the shock and ruining small-bump compliance.
The cleanest setups usually come from the fewest changes. When you can feel the difference between sag, rebound and progression, the shock starts working with the frame rather than masking it. From there, the next sensible question is whether the DPX2 still stacks up against Fox's current trail and enduro shocks.
Where it sits against Fox's current shocks
In 2026, I would not talk about the DPX2 as if it were the centre of Fox's rear-shock line. The current trail and all-mountain conversation is more about FLOAT X, while FLOAT X2 covers the more aggressive enduro and gravity end of the spectrum. That does not make the DPX2 obsolete, but it does change how I would recommend it. If you already own one, it can still be a very good shock. If you are choosing from scratch, the newer family deserves a hard look.
| Shock | Best for | Strengths | Trade-offs |
|---|---|---|---|
| DPX2 | Trail and all-mountain bikes, especially older frames and existing builds | Balanced ride feel, clear setup logic, good support for a lighter air shock | Older platform, fewer current options, not the deepest tuning range |
| FLOAT X | Aggressive trail and all-mountain riding | Modern monotube design, strong support, simpler current platform | Less race-style tuning than X2 |
| FLOAT X2 | Enduro and gravity use | Most adjustability, more control over high-speed and low-speed circuits | Heavier, more complex, unnecessary for many trail bikes |
That comparison is the real decision point. I would choose the DPX2 if I wanted a sensible, efficient shock for an existing trail bike and did not need the extra complexity of an X2. I would choose FLOAT X if I was buying into Fox's current trail platform and wanted something easier to justify long term. I would only move to X2 if the bike and rider actually need the extra damping control, because more adjustability is not automatically better. Sometimes it just means more ways to get it wrong. That leads straight into the part most riders ignore until it costs them money: fitment and maintenance.
Fitment, service and the mistakes I would avoid
With rear shocks, fitment is not a detail, it is the whole story. The wrong eye-to-eye, stroke, mount style or hardware can turn a good shock into an expensive problem. Fox notes that installation varies a lot between frame manufacturers, so I would always check the bike maker's spec first and then verify clearance through the full travel. Some trunnion versions were even supplied with short valve options for tighter frames, which tells you how specific this category can get.
I also pay attention to service signals. Fox's general rear-shock guidance points to cleaning the exterior every 30 hours and doing a more complete service around 100 hours or annually, with earlier attention for muddy, dusty or high-impact use. The DPX2 part data also lists a 125-hour full-service interval for specific versions, so the safest move is to follow the exact shock code and not assume every generation shares the same schedule. In the UK, that usually means a Fox-authorised service shop or a reputable suspension specialist, not a general bike mechanic who only sees shocks occasionally.
- Do not pressure-wash the shock or blast water at the seal junction.
- Do not use solvents or degreasers on the exterior finish.
- Do not change volume spacers before sag is correct.
- Do not ignore unusual noises, oil marks or a shock that feels sticky through the stroke.
- Do not try to service a shock that is in a "stuck down" condition.
One more limitation is worth calling out: Fox treats the DPX2 damping adjuster assemblies as non-rebuildable. If they are damaged, the fix is replacement, not a heroic strip-and-rebuild in the garage. I like that honesty because it sets the right expectation. This is a capable trail shock, but it is still a precision component that rewards clean maintenance and punishes guesswork. If you keep those boundaries in mind, the shock can stay quiet and predictable for a long time.
My practical view is this: if the bike already has a healthy DPX2 and the frame suits its character, keep it, service it properly and tune it with patience. If you are shopping for a new shock in 2026, compare it honestly with FLOAT X first and move to X2 only if the terrain and riding style really justify the extra complexity. That is the simplest way to avoid overbuying, over-tuning and ending up with a rear end that looks good on paper but feels wrong on the trail.