Keeping a mountain bike brake hose at the right length makes the cockpit feel calmer, the steering freer, and the brakes easier to trust when the trail gets rough. The job is simpler than it looks, but cutting hydraulic hose on a mountain bike still rewards precision: I want the length right, the cut square, and the fittings installed in the correct order. In this guide I cover the full process, plus the mistakes that turn a quick trim into a messy bleed.
The essentials that keep the job clean, safe, and easy to finish
- Check bar rotation and suspension movement before you mark the hose.
- Leave a little extra length, because a hose that is slightly long is easier to live with than one that is too short.
- Use a fresh blade or a proper hose cutter so the end is perfectly square.
- Fit new olives, barbs, or connector inserts unless your brake manual clearly says otherwise.
- Expect to bleed or at least fully test the lever, because small fluid losses and tiny air pockets are normal risks.
Why hose length matters on an MTB
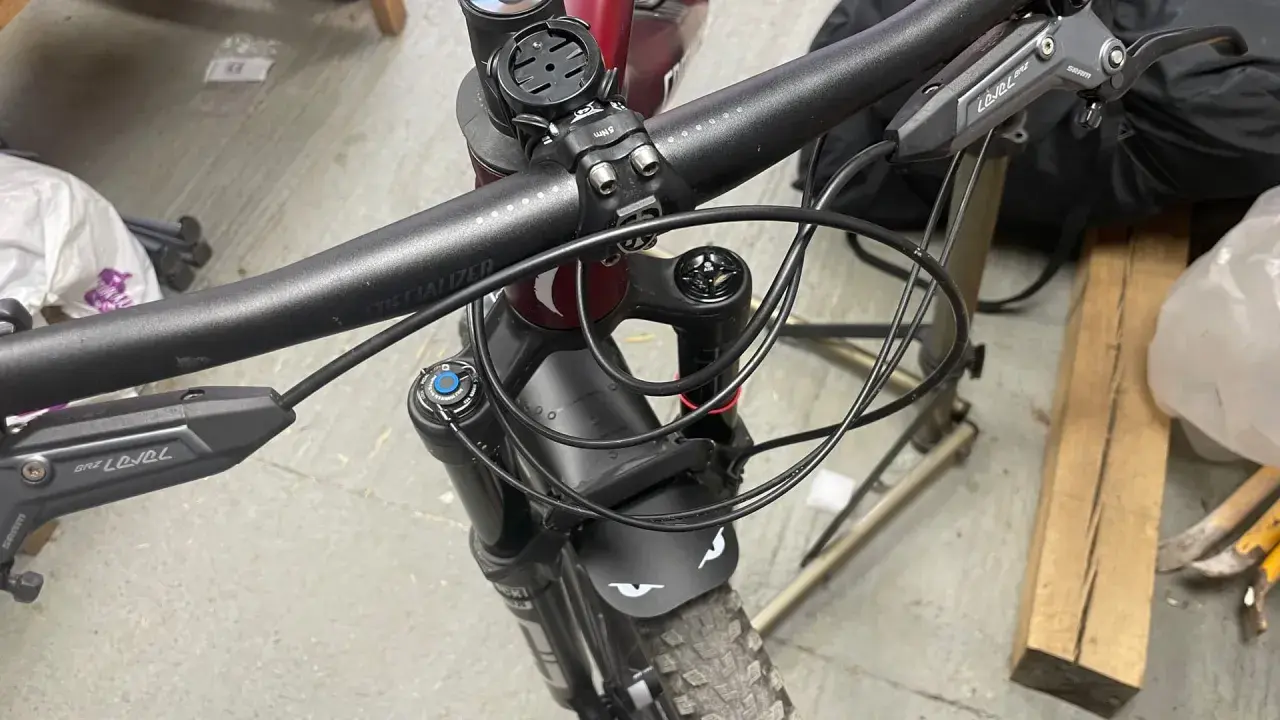
I think of brake hose length as part of bike fit, not just plumbing. If the hose is too long, it can snag, rub the head tube, or clutter the front end when you are trying to keep the bars clean and free on technical climbs. If it is too short, it may feel fine in the workstand and then tug at full steering lock or full fork compression, which is the sort of problem that shows up at the worst possible moment.
That matters even more on modern trail and enduro bikes, where wide bars, short stems, and long-travel suspension all put more demand on routing. A hose that is barely long enough on flat ground can become tight as soon as the fork bottoms out or the bar swings through a full turn. I would rather trim a line twice than discover on a descent that I cut it too close the first time. Once the length decision is clear, the next step is getting the tools and consumables ready so the job does not stall halfway through.
What I prepare before I touch the hose
Before I cut anything, I lay out everything I will need so I am not hunting for parts with an open line in my hand. A clean setup matters here, because hydraulic systems do not forgive dirt, rushed assembly, or missing fittings.
- Fresh cutting tool or a proper hose cutter, not a blunt old blade.
- Correct replacement parts for the brake system, such as an olive, barb, or connector insert.
- Correct brake fluid for the brand and model, because mineral oil and DOT fluid are not interchangeable.
- Clean rags and gloves to keep oil off the frame, rotor, and pads.
- Torque wrench if the lever or caliper fitting has a published torque value.
- Bleed kit if there is any chance air has entered the system.
I also make sure the bike is stable, either in a workstand or securely supported. On a dirty MTB, I usually clean the area around the lever and caliper first, because grit and brake fluid are a bad mix. With the work area ready, I can measure the hose properly instead of rushing into the cut.
How I measure the new length without painting myself into a corner
The most useful habit here is simple: measure with the bike in the worst-case position, not the easiest one. I start with the bars centred, then I turn them fully left and fully right to see whether the hose tugs or binds. If the bike has suspension, I also check what happens when the fork compresses, because the line can tighten as the front end moves through its travel.
- Route the hose roughly where it will sit after the job is finished.
- Turn the bars all the way left and right, and watch the hose near the lever and head tube.
- Compress the fork or rear suspension enough to see whether the line tightens.
- Leave a small service loop where the routing needs it, rather than forcing the hose straight.
- Mark the cut with tape, then re-check it before the blade comes out.
My rule is to leave a small margin of forgiveness, usually around 10 to 20 mm, instead of trimming the hose to a dead-straight fit. That little bit of extra length is far easier to live with than a line that is taut at full lock. Once the mark looks right from every angle, the actual cut becomes the easy part, but only if the blade is sharp and the hose is supported.
The clean cut that saves the bleed job
The cut needs to be square, not just neat. A hose that is angled, crushed, or frayed can refuse to seal properly once the fitting goes back on, and that is when small leaks and spongy lever feel start to appear.
- Use a proper hose cutter or a fresh, sharp utility blade.
- Support the hose so it does not flatten as the cut is made.
- Make one decisive cut instead of sawing back and forth.
- Inspect the end immediately. If it looks oval, ragged, or split, trim it again.
- Keep dirt away from the open line, because contamination inside the hose is far more annoying than a little mess on the bench.
I do not treat the 90-degree cut as workshop fussiness. It is part of the seal. Shimano’s hose instructions are very direct about a square end, and the same logic applies to every hydraulic brake I have worked on: the cleaner the end, the more predictable the rebuild. Once the hose is cut cleanly, the fitting side of the job matters just as much, because the wrong insert or reused olive will undo all that work.
What happens after the cut
After the cut, I immediately move to the brand-specific fitting sequence. Shimano systems typically use an olive and connector insert, while many SRAM systems use a barb and olive or a model-specific hose kit. The small parts are not decoration, they are what actually lock the hose into the brake, so I treat them as one-time-use items unless the manufacturer says otherwise.
| Brake family | What usually goes back on | Practical note |
|---|---|---|
| Shimano | Olive and connector insert | Keep the hose straight during insertion and tighten to the model spec, which on some systems is 5 to 6 N·m. |
| SRAM | Barb and olive, or a model-specific hose kit | Use the exact parts for the brake family and confirm the correct fluid before opening the system. |
| Other mineral-oil or DOT systems | Brand-specific compression parts | Check the exact manual before you start, because fittings and fluids are not universal. |
The mistakes that create leaks on the first ride
Most bad hose jobs come from the same handful of mistakes. None of them are dramatic on their own, which is why they catch people out. A bike can look fine on the stand and still fail once the bars are turned, the suspension moves, or the brakes heat up on trail.
- Measuring only in the workshop position instead of checking full lock and full suspension movement.
- Reusing compression parts that should have been replaced with fresh ones.
- Cutting at an angle or crushing the line with the wrong tool.
- Twisting the hose when reconnecting it at the lever or caliper.
- Contaminating pads or rotors with brake fluid, then trying to ride anyway.
- Guessing the brake fluid or torque instead of checking the exact model.
If fluid touches the pads or rotor, I stop and deal with that properly, because a wipe is not always enough. Brake contamination can turn a clean mechanical job into a brake feel problem that lasts for weeks. The safer habit is to finish the hose work first, then inspect the braking surfaces before the bike ever leaves the stand. Sometimes the cleanest solution is not shortening at all, which is why I separate trim jobs from replacement jobs before I start.
When I shorten the hose and when I replace the whole line
There are times when trimming the hose is exactly the right move, and times when replacement is the better call. I decide that before I cut, because once a hose is too short, there is no clever shortcut that makes it long again.
| Situation | Best move | Why |
|---|---|---|
| New cockpit, hose is only a bit long | Shorten and refit | The hose is healthy and you only need a better fit. |
| Hose is kinked, cracked, scuffed, or damaged near the fitting | Replace the whole line | Trimming a damaged hose only hides the problem for a while. |
| Bike uses internal routing and the hose is already at minimum length | Leave it alone or replace with the correct length | A hose that is too short is worse than a tidy-looking cockpit. |
| You are changing bars, stem, or fork and the routing changes a lot | Re-measure from scratch | Old length assumptions stop being useful once the front end changes. |
| You are unsure about the brake family or fitting type | Stop and identify the system first | The wrong insert or fluid can create a safety problem. |
This is also where workshop time makes sense. If the line is already marginal, a replacement hose and a proper bleed are cheaper than discovering, halfway through the job, that the trim left you with no usable slack. On a wet UK trail, I care more about reliability than saving ten minutes. Once the hose choice is settled, I finish with a few checks that tell me whether the bike is actually ready to ride.
The last checks I make before the first trail ride
- Bars turn fully left and right without pulling the line.
- Fork or shock movement does not tighten the hose.
- No fluid seeps from the lever or caliper fitting.
- The lever feels firm after several squeezes.
- Pads and rotor are clean, dry, and free from oil.
After that, I still do a short shakedown ride before I call the job done. Five minutes around the block is enough to expose a weak fitting or a line that is just a little too tight, and it is far cheaper than finding that out halfway down a wet descent.