The essentials for stopping smoothly and safely
- Use both brakes most of the time, with the front brake doing most of the stopping work.
- On a standard British setup, the front brake is usually on the right lever and the rear brake on the left.
- Shift your body slightly back as you slow down so the bike stays stable and the front wheel keeps grip.
- Brake before corners and rough features, not in the middle of them.
- In wet, loose, or steep conditions, start earlier and use gentler, more progressive pressure.
- Good braking also depends on maintenance: pad wear, cable tension, rotor condition, and clean braking surfaces.
Use both brakes, but let the front do most of the stopping
The first thing I tell riders is that the front brake is not something to fear. It is the stronger brake, and in most real stopping situations it does the heavy lifting. The rear brake still matters, but mainly for balance, control, and helping the bike settle as you slow down.
On a standard British setup, the front brake is usually on the right lever and the rear brake on the left. That is worth checking if you borrow a bike abroad, because some setups are reversed. Once you know which lever does what, aim to use both together rather than grabbing one and ignoring the other.
The trap many beginners fall into is relying on the rear brake because it feels safer. It does feel calmer, but it also gives you much less stopping power. On a steep descent or a busy road, that can mean you run out of space far sooner than you expected. The next step is to use your body so the stronger front brake can work without upsetting the bike.
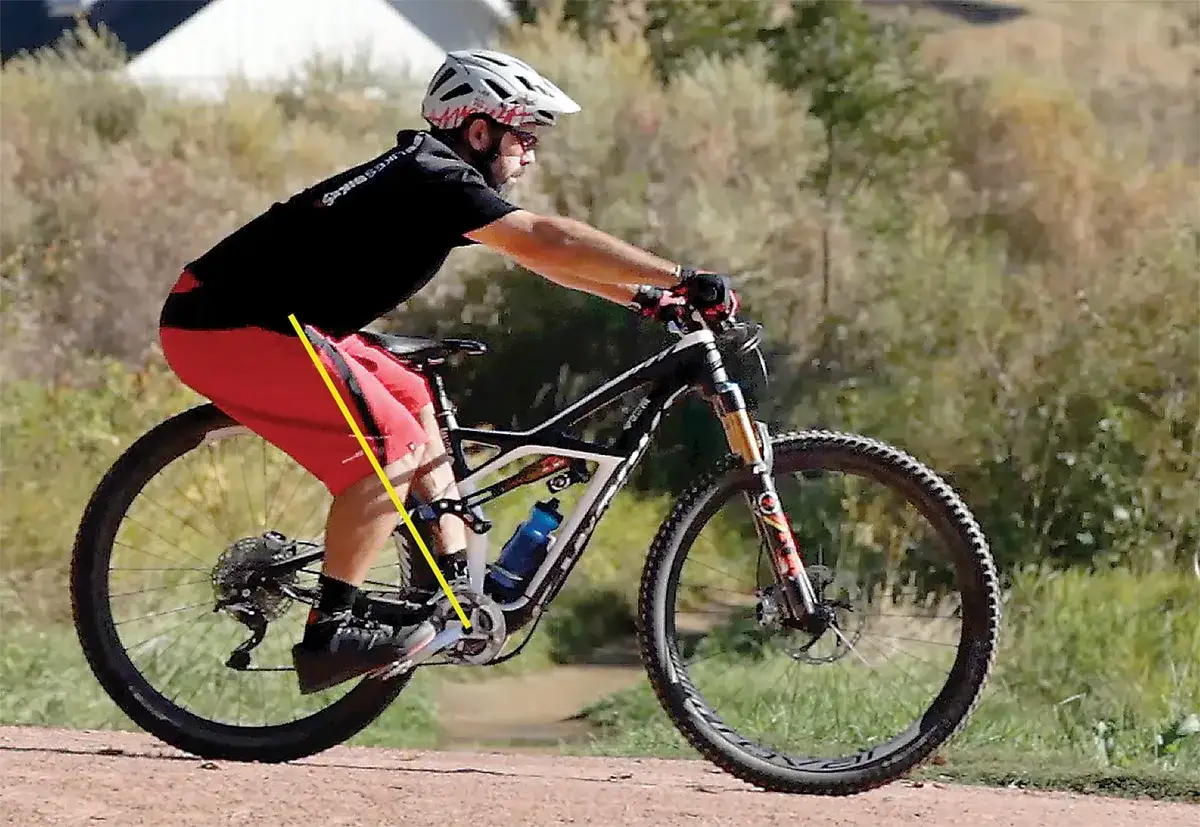
Set your body before you squeeze the levers
Good braking starts before your fingers move. Keep your gaze ahead, not down at the front wheel, and make sure your hands are already on or near the levers. I prefer riders to stay relaxed through the shoulders and elbows, because stiff arms transmit every jolt straight into the bars.
As you slow, shift your hips slightly back and keep your chest low enough to stay centred over the bike. That move helps keep weight on the rear wheel and stops the front end from feeling overly light. On an MTB, especially on a steep trail, it can be the difference between controlled braking and the rear wheel lifting or the front tyre washing out.
If you are braking hard on flat ground, stay straight and keep the bike upright. If you are on a descent, think “back and low” rather than “leaning back dramatically”. Too much movement can unbalance you just as much as too little. Once the body position is right, the actual braking sequence becomes much easier to manage.
Practice the braking sequence before the trail gets demanding
When I explain braking, I like to break it into a simple sequence. It is not about one dramatic grab. It is about building pressure in a controlled way, then releasing it cleanly when you need the bike to roll again.
- Look where you want to stop or where you want the bike to be after slowing down.
- Move your body slightly back and keep the bike pointing straight.
- Start applying the rear brake, then add the front smoothly a fraction later.
- Increase pressure progressively until you are slowing at the rate you want.
- Ease off before you turn, or if the tyre starts to lose grip.
- Come to a complete stop with calm, even pressure, then put a foot down.
That rear-then-front timing is especially useful for riders who are still building confidence, because it keeps the bike settled while the stronger brake comes in. On a dry, straight surface you can brake quite firmly. On rough ground, your inputs should be lighter and more controlled.
The best way to make this feel natural is to practise in a quiet car park or empty lane. Ten minutes of deliberate stopping drills will teach you more than months of only braking when something suddenly appears in front of you. Once the basics are automatic, the next question is how braking changes on different surfaces.
Brake earlier and gentler on wet, loose or steep terrain
Traction is the real limit on a bike, not hand strength. On wet tarmac, loose gravel, mud, roots, or steep descents, your tyres can only do so much before they slide. That is why braking needs to start earlier and feel smoother when the ground gets less predictable.| Condition | What I would do | Why it matters |
|---|---|---|
| Wet road or trail | Brake earlier and use lighter, progressive pressure | Wet tyres need more distance to stop and can skid more easily |
| Loose gravel or dry dust | Stay upright and avoid sudden lever pulls | Loose surfaces give less grip, especially at the front wheel |
| Steep descent | Use short braking phases instead of dragging the brakes continuously | Short bursts keep the bike more manageable and reduce heat build-up |
| Corner entry | Finish most of your braking before you turn | Tyres grip better when they are not being asked to brake and corner hard at the same time |
“Feathering” the brakes means applying light, measured pressure instead of locking up the wheel or dragging the lever. On a loose trail, a tiny amount of rear-wheel slide can happen, but a fully locked wheel usually gives you less control, not more. I would always rather see a rider slow a little earlier than try to save distance with a panicked squeeze.
That surface awareness is only useful if the brakes themselves are working properly, which brings us to the maintenance side of the job.
Keep the brake system working, not just the technique
Braking feels bad very quickly when the bike is overdue for maintenance. Worn pads, stretched cables, air in hydraulic lines, glazed surfaces, or oil on the rotor can all make a good rider feel clumsy. When the system is healthy, technique works. When it is not, technique has to compensate for a problem that should have been fixed earlier.For most bikes, I would check lever feel before every ride. The lever should feel firm and consistent, not spongy or able to pull all the way to the bar. If it does, the cause may be pad wear, cable stretch, contamination, or a hydraulic issue. On many disc systems, pad material at about 0.5 mm is already at the replacement limit, so do not wait until braking becomes desperate.
Here is the maintenance checklist I use most often:
- Pads - check for wear lines, glazing, or thin material and replace them before they are gone.
- Rotors or rims - keep braking surfaces clean and free from oil or grease.
- Cables and housing - look for fraying, rust, stiffness, or excessive lever travel on mechanical brakes.
- Hydraulic systems - watch for spongy levers, fluid leaks, or pads that rub after a ride.
- Alignment - make sure pads hit the correct part of the rim or rotor, not the tyre or the edge of the disc.
- Bed-in - after fitting new pads or rotors, do a few controlled stops so the braking surface settles properly.
If oil or grease gets onto disc pads, I treat that as a serious problem, not a cosmetic one. The rotor can often be cleaned, but contaminated pads usually need replacing. That is one of those maintenance jobs that pays you back every time you ride, because even perfect technique cannot make up for brake pads that are slipping on the rotor.
Watch for the mistakes that quietly ruin braking control
Most braking mistakes are not dramatic. They are small habits that gradually reduce control until the bike feels unpredictable. The good news is that each one is easy to recognise once you know what to look for.
- Grabbing the front brake suddenly - this shifts weight too fast and can throw the rider forward.
- Dragging the brakes all the way down a hill - this builds heat and usually reduces feel.
- Using only the rear brake - the bike stops slowly and the rear tyre can lock up early.
- Braking while heavily leaned over - traction is shared between turning and slowing, so both suffer.
- Ignoring pad wear - worn pads feel weak long before they fail completely.
- Practising only at low stakes - if you never rehearse firmer stops, you will not trust the brakes when you need them.
There is one mistake I see a lot on mountain bikes: riders wait too long, then try to fix speed at the last second. That usually leads to a lock-up or a badly judged corner entry. It is almost always better to reduce speed early, then let the bike roll smoothly into the obstacle, turn, or descent. Once that habit is in place, braking starts to feel much more predictable.
Turn braking into a habit you can trust
The most useful thing you can do is practise braking when nothing is going wrong. I like a simple 10-minute drill: five gentle stops, five firmer stops, and a few emergency-style stops on a quiet, flat surface. Keep your movements smooth, keep the bike straight, and pay attention to where the front wheel starts to feel light.
After that, repeat the same drill on a gentle slope if you can do it safely. The slope changes how the bike loads up, and that is where many riders discover that they have been braking too suddenly or too late. If you can stop calmly on an empty lane or car park, you will be far more composed on a wet trail or a steep descent.
The rule I use is simple: if the brakes feel vague during a quiet practice stop, they will feel worse when the trail gets fast, steep, or slippery. Keep the system clean, check the pads, and practise the motion until it is boring. That is the point where braking stops being a guess and becomes a skill you can trust.