A clean SRAM AXS setup is less about forcing a wireless drivetrain to work and more about getting the base mechanics, firmware, and trim settings aligned. When the derailleur, chain length, cassette, and app all match, shifts feel sharp instead of vague, and the system is easier to trust on rough trails. I’m going to focus on the steps that make the biggest difference: compatibility, pairing, setup by drivetrain type, fine-tuning, and the mistakes that usually waste time.
The setup decisions that change shift quality fastest
- Check which AXS ecosystem you have first: standard Eagle AXS, Eagle Transmission, or road/XPLR AXS.
- Pair the components and update firmware before chasing shift feel.
- Transmission uses a different setup method from older hanger-based AXS derailleurs, so do not treat them the same.
- Use MicroAdjust as a trim tool, not a fix for a bad base installation.
- Most shifting problems come from chain length, hanger or frame alignment, or outdated firmware.
Check compatibility before you touch anything
The first mistake I see is treating every AXS bike as if it uses the same rear-end geometry. It does not. A standard Eagle AXS derailleur, an Eagle Transmission derailleur, and a road or XPLR AXS setup all want different setup habits, different tools, and different expectations. If you start with the wrong assumption, you can spend an hour trimming a bike that was never correctly installed in the first place.
| System | What matters most | Common trap |
|---|---|---|
| Eagle AXS with a conventional hanger | Hanger alignment, chain length, chain gap or B-gap style adjustment, then MicroAdjust | Trying to tune around a bent hanger after a crash |
| Eagle Transmission | UDH-compatible frame, correct setup cog and setup key, chain length, then minimal trim | Looking for high and low limit screws that are not part of the system |
| Road and XPLR AXS | Correct chain gap gauge and cassette-specific setup | Copying MTB values onto a gravel or road drivetrain |
Pair the components and update firmware first
I always handle pairing and firmware before I touch fine adjustment. It saves time because an unpaired or outdated system can behave oddly and send you looking in the wrong place. The AXS app is useful here because it shows battery status, lets you manage the bike profile, and pushes firmware updates without extra hardware.
- Fit a charged battery and make sure the derailleur or primary component is awake.
- Press and hold the AXS button on the main component until the LED starts blinking green slowly, then release it.
- Pair the remaining AXS components one by one by holding each component’s AXS button until its LED confirms the link.
- Open the AXS app with Bluetooth enabled, add the bike profile, and check for updates.
- Update every paired component until the app shows the system is current.
If a component will not wake, I first charge the battery and try again. If the app cannot see the bike, I check Bluetooth, reopen the app, and wake the component again. That is basic housekeeping, but it removes a lot of fake problems before they grow into a workshop session. With the components awake and current, the derailleur-specific setup becomes the part that actually changes shift quality.
Set the derailleur for the system you actually own
This is the point where the setup path splits. The right method depends on whether you are dealing with a traditional hanger-based Eagle AXS derailleur, a Transmission drivetrain, or a road/XPLR setup. I would rather be blunt here: the wrong installation method can make a perfectly good drivetrain feel broken.
Eagle AXS with a conventional hanger
For a standard MTB AXS derailleur, I start by making sure the chain is the correct length and the rear wheel is seated properly in the frame. Then I shift into the largest cog and set the derailleur position using the correct chain-gap or B-gap procedure for that model. If the hanger is even slightly bent, the bike may still shift, but it will never feel fully settled. That is why I check hanger alignment before I blame the app or the battery.
On a good install, the derailleur should move cleanly across the cassette without needing heavy trim on every other gear. If you are fighting the bike at one end of the cassette, the base setup is usually the real issue.
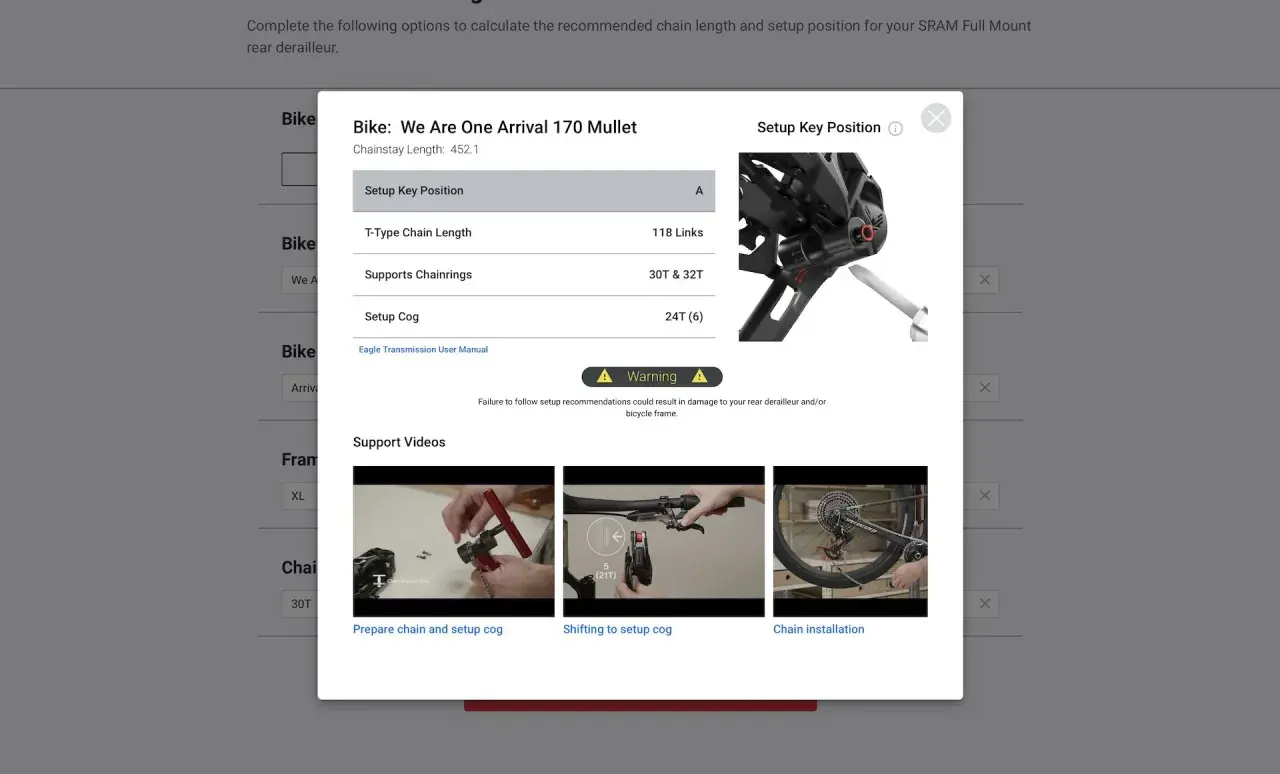
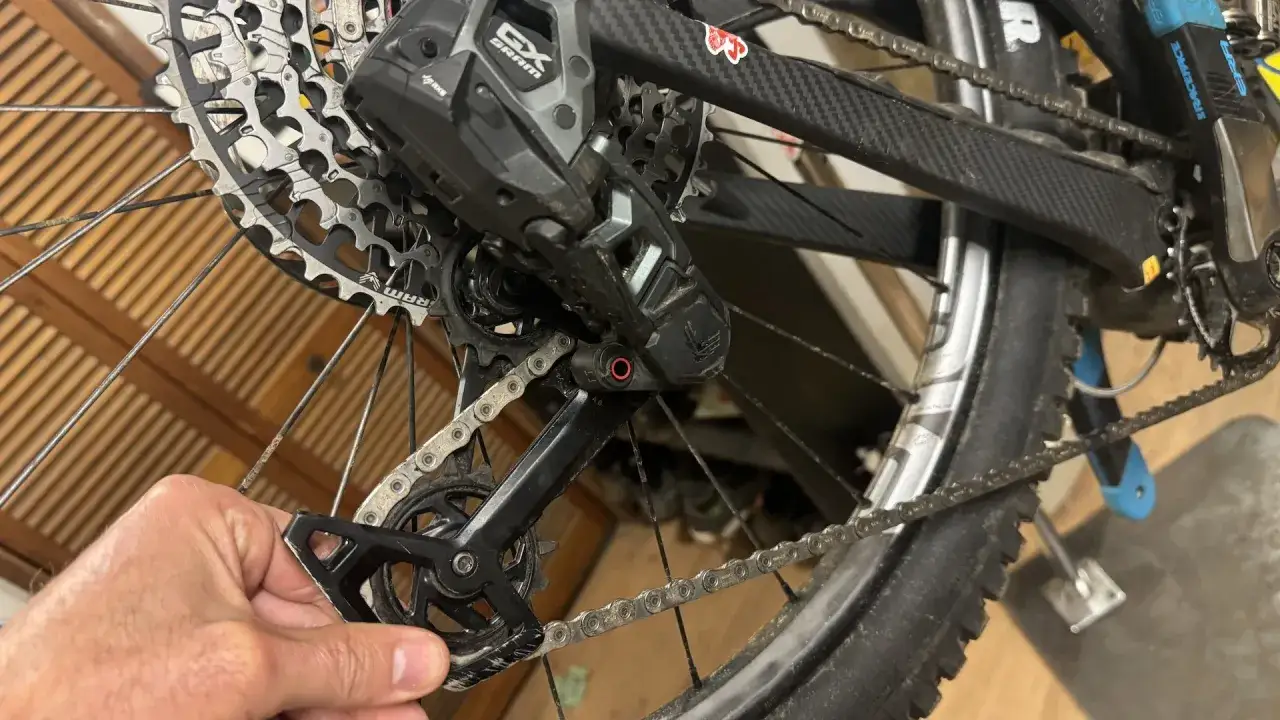
Eagle Transmission
Transmission is simpler in some ways and stricter in others. The frame must be UDH compatible, and the setup is based on the correct setup cog and setup key rather than traditional limit-screw thinking. SRAM’s process is basically prepare, hang, tighten, which is why Transmission can feel so clean when it is installed properly.
Here the details matter: chain length, correct setup key position, and the right frame interface are non-negotiable. Transmission also changes the way you think about adjustment. Instead of chasing a hanger, you are confirming that the system is seated and indexed correctly from the start. Once that base install is right, the derailleur only needs tiny trim moves. On Transmission, each MicroAdjust click moves the derailleur by 0.2 mm, so it is a precision tool, not a rescue tool.
Read Also: Shimano Di2 vs SRAM AXS - Which MTB Drivetrain is Right For You?
Road and XPLR AXS
Road and XPLR drivetrains use their own chain-gap tools and cassette-specific targets, so the numbers and parts are not interchangeable with MTB hardware. If you are working on a gravel bike, that distinction matters more than people expect. I have seen riders try to use the “close enough” logic from an Eagle build and end up with a drivetrain that shifts, but never crisply. On those systems, the chain gap gauge is there for a reason: it puts the pulley and cassette in the right relationship before you start trimming.
Once the base install is right, tiny trim changes start to matter. That is the point where MicroAdjust becomes useful instead of distracting.
Use MicroAdjust to clean up the last few shifts
MicroAdjust is where a lot of riders either underuse the system or overuse it. I treat it like a final tuning step, not a fix for bad alignment. The trick is to move in small steps, test, and stop as soon as the drivetrain feels clean across the cassette.
- If the chain hesitates toward the larger cogs, trim the derailleur inboard a click at a time.
- If the chain hesitates toward the smaller cogs, trim it outboard one click at a time.
- If you hear a light rasp in one section of the cassette, make one small change and test again before touching anything else.
- If you need repeated trim just to make the drivetrain usable, the base setup is wrong.
“Inboard” means toward the wheel, and “outboard” means away from it. That small distinction matters because the direction of the correction is easy to second-guess when the bike is noisy. My rule is simple: one click, one test, then stop. If the system is right, you should not need to keep chasing it. When that is done, the remaining problems are usually mechanical, not electronic.
Fix the mistakes that look like electronics problems
Most AXS complaints sound like software trouble, but the cause is often much more ordinary. A dirty chain, poor wheel seating, worn parts, or a crash-bent hanger will make a wireless drivetrain feel temperamental even when the electronics are fine. I would rather check the boring stuff first than spend time re-pairing a bike that only needs a mechanical correction.
| What you notice | Likely cause | What I would check first |
|---|---|---|
| The app will not see the bike | Battery asleep, battery flat, or Bluetooth off | Wake the component, charge the battery, then restart the app |
| Shifting is noisy at one end of the cassette | Chain gap or trim is off | Recheck the setup, then use one MicroAdjust click at a time |
| The bike shifts fine in the stand but not on the trail | Hanger issue, frame flex, wheel not seated properly, or chain wear | Inspect the hanger or UDH interface, rear axle, and chain condition |
| It keeps feeling slightly wrong after a crash | Alignment problem, not an app problem | Stop trimming and inspect the hardware before anything else |
If I see repeated issues after a crash, I stop assuming the drivetrain just needs “another tweak.” That mindset wastes time. A clean setup should stay consistent once the bike is built correctly, so the real test is whether the system remains quiet and predictable under load.
The five-minute checks that make the next ride easier
Before I call the job done, I keep a short list in my head: charged battery, current firmware, clean chain, and a full-range shift test. I also make sure I know how the bike behaves after a hard effort, because some issues only show up when the drivetrain is loaded on a climb or a rough descent. If you travel with the bike, keep the charger and the right setup notes with it, because a five-minute check in the car park is far cheaper than a lost ride day.
The best AXS setups are the ones you stop thinking about on the trail. If the bike keeps needing repeated trim, I go back to frame compatibility, hanger or UDH alignment, chain length, and cassette wear before I touch the app again. That order saves time, and it usually finds the real problem faster than random adjustment ever will.