Pedal threads are one of those small drivetrain details that can turn a simple swap into a damaged crank if you get them wrong. On most mountain bikes the standard is reassuringly consistent, but the left and right sides do not thread the same way, and a few older or junior bikes still use a different size. This guide explains the MTB pedal thread size on modern bikes, how to identify it on your own crank arms, and what to check before fitting new pedals.
These are the key facts that matter most
- Most modern mountain bikes use 9/16" x 20 TPI pedal threads.
- The right pedal tightens clockwise; the left pedal uses a left-hand thread and tightens counterclockwise.
- Some children's, BMX, and older bikes still use 1/2" x 20 TPI.
- The thread size is cut into the crank arm, so the pedal must match the crank, not the other way round.
- Starting by hand and using grease on the threads prevents most cross-threading problems.
The standard size on most mountain bikes
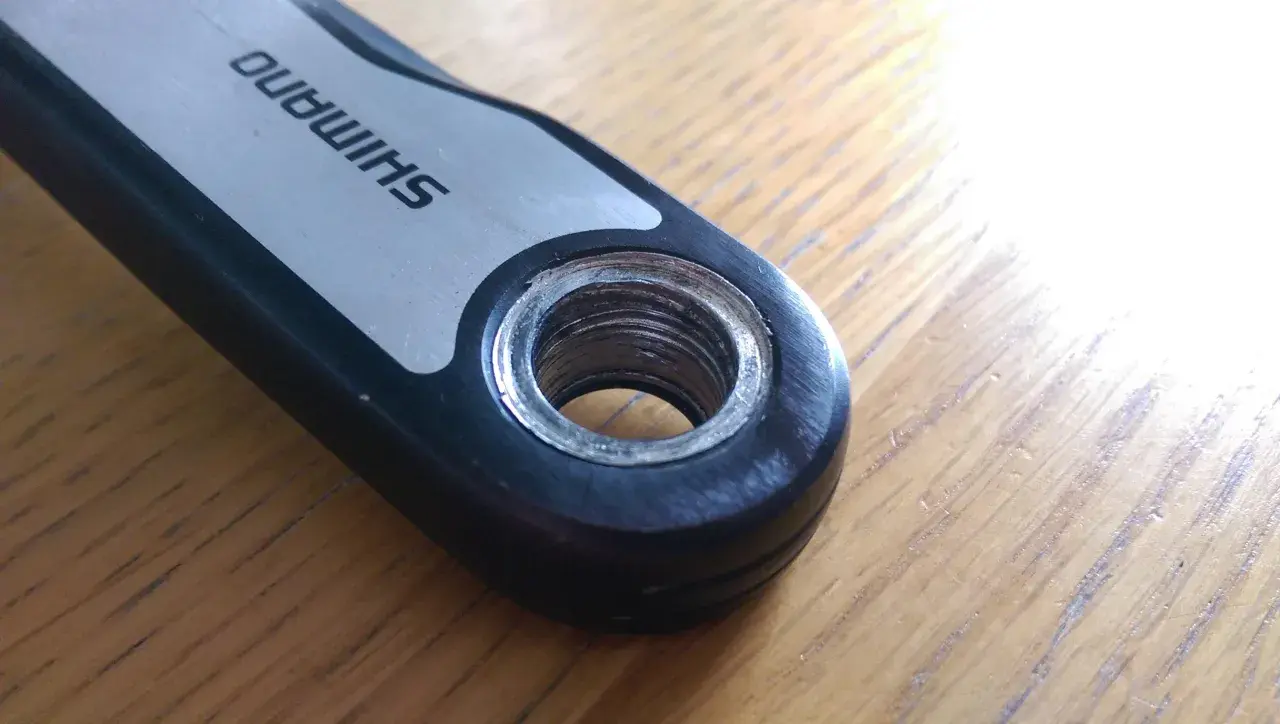
For almost every modern adult MTB, the answer is simple: 9/16" x 20 TPI. The first number is the spindle diameter, and the second is the thread pitch, measured as 20 threads per inch. Shimano service documentation for current chainsets still uses that same size, which is why replacement pedals from mainstream brands are usually built around it.
What matters more is where that thread sits. The pedal spindle screws into the crank arm, not into the pedal body, so the crank determines compatibility. If your crank is tapped for 9/16", any standard MTB flat pedal or clipless pedal made for adult bikes should fit, provided the pedal body and spindle length make sense for your riding style.| Thread size | Where you will usually see it | What it means in practice |
|---|---|---|
| 9/16" x 20 TPI | Most modern adult MTBs, trail bikes, enduro bikes, and road bikes | The default standard for replacement pedals |
| 1/2" x 20 TPI | Some kids' bikes, older BMX bikes, and a few vintage or budget models | Not interchangeable with 9/16" cranks |
That distinction is small on paper, but huge in the workshop. The next step is learning how to confirm which one your crank arms actually use.
How to tell whether your crank uses 9/16 or 1/2
I usually check three things before I order anything: the old pedal markings, the crank itself, and the spindle diameter. A lot of pedals are stamped L and R, which helps with side identification, but the stamp does not always tell you the thread size. If the pedal is already off the bike, you can measure the threaded section with calipers: 9/16" is about 14.3 mm across, while 1/2" is about 12.7 mm.
- Look for size markings on the pedal box, the pedal spindle, or the crank documentation.
- Measure the spindle if you have calipers; do not guess from appearance alone.
- Assume a modern adult MTB is 9/16" unless you have proof otherwise.
- Be cautious with children's, rental, or older second-hand bikes, because that is where 1/2" still turns up.
- Never force a pedal in as a test fit; one bad turn can start cross-threading immediately.
When the size is unclear, I treat the bike as a compatibility check, not a guess-and-hope job. Once you know the size, the left-right thread direction is the part that tends to catch people out.
Why the left pedal tightens the opposite way
The right pedal uses a normal right-hand thread, so it tightens clockwise and loosens counterclockwise. The left pedal uses a left-hand thread, which means the directions are reversed. That design stops the pedal from gradually working loose as you pedal, because the rotation of the crank and spindle tends to keep the pedal seated instead of backing it out.
| Side | Thread direction | Installs by turning | Removes by turning |
|---|---|---|---|
| Right / drive side | Right-hand thread | Clockwise | Counterclockwise |
| Left / non-drive side | Left-hand thread | Counterclockwise | Clockwise |
That reverse thread is not a curiosity; it is the reason pedals stay put under load. When I fit pedals, I always start them by hand for several clean turns before I reach for a wrench, because cross-threading usually happens in the first few turns, not at full tightness.
If the pedal does not spin in smoothly, stop immediately. The next section is where fit and compatibility become more important than thread direction alone.
What to check before replacing MTB pedals
Once the thread size is confirmed, the real job is choosing a pedal that fits both the crank and the way you ride. For most riders, that means checking four things: thread size, platform or clipless design, spindle length, and whether there is enough clearance around the crank and chainstay.
- Thread size first - 9/16" x 20 TPI is the normal MTB standard, but never assume on an unknown bike.
- Pedal type second - flat pedals, clipless pedals (the type where the shoe locks into a cleat), and wider enduro platforms all use the same basic crank thread, but they suit different riding styles.
- Spindle length matters - this is how far the axle extends beyond the pedal body, and it can affect stance and shoe clearance.
- Material and sealing matter in wet UK conditions - a well-sealed pedal with greased threads is less likely to seize in the crank.
- Installation method matters - grease or anti-seize on the threads is usually the right move unless the manufacturer says otherwise.
For a new install, I prefer a light coating of grease and a careful hand start, then a proper tighten with the correct pedal wrench or hex key. A common torque range is around 35-55 N·m, but I still follow the pedal maker’s own spec because some designs sit outside it.
That gets you a clean fit, but it does not solve the more frustrating scenario: threads that have already been damaged or stripped.
What to do when the threads are damaged
Damaged pedal threads usually show up as a pedal that refuses to start, feels loose even when tightened, or leaves obvious metal shavings behind. A slightly rough thread can sometimes be saved, but a badly stripped crank needs a proper repair decision rather than more force. The mistake I see most often is someone tightening harder, which usually makes the damage worse.
| Damage level | Best move | When I stop repairing |
|---|---|---|
| Light | Clean the threads with the correct pedal tap, a cutting tool that restores the thread profile | If the pedal still starts crooked or binds early |
| Moderate | Try a thread insert, a metal sleeve that rebuilds a stripped hole, if the crank design allows it | If the hole is ovalled or the material is thin |
| Severe | Replace the crank arm | If there is visible cracking or repeated slip |
- Light damage - the correct pedal tap can clean and restore the thread enough for normal use.
- Moderate damage - a thread insert or bushing repair may work if the crank design allows it.
- Severe stripping - replace the crank arm; that is often the safest and cheapest long-term fix.
- Cracks or deformation - do not repair and reuse the arm; replace it.
On alloy cranks, repair can be worthwhile if the damage is limited to the first few threads. On carbon or heavily worn arms, replacement is often the smarter call because the cost of a failed repair is higher than the value of the part. If the pedal has already seized or chewed out the crank, the next pedal swap should not be an improvisation.
The fit check I use before ordering new pedals
Before I buy replacement pedals, I run a short checklist and it prevents most mistakes. It takes less time than returning the wrong pair, and it is especially useful if the bike was bought second-hand or built from mixed parts.
- Confirm the crank arm is tapped for 9/16" x 20 TPI unless you have proof it is 1/2".
- Check whether you need flat pedals, clipless pedals, or a wider platform for rougher trails.
- Make sure the left pedal is the left pedal before you start threading.
- Use grease on the threads and start both pedals by hand.
- After the first few rides, or after about 100 km on a new install, re-check that both pedals are still secure.
That small routine is usually enough to keep pedal swaps straightforward. For most MTB riders, the standard is simple: 9/16" x 20 TPI, correct side, clean threads, and no forcing the fit. Get those basics right and the rest of the drivetrain work is much easier to trust on the trail.