The right setup is mostly a riding-style decision
- Most modern MTBs are built around a 1x12 layout because it is simple, compact and easy to live with on rough ground.
- A 10-51T or 10-52T cassette usually gives enough range for steep climbs without a front derailleur.
- Compatibility starts with the smallest cog: HG, Micro Spline and XD freehubs are not interchangeable.
- I start planning chain replacement at around 0.5% wear, because waiting too long often costs a cassette as well.
- Most shifting complaints come from wear, contamination or setup, not from a fundamentally bad groupset.
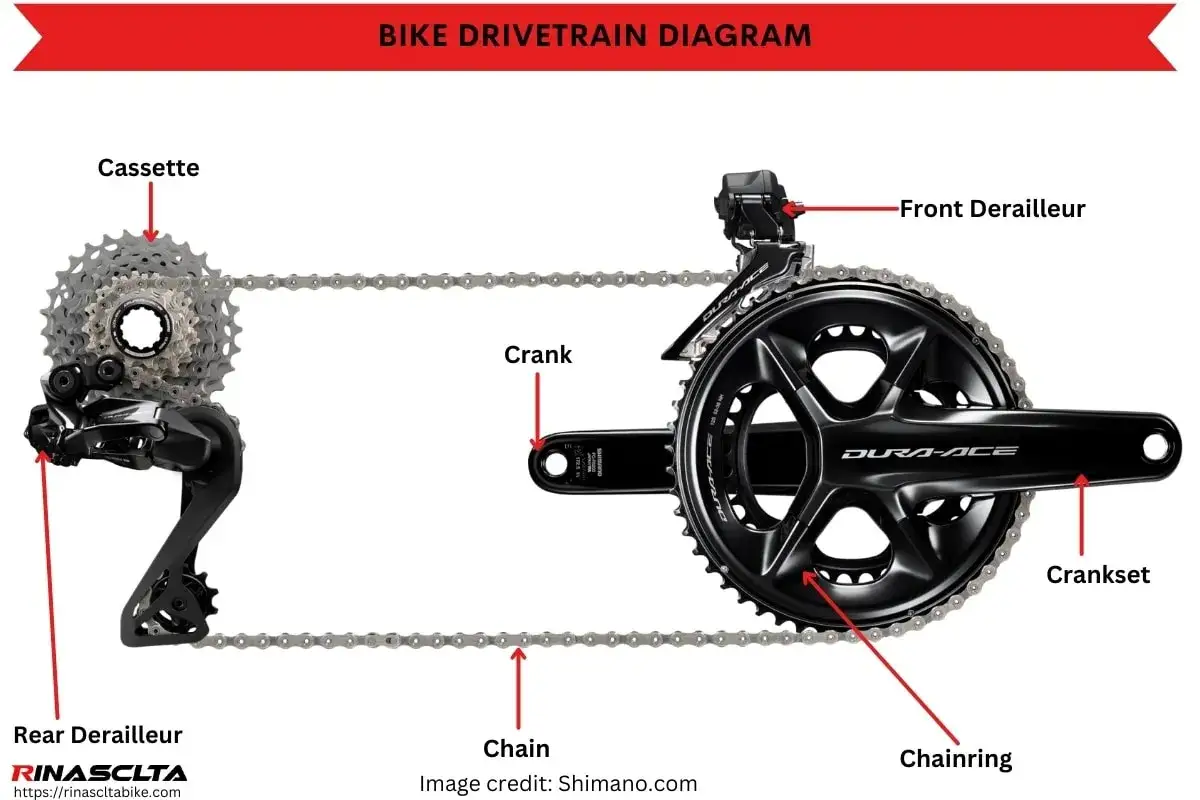
How the system actually moves power to the rear wheel
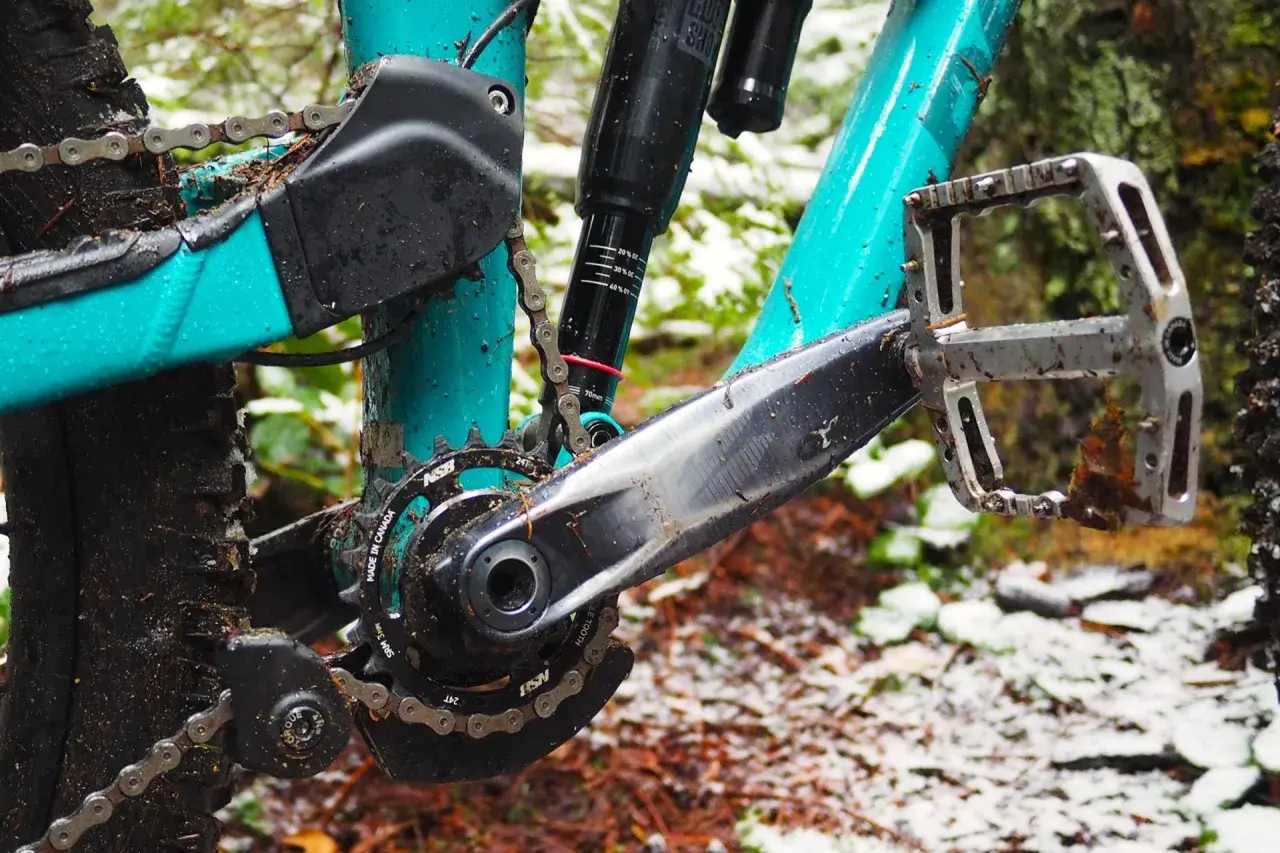
At its simplest, the setup is a chain of jobs. The cranks and chainring turn your legs into rotation, the chain carries that torque backwards, the cassette gives you different gear ratios, and the rear derailleur moves the chain from sprocket to sprocket. The shifter controls that movement, while the bottom bracket lets the cranks spin smoothly and the clutch in the derailleur keeps chain tension steady on rough ground.
Read Also: MTB Flip Chip Explained - Master Your Bike's Geometry
The parts I look at first
- Crankset and chainring - convert your leg force into rotation.
- Bottom bracket - the bearing system that lets the cranks spin smoothly.
- Chain - carries that force to the rear wheel.
- Cassette - the rear cluster that changes the gear ratio.
- Rear derailleur - guides the chain across the cassette and keeps tension in the system.
- Shifter - tells the derailleur when to move.
A narrow-wide chainring, with alternating wide and narrow teeth, helps hold the chain in place; that matters more on a hardtail smashing through roots than it does on a smooth lane. On many modern bikes, the front derailleur has disappeared entirely because one ring up front simplifies the whole setup and improves mud clearance. Once you know what each piece contributes, the next question is which layout makes sense for your riding.
Why 1x systems dominate modern trail bikes
For most riders, 1x is the default because it removes the front derailleur, keeps the cockpit cleaner and cuts a lot of mechanical fuss. It is not magic, though: you trade tighter gear steps for simplicity, and that trade-off is either perfect or annoying depending on how and where you ride. On wet UK trails, I usually favour the simpler option because mud and debris punish extra moving parts.
| Setup | What it gives | Best for | Trade-offs |
|---|---|---|---|
| 1x | Single chainring, usually paired with a wide-range cassette such as 10-51T or 10-52T | Trail, enduro, technical riding, muddy conditions | Larger jumps between gears |
| 2x | Two chainrings with a broad total range and smaller steps between gears | XC, marathon racing, riders who care about cadence on long climbs | More parts, more setup, more mud sensitivity |
| 3x | Three chainrings and very wide theoretical range | Older bikes, low-cost rebuilds, legacy setups | Heavy, fiddly and largely obsolete on modern MTBs |
In 2026, the safe assumption is that 1x12 is the baseline for new MTB builds, with refined mechanical and wireless variants from the big brands still competing on feel and serviceability. Systems like Shimano HYPERGLIDE+ and SRAM Transmission improve shifting under load, but they do not erase the need for good setup. The real test is whether the lowest gear is low enough to keep your cadence, your pedalling rhythm, comfortable on steep climbs, and whether the gaps between gears still feel natural when the trail opens up.
Compatibility details I check before spending money
Compatibility is where a lot of expensive mistakes happen. The cassette, freehub, chainline, derailleur mount and frame clearance all have to agree, and changing one piece can quietly break another. I would rather spend ten minutes checking these points than discover that a new cassette or derailleur will not fit the wheel or frame I already own.
| What I check | Why it matters | Typical mistake |
|---|---|---|
| Freehub body | It has to match the cassette’s smallest cog and spline pattern. | Buying a 10T cassette for an HG wheel. |
| Chainline | It is the lateral position of the chainring relative to the cassette. | Using the wrong offset and ending up with noisy outer gears. |
| Derailleur mount | Some current systems use standard hanger-based layouts, while others use direct-mount frames with different rules. | Assuming every derailleur works on every frame. |
| Frame and suspension clearance | Tyre, chainstay, motor and travel space all affect what fits. | Choosing a ring or cage that clashes at full compression. |
A small but useful detail: a 10-tooth smallest sprocket usually means Micro Spline or XD, while some 11-tooth cassettes can still run HG. That one check prevents a lot of expensive returns. In 2026, the market is not really old versus new; it is serviceable mechanical shifting versus cleaner wireless integration, plus a few direct-mount systems for riders who want maximum robustness. I do not pick wireless just because it sounds modern. I pick it when I want the tidiest cockpit and I am happy to manage batteries. If the parts fit correctly, the next win comes from keeping them clean and in line.
The maintenance routine that keeps shifts crisp
The best setup still gets slow and noisy if you ignore it. My maintenance routine is boring on purpose: clean off grit, relube correctly, check chain wear, and fix alignment issues before they eat expensive parts. That prevents most of the rough, crunchy shifting riders blame on the cassette.
- Clean the chain after muddy rides, especially if you ride through wet clay or grit.
- Apply lube sparingly and wipe off the excess; a wet chain should not look dripping.
- Use a wet lube in persistent rain and a drier formula when the trails are dusty.
- Check chain wear with a gauge; at 0.5% I plan a replacement, and at 0.75% I expect the cassette to be at risk.
- Recheck cable tension and indexing after the first few rides on a new build or after transport.
- Inspect the hanger or derailleur mount after any strike; one small bend can ruin shifting across the whole cassette.
- On full-suspension bikes, check chain length with the suspension in its normal working range so the derailleur is not over-stretched at full compression.
If you run a cable derailleur, I also check the B-screw and the limit screws whenever the top or bottom gears feel awkward. The B-screw sets the gap between the upper pulley and the cassette, and when that spacing is wrong the whole system starts to feel vague. When it still misbehaves after that, the symptoms usually point to a small list of causes rather than a mystery fault.
The failures I see most often on the trail
Most drivetrain problems show themselves in a predictable way if you listen for them. The useful trick is not to ask what is wrong in the abstract, but to ask where in the cassette the problem appears and whether it happens under power, coasting or only after a hit.
| Symptom | Likely cause | First move |
|---|---|---|
| Skipping under hard pedalling | Worn chain, worn cassette, or hanger/derailleur misalignment | Check chain wear first, then alignment |
| Chain drops on rough descents | Too little chain tension, worn chainring, weak clutch, or missing guide | Inspect the chainring, chain length and clutch action |
| Shifts feel vague across the whole cassette | Dirty cable housing, poor indexing, or a bent hanger | Reset tension and inspect alignment |
| Noisy only in one sprocket | Bent tooth or damaged cog | Rotate to another gear and inspect that cog closely |
If a bike starts skipping only when you stamp on the pedals, I assume wear first and bad setup second. If it sounds ugly only after an impact, I assume something is bent. That logic saves time and keeps you from replacing parts that were not the problem.
The few choices that pay back most on real trails
If I were building a bike for modern trail use, I would usually start with a 32T chainring, then move to 30T if the climbs are genuinely brutal or 34T if the riding is fast and smooth. That single choice changes how often you sit in the most efficient part of the cassette, which in turn changes how long the chain, cassette and derailleur last. For steep, muddy UK routes, a sensible low gear matters more than chasing top-end speed.
- Start with the lowest gear you need for the steepest local climb.
- Check the freehub body before you buy the cassette.
- Replace the chain early and save the cassette.
- Keep a spare quick link and a chain wear gauge in the workshop or van.
- Choose mechanical when field service matters most, and wireless when you want a tidier cockpit and do not mind batteries.
In practice, the best setup is the one you can ride through a whole wet season without babysitting. It shifts when you ask, stays quiet when the trail gets rough, and wears out in a predictable order instead of surprising you halfway through a ride.