
Mountain bike gears are less about chasing the biggest number of cogs and more about finding a range that lets you climb smoothly, keep traction in mud and still pedal comfortably on faster sections. In this guide I break down how the drivetrain works, how 1x and 2x setups differ, which ratios make sense on UK trails, and what to check before upgrading or replacing parts. I’ll also point out the mistakes that usually cause poor shifting long before the components themselves are the real problem.
The gearing choices that matter most on a mountain bike
- Most modern MTB drivetrains use a single chainring and a wide-range cassette, because simplicity and mud clearance matter off-road.
- A 10-51T or 10-52T cassette gives roughly a 510% to 520% range, which is enough for most trail and XC riding when paired with the right chainring.
- For many UK riders, a 30T or 32T chainring is the most balanced starting point; steeper terrain often rewards 28T to 30T.
- On 11- and 12-speed systems, I replace the chain at around 0.5% wear to avoid chewing through the cassette.
- If shifting is poor after a knock, the derailleur hanger, cable indexing or chain wear is usually the first thing to inspect.
- Before buying parts, the cassette, freehub body, derailleur, shifter and chain all need to be compatible, not just "12-speed" on the box.
How the gearing system turns pedalling into usable speed
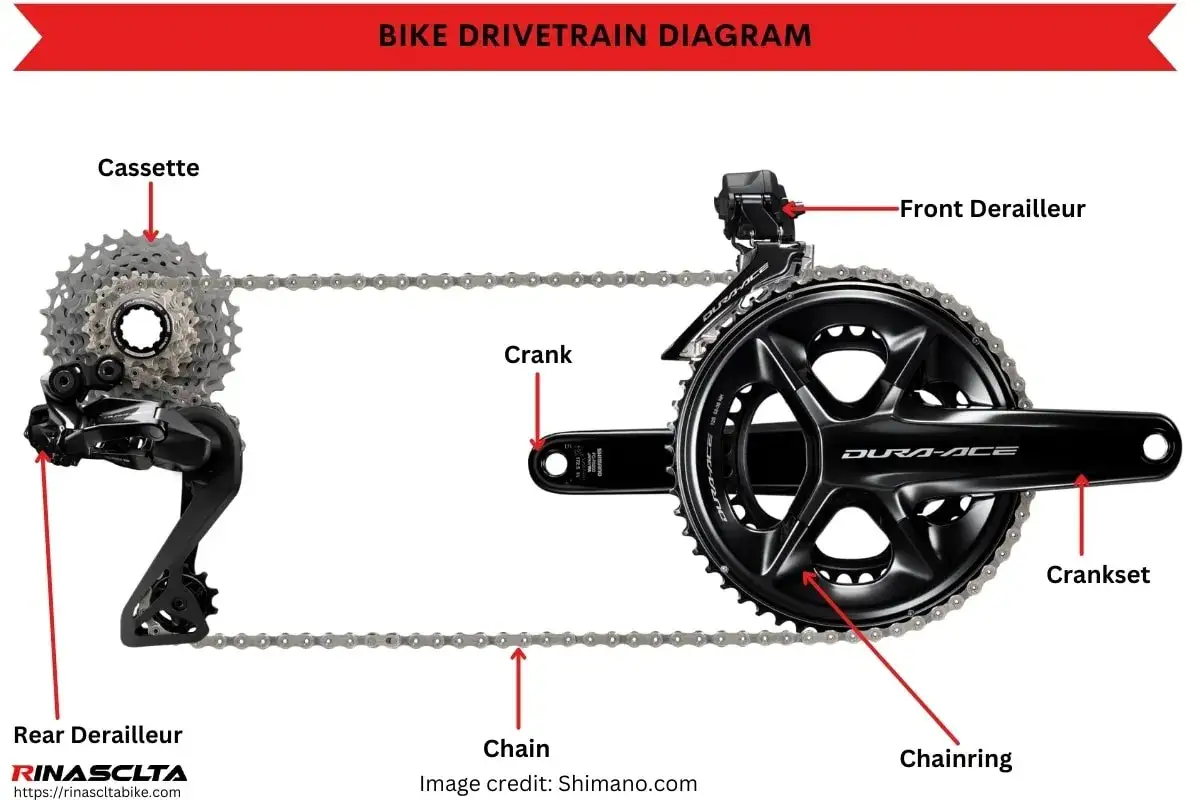
A drivetrain does one job: it converts your pedalling into a ratio that matches the trail. The chainring at the crank drives the cassette at the rear, and the difference between those two tooth counts decides whether each pedal stroke feels easy, hard or somewhere in between. A smaller front chainring and a larger rear sprocket make climbing easier; the opposite combination gives more speed on flatter ground.
Two terms matter here. Gear range is the span between the hardest and easiest gears, while cadence is how fast you spin the cranks. A good setup keeps your cadence close to where you ride best, instead of forcing you to grind on climbs or spin out on descents. That is why a wide-range cassette matters so much on mountain bikes.
Chainring and cassette
On modern bikes, the chainring is usually between 28T and 34T, and the cassette often starts at 10T or 11T. A 32T chainring paired with a 10-51T cassette gives a very usable spread for mixed riding, because the low gear is easy enough for steep climbs while the high gear still works on fireroads and linking sections. In practice, I think of the chainring as the fine-tuning tool and the cassette as the big-picture choice.
Why the derailleur matters
The rear derailleur does more than move the chain. Its spring tension, cage length and clutch mechanism help keep the chain under control when the bike is bouncing through roots and rock gardens. A clutch derailleur adds resistance to chain slap, which reduces dropped chains and makes the drivetrain feel calmer on rough ground. That small detail is one of the main reasons modern off-road drivetrains feel better than older ones.
Once you understand that relationship, the next question is whether a single chainring is enough or whether a front derailleur still earns its place.
1x, 2x and 3x setups compared
The big drivetrain choice is not about brand loyalty; it is about how much simplicity, range and cadence control you want. I would not build a new bike around a 3x system unless I was restoring an older frame or trying to spend as little as possible. For most riders, the real debate is 1x versus 2x.
| Setup | What it does well | Where it falls short | Best fit |
|---|---|---|---|
| 1x | Simple controls, better mud clearance, lighter, fewer parts to adjust | Larger jumps between gears, especially on the cassette | Trail, enduro, modern XC, wet UK riding |
| 2x | Finer cadence control and a broader spread without very large cassette jumps | More complexity, front shifting to manage, more setup to keep perfect | XC racers, endurance riders, mixed-terrain riders who value cadence precision |
| 3x | Very broad range on older bikes and some budget builds | Heavy, clunky, more prone to front-shift fuss, mostly obsolete on new MTBs | Older bikes and low-cost rebuilds only |
For off-road use, 1x is now the practical default because it is easier to ride, easier to maintain and much better in mud. The trade-off is that the gaps between gears are bigger, so you may notice cadence jumps when you move across the cassette. A 2x system still makes sense when you care about keeping cadence very tightly dialled on long climbs or when you cover a lot of mixed terrain. That choice becomes much clearer once you look at the terrain you actually ride.
In other words, do not choose the system with the most gears on paper; choose the one that lets you stay in the right rhythm on your local trails.
How to choose ratios for UK trails
UK riding puts a premium on low-end climbing, traction and reliable shifting in wet conditions. That usually means slightly easier gearing than riders expect when they first move from road or gravel bikes. I generally start with the terrain first, then set the chainring size to suit it.
Steep, wet and technical riding
If your rides include sharp climbs, slippery roots and short punchy ascents, a 28T or 30T chainring is often the sweet spot. Pair it with a 10-51T or 10-52T cassette and you get a low gear that reduces the urge to stall on the steepest sections. That matters more than top speed if you are spending a lot of time in woodland, on loamy singletrack or on winter routes that turn greasy fast.
All-round trail use
For the average trail bike, I would usually begin with a 32T chainring. It is the safest all-round choice because it gives enough climbing help without making flat or downhill link sections feel over-geared. If you ride a mix of trails, bridleways and longer loops, this is the setup that tends to make the fewest compromises.
Fast XC and marathon riding
If you are fit, ride smoother terrain or spend more time racing and covering distance, a 34T chainring can make sense. The reason is simple: you will spend less time spinning out at speed. The downside is that on steep climbs, especially in mud, you may wish you had one easier gear. I only recommend going bigger if you know the climbs are manageable or you genuinely value speed over climbing comfort.
Read Also: Shimano Di2 vs SRAM AXS - Which MTB Drivetrain is Right For You?
Older bikes and budget builds
On an older frame, the cheapest route is not always a new wide-range 12-speed system. Sometimes a well-set-up 11-speed drivetrain with an 11-46T or 11-50T cassette is the most sensible value choice, especially if the wheel already uses an older freehub standard. There is no prize for overbuying complexity when the bike simply needs dependable gearing.
Once the gearing suits the ride, compatibility decides whether the parts will work together or just look right on paper.
What has to match before you buy parts
This is where many drivetrain upgrades go wrong. A part can be excellent on its own and still be the wrong choice for your bike. I always check the whole chain of compatibility, not just the number of speeds.
- Freehub body - If your cassette starts at 10T, the rear wheel usually needs a specific freehub standard. Many 10-51T and 10-52T cassettes use different bodies from older 11-speed hubs.
- Derailleur and shifter family - Shimano and SRAM do not always mix cleanly, because their actuation ratios and cassette designs are different. Matching the system avoids vague shifting.
- Largest sprocket size - The derailleur must be rated for the biggest cog on the cassette. A setup that works with 42T may not be happy with 51T or 52T.
- Chain speed - Use the chain designed for that speed count. A 12-speed chain is narrower and works differently from an 11-speed chain.
- Chainline and frame standard - Boost spacing, bottom bracket position and the chainring offset all affect how straight the chain runs across the cassette.
- Hanger standard - Modern frames may use a direct-mount or UDH-style hanger, while older bikes depend on replaceable hangers that can bend in a crash.
One useful rule is this: if the cassette has a 10-tooth smallest cog, check the freehub before anything else. That one detail decides whether the upgrade is easy or expensive. Some current premium systems also use tighter-range cassettes for cleaner steps and better ground clearance, but those are specialist choices rather than universal upgrades. For most riders, the best setup is still the one that matches the wheel, the derailleur and the way the bike is actually ridden.
After compatibility, the next difference between a smooth bike and a frustrating one is maintenance discipline.
How to keep shifts crisp instead of noisy
Off-road drivetrains live a hard life. Mud, grit and water do not just make the bike dirty; they accelerate wear and make indexing less precise. I do not treat drivetrain maintenance as a cosmetic job. It is part of keeping the gears usable and avoiding unnecessary replacement costs.
- Clean the chain and cassette regularly - A dirty chain is noisy, less efficient and harder on the teeth. In wet UK conditions, this matters more than riders often admit.
- Lubricate for the conditions - Use a wet lube when the trails are saturated and a drier lube when conditions are cleaner. Too much lube attracts grit, so wipe the chain after application.
- Check chain wear early - On 11- and 12-speed chains, I look to replace at around 0.5% wear. On 5- to 10-speed chains, 0.75% is the usual ballpark. Waiting longer can turn a cheap chain into a much more expensive cassette job.
- Inspect the hanger after an impact - If shifting suddenly feels vague after a crash or a bike rack knock, a slightly bent hanger is a common culprit.
- Re-index before replacing parts - Cable stretch, limit screw errors and a badly set B-screw can all mimic worn components. The B-screw, in simple terms, sets the distance between the upper pulley and the cassette.
- Replace worn parts as a set when needed - If a new chain skips on an old cassette, the cassette is already telling you it is worn out.
Noise is not always failure, but persistent skipping under load usually means one of three things: wear, misalignment or poor chain tension. That is why I always diagnose before I buy anything new. It saves money and prevents the common mistake of swapping in another worn-looking part and hoping the problem disappears.
The first upgrade I would make on a tired drivetrain
If I were standing in a workshop with a bike that shifted badly, I would not start by chasing the fanciest cassette. I would work through the improvements in the order that gives the biggest gain per pound spent. That approach usually fixes the real issue faster and keeps the budget under control.
| Priority | Typical UK spend | Why it matters |
|---|---|---|
| Chain | £20-£60 | Restores crisp shifting and protects the cassette if the old chain is worn |
| Cassette | £40-£160 | Fixes hooked teeth, improves range and removes skipping when wear has gone too far |
| Chainring | £25-£80 | Tunes climbing ease versus top speed without changing the whole system |
| Shifter and derailleur | £80-£300+ | Worth it when the current setup is outdated, damaged or no longer compatible with the wheel |
My usual recommendation is simple. If the drivetrain still shifts well, fit the chainring size that suits the terrain and keep riding. If it is noisy or inconsistent, start with the chain, then check the hanger and indexing, then move to the cassette if wear demands it. That order works because the cheapest fixes often deliver the biggest real-world improvement.
For most UK riders, a sensible 30T or 32T chainring, a wide-range cassette and a well-maintained 1x system will feel better on the trail than a more complicated setup that was chosen for the spec sheet rather than the riding. If you keep the parts matched and replace wear at the right time, the drivetrain will feel quieter, lighter on the pedals and far less fussy when the weather turns ugly.