Replacing a worn chain is one of the simplest drivetrain jobs, but it pays off fast: shifting stays cleaner, the cassette lasts longer, and the bike feels less gritty on climbs and in wet UK conditions. In practice, the job is mostly about three things: spotting wear early, choosing the right replacement, and sizing it correctly before you join the chain back together. I’ll walk through the full process step by step, with the MTB details that matter when the bike lives on mud, grit, and suspension movement.
The essentials before you start
- Don’t wait for a snapped chain. Most chains are better replaced at the first clear wear reading, before they damage the cassette.
- Match the new chain to the drivetrain. Speed, brand compatibility, and whether you use a quick link all matter.
- Size matters more than people think. Too short can damage the derailleur; too long can make shifting sloppy and noisy.
- Full-suspension bikes need extra care. Chain growth changes the correct length when the rear end compresses.
- Check the rest of the drivetrain after fitting. If the new chain skips, the cassette may already be worn.
When the chain is worn enough to replace
A chain does not really “stretch” in the way most riders imagine; the pins and rollers wear, and the chain becomes longer over time. That extra length changes how the chain sits on the cassette teeth, which is why a worn chain can quietly wreck more expensive parts if you leave it too long. For mountain bikes, I usually want the chain replaced early rather than “used to the limit”, because mud, grit, and power spikes from technical climbing all speed up wear.
| Wear reading | What it usually means | What I would do |
|---|---|---|
| 0.5% | Common replacement point for many 11- and 12-speed drivetrains | Replace the chain soon, especially on a high-value MTB cassette |
| 0.75% | Typical “do not delay” point on many wider chains | Replace the chain now and inspect the cassette closely |
| 1.0%+ | The cassette and chainrings may already be affected | Expect more than a chain swap if a new chain skips |
| 12 links measure over 12 1/8 in | Old-school ruler check says the chain is worn | Replace the chain and check the rest of the drivetrain |
If I fit a new chain and it skips on just one or two cogs, I do not blame the new chain first. In many cases, the cassette is already worn into that old chain’s shape. That is the point where a cheap chain swap stops being cheap. Once you know the wear stage, the next job is choosing the right parts and tools.
The parts and tools I’d line up first
Before I touch the chain, I make sure I have the right replacement, because drivetrain compatibility is not a place to guess. In the UK, a decent MTB chain is often somewhere around £12 to £35 depending on speed and brand, with premium 12-speed or e-bike options costing more. That is still far cheaper than replacing a cassette that has been run past its limit.
| Item | Why it matters | My note |
|---|---|---|
| Replacement chain | Must match speed and drivetrain type | Buy the exact speed rating, and check whether your system expects a specific chain model |
| Chain checker or ruler | Confirms wear before you buy parts | A checker is faster; a ruler still works if you are careful |
| Chain tool | Needed for riveted chains and some shortening jobs | Make sure it fits your chain speed |
| Quick-link pliers | Makes opening and closing a master link easier | Not mandatory, but they save time and finger pain |
| Degreaser and rag | Lets you clean the cassette, chainrings, and jockey wheels | Chain off the bike is the best time to clean properly |
I also check the small details that catch people out: whether the chain uses a quick link, whether the drivetrain is 1x or 2x, and whether the bike has any unusual chain-length rules from the manufacturer. If your bike has a modern transmission-style system or another specific setup, I would follow that brand’s sizing procedure exactly rather than relying on a generic shortcut. Once the parts are right, removal becomes straightforward.
Sizing the new chain for your drivetrain
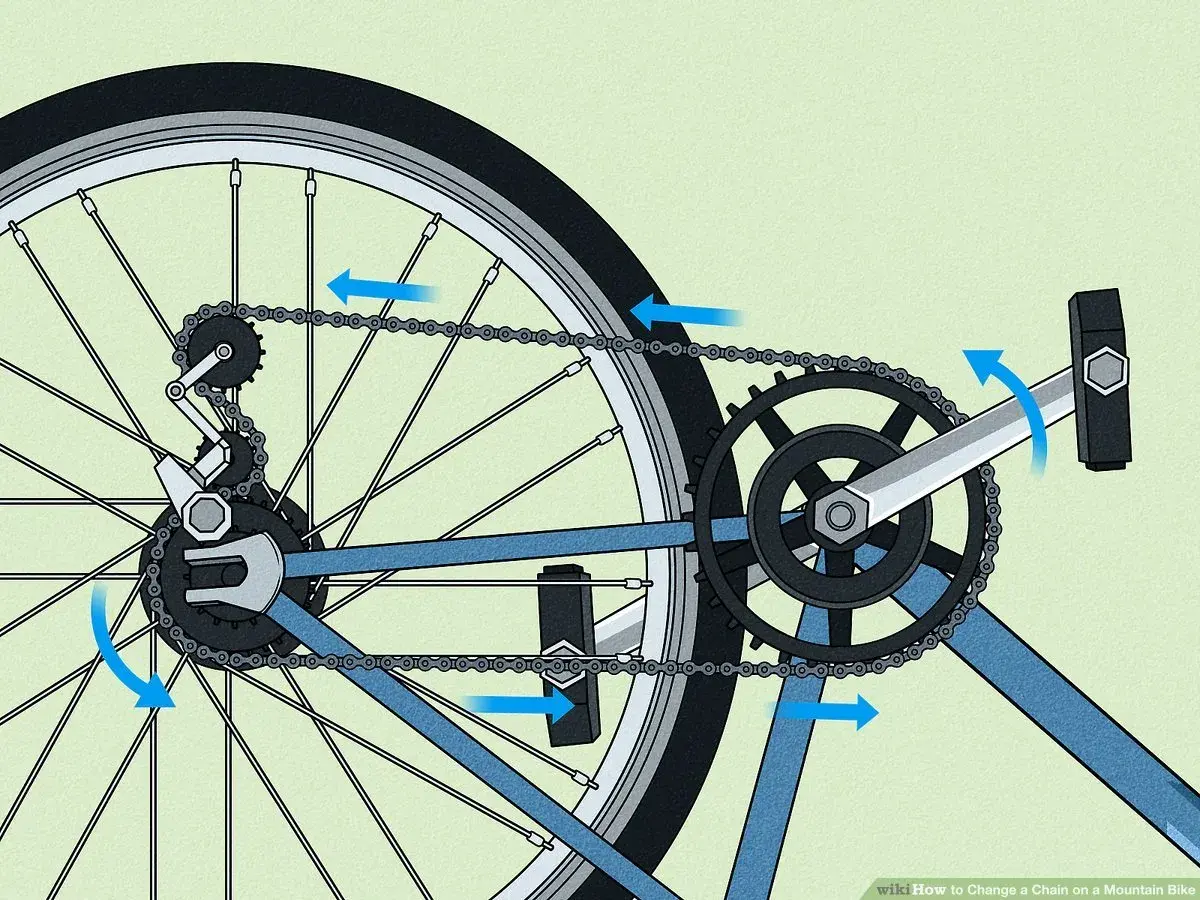
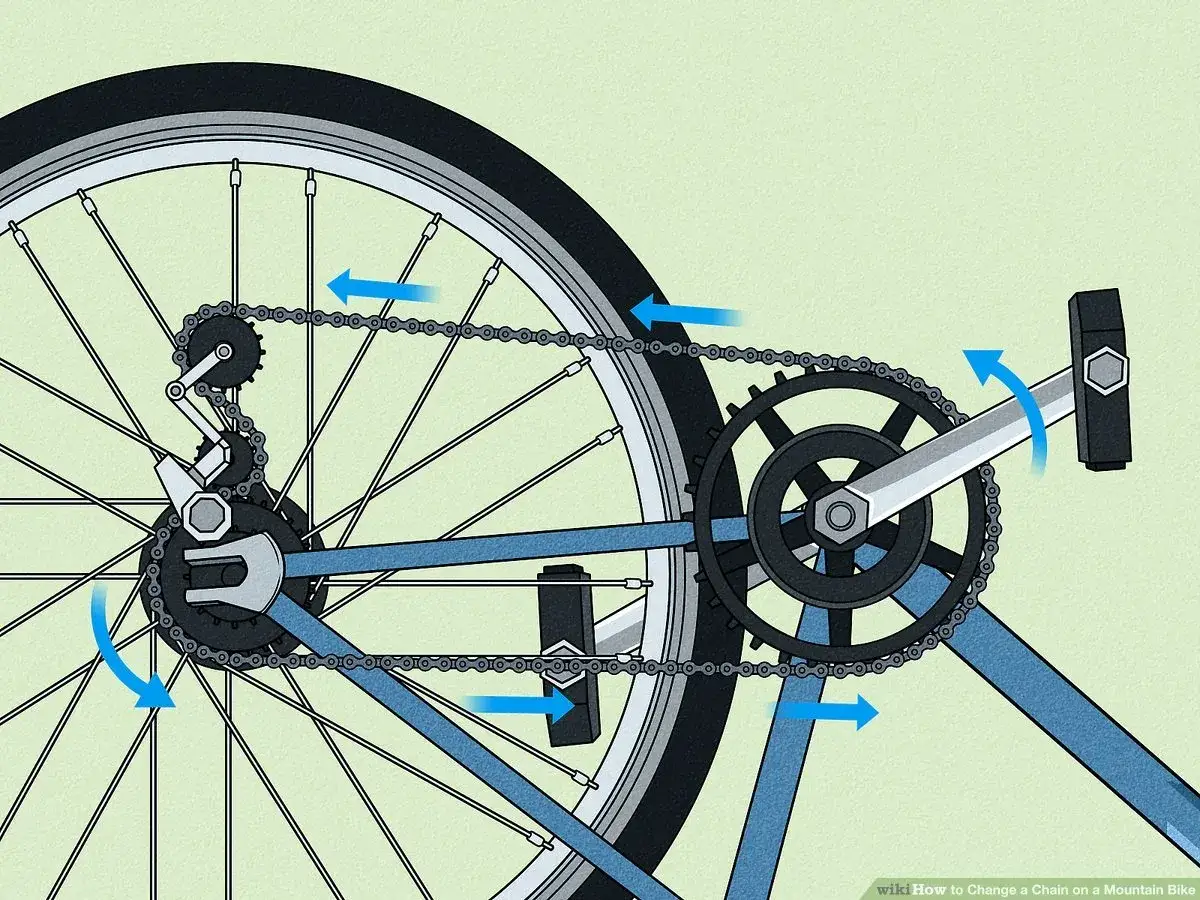
This is the part that decides whether the bike feels crisp or annoying. The easiest starting point on a derailleur bike is the classic big-ring, big-cog method: route the chain around the largest chainring at the front and the largest cog at the back, but do not run it through the rear derailleur yet. Pull the chain ends tight, then add the extra length needed for the join, usually two full links beyond the point where the ends meet. That gives the derailleur enough wrap without leaving the chain sloppy.
For a hardtail, that method is usually enough. For a full-suspension MTB, I want the rear suspension compressed to the point the chainstay length is effectively at its maximum extension before I finalise the length. That matters because chain growth can make a chain that looks perfect in the workshop turn out too short once the suspension moves through its travel.
| Bike type | How I size the chain | Why it matters |
|---|---|---|
| Hardtail or rigid MTB | Big chainring to big cog, bypass the derailleur, then add the correct overlap | Fastest and usually accurate for standard derailleur bikes |
| Full-suspension MTB | Do the same, but compress the rear suspension before final sizing | Prevents the chain from going tight at full compression |
| Brand-specific modern systems | Follow the manufacturer’s exact sizing rule | Some systems use their own overlap method and should not be guessed |
If I have the old chain in good enough condition to compare, I still count links before cutting the new one. That is the simplest way to avoid a “close enough” mistake. Next comes removal, and this is where it helps to work cleanly instead of forcing anything.
Removing the old chain without damaging anything
I start by shifting to the smallest chainring and smallest rear cog, because that removes tension. On bikes with a clutch derailleur, I switch the clutch off if the mechanism allows it. If the chain has a quick link, I open that first; if it is riveted together, I use the chain tool to push a pin out cleanly. The goal is controlled removal, not muscle.
With the chain off, I usually take ten extra minutes to clean the cassette, chainrings, and jockey wheels. That is not busywork. A fresh chain on dirty parts wears faster, sounds worse, and can shift badly from day one. I also inspect the derailleur cage, hanger, and pulleys while I can see everything easily. If the chain broke on the trail, I would be especially alert for bent parts or a damaged hanger before fitting the replacement.
Once the old chain is off, the remaining job is to route and join the new one correctly. That is where most avoidable mistakes happen.
Joining the chain and setting the quick link correctly
When I thread the new chain through the rear derailleur, I pay attention to the pulley wheels and the cage path. It is surprisingly easy to route the chain incorrectly when you are focused on the join, and a single mistake there creates noise, poor shifting, and premature wear. I also make sure the chain is not twisted before I connect it.
If the chain uses a quick link, I insert both halves from the inside of the chain and make sure the arrow on the link points in the direction of crank rotation when viewed from the front. If a manufacturer says the link is single-use, I treat it that way. For example, Shimano’s quick-link guidance says not to reuse a removed link, and that is the safer habit to follow unless your chain system explicitly says otherwise.
To seat the quick link, I usually place it on the upper run of the chain and use gentle pedal pressure with the rear brake held on, or a proper master-link tool if the chain design needs it. The link should snap home fully, not sit half-closed. Then I run the cranks by hand and feel for any stiff link. A single tight link can make the chain pulse through the derailleur and cause ghost shifting, so I do not ignore it.
If the chain uses a connecting pin instead of a quick link, I press the pin in carefully with the chain tool and stop at the correct depth. Over-driving the pin is a common beginner mistake, and it can ruin a link that otherwise would have been fine. Once the chain is joined, I move on to the errors that cause most of the bad experiences people blame on the new chain.
The mistakes that cause poor shifting or premature wear
Most chain swaps go wrong in predictable ways. I see the same problems over and over, and almost all of them are preventable:
- Using the wrong speed chain. A 10-speed chain is not the same as an 11- or 12-speed chain, and shifting quality suffers immediately if you mix them.
- Cutting the chain too short. This can overload the derailleur in the big-big combination and even damage the mech.
- Leaving it too long. The drivetrain can rattle, shift lazily, and drop chain tension on rough trails.
- Routing it through the derailleur incorrectly. This creates noise, poor wrap, and in some cases dangerous misalignment.
- Reusing a worn quick link. If the link has already been removed or looks deformed, I replace it instead of gambling on it.
- Ignoring a worn cassette. A fresh chain will not fix a cassette that is already hooked and skipping.
The cleanest test is simple: shift through every gear, listen for noise, and look for hesitation under load. If one part of the range still jumps, I assume there is more wear somewhere else in the drivetrain. That brings me to the last checks I do before I call the job finished.
The trail-ready checks I do before the first ride back
Before I take the bike back onto the trail, I spin the cranks and run through the whole cassette on a stand or in a work position. I want smooth shifts both up and down the block, no chain slap from an over-long setup, and no sign that the derailleur is overextending in the biggest gears. On a full-suspension bike, I also compress the rear end once or twice and check that the chain still has sensible tension through the travel.
After the first muddy ride, I wipe the chain, dry it, and relube it. That is especially important in the UK, where wet trails and winter grit strip lubricant quickly. If you want the new chain to last, do not treat the installation as a one-off task. The maintenance after the swap is what protects the investment.
A small job that protects the rest of the drivetrain
The real value in a chain replacement is not the chain itself. It is the cassette and chainrings you save by replacing early, sizing accurately, and keeping the drivetrain clean. For a trail bike, I think of the chain as a wear buffer: easy to replace, cheap compared with the rest of the system, and worth watching closely after wet rides or muddy weekends.
If you keep one habit from this guide, make it this: check chain wear regularly, replace before the cassette starts to complain, and never rush the sizing step. That is the difference between a bike that shifts crisply for months and one that turns a simple maintenance job into a much bigger bill.