Chain length is one of those drivetrain details that looks small until it starts causing poor shifting, chain slap, or an over-stressed derailleur, and this guide shows how to size chain length for hardtails, full-suspension bikes, and modern 1x drivetrains without guesswork. I will focus on the practical wrap method, the differences that matter on MTB bikes, and the mistakes that catch riders out when they cut a new chain too soon. The aim is simple: get the chain long enough for the worst-case gear combination, but not so long that the rear mech loses control of the slack.
The essentials for getting chain length right
- Start with the largest front ring and largest rear sprocket, then size from that worst-case position.
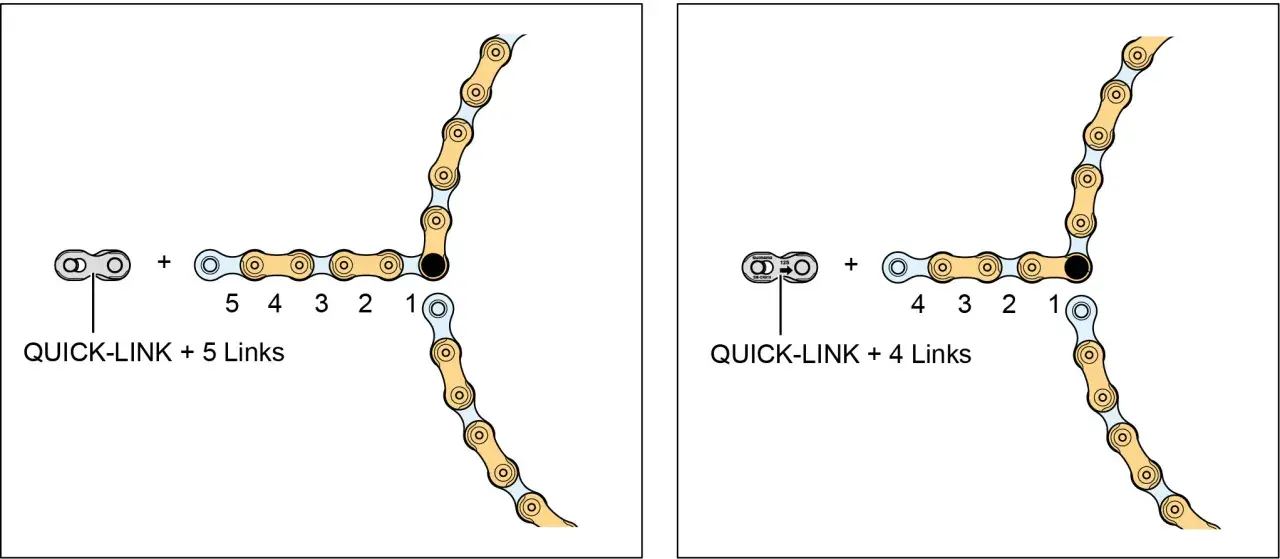
- On most hardtails, Shimano’s guide lands on the zero position plus 4/5 links with a QUICK-LINK or 5/6 links with a connecting pin.
- On full-suspension frames, add one more step of allowance because rear suspension changes chain growth as the bike moves.
- Do not copy the length of a worn chain blindly; wear changes what that chain is telling you.
- If you run SRAM Eagle Transmission, use SRAM’s model-specific chain-length calculator instead of a generic rule.
Why chain length is a drivetrain decision, not a guess
I always think about chain length as a clearance problem rather than a counting exercise. The chain has to cope with the biggest gear combination, the derailleur has to keep tension in the smaller cogs, and the frame has to move if the bike has rear suspension. That is why one length can be perfect on a hardtail and wrong on an XC full-suspension bike with the same cassette.
Front chainring count matters too. A 1x drivetrain is simpler because there is no front derailleur to clear, but a bigger cassette range or a larger chainring still changes the final wrap. With 2x and 3x setups, I am even less interested in “the old chain looks about right” and more interested in the actual big-big fit. Once you treat chain length as part of the drivetrain design, the sizing process becomes much more predictable.The next step is the part that matters most in the workshop: measuring the new chain against the bike itself, not against a guess.
The safest way to size a new chain
If the bike does not have a usable old chain, I start from scratch. A common workshop shorthand is big ring, big cog, then add two links, but I treat that as a starting point rather than a universal answer. Shimano’s own MTB guidance shows why: the final allowance changes with frame type and with the way the chain is joined.
- Wrap the chain around the largest chainring and the largest rear sprocket, but do not route it through the rear derailleur yet.
- Pull the ends together at the rear of the cassette and mark the overlap point. That overlap is the zero position.
- Add the allowance required by your bike type and joining method, then cut only after you are confident the chain will still have working room in big-big.
- Route the chain through the rear derailleur correctly, join it, and check that the link articulation feels smooth.
- Test the drivetrain in the biggest and smallest gear combinations before you ride off-road.
The important detail is that the overlap does not always land on the same kind of link. That is why the final count is sometimes a range rather than a single number. If the zero position lines up neatly, use the lower end of the range; if it does not, use the higher end so the derailleur is not forced to work outside its comfort zone.
How hardtails, full-suspension bikes and 1x drivetrains change the answer
A hardtail gives you the most forgiving answer because the rear axle does not move through travel in the same way. A full-suspension bike is more demanding: the chain must stay long enough when the suspension is at greatest extension, or the drivetrain takes the load instead of the frame. Shimano explicitly warns that an overly short chain can place excessive load on the system when the rear suspension moves.
| Setup | What changes | Practical rule I use |
|---|---|---|
| Hardtail | Very little chain growth | The big-big wrap method usually lands close, then I fine-tune with the connector allowance. |
| Full-suspension | Chain growth changes through travel | I check at full extension and follow the frame or drivetrain manual when it gives a specific value. |
| 1x MTB | Fewer front-end variables | Easier to size, but I still verify that the derailleur cage has room in big-big. |
| 2x / 3x MTB | More front-ring combinations | The largest chainring and largest rear sprocket both have to be covered cleanly. |
| SRAM Eagle Transmission | Model-specific setup | I use the chain-length calculator rather than a generic workshop rule. |
That last row matters more than many riders expect. Transmission systems are built around a defined setup process, so the old “close enough” habit is a poor fit there. Once you know which setup you have, the common mistakes become easier to avoid.
The mistakes that make a chain feel wrong even when it fits
Most bad chain jobs are not dramatic. They are just slightly wrong in a way that steals shifting quality and makes the drivetrain feel tired before its time.
- Copying a worn chain - Shimano notes that wear changes the chain’s apparent length, so an old chain is not a clean template unless you know it was correct to begin with.
- Sizing on small-small - that can leave you with a chain that looks tidy in the stand but is too short in the hardest gear.
- Forgetting suspension movement - on full-suspension bikes, a chain that fits at rest can become tight when the rear end extends.
- Using the wrong joiner - a quick-link or connecting pin has to match the chain speed and model, otherwise the join becomes the weak point.
- Blaming chain length for every noise - chainline, derailleur alignment, and hanger position can all create a bad feel even when the chain is sized correctly.
If a bike already has a badly worn chain, I would not use it as the length reference unless I knew the drivetrain had been built correctly in the first place. A clean sizing job starts with clean assumptions. Once those traps are out of the way, the cutting and joining job is much more predictable.
Cutting, joining and checking the chain before you ride
Once the length is right, the rest of the job is mostly about being tidy. Use the correct chain tool for the chain speed, cut one link pair at a time, and make sure the chain is routed through the derailleur correctly before you join it. Shimano’s manuals are blunt about this: if the chain is not placed correctly in the tool, you can damage the tool, and if the chain is misrouted, you will be redoing the whole job.
- Cut only after you have confirmed the wrap length.
- Join the chain with the correct quick-link or connecting pin for that chain.
- Flex the join by hand and back-pedal the cranks to spot a tight link.
- Shift across the cassette under light pedal pressure and listen for hesitation.
- Use small-small only as a slack check, not as a gear combination you expect to ride often.
If the chain is too long, remove one full link pair and repeat the check. If it is too short, stop there; forcing the drivetrain is the fastest way to turn a minor setup error into a broken hanger or a damaged derailleur. The final verification is simple, but it is the one I trust most on trail bikes: the drivetrain should still have breathing room when the suspension is at full extension.
The checks I would never skip on an off-road bike
Before I call a chain job finished, I want three things: the derailleur cage still has movement in the biggest gear, the chain does not sag badly in the smallest gear, and the bike shifts cleanly after a short test ride. If any of those three are missing, I recheck the sizing before the first proper trail session.
- Big-big test - the cage must not be pulled tight or locked straight.
- Suspension test - on a full-suspension bike, the chain must still behave when the rear end is fully extended.
- Shift test - the chain should move across the cassette without hesitation or scraping from a too-tight join.
That is the most practical way to think about chain length on an MTB: size for the worst-case gear, respect the frame’s movement, and do not trust a worn chain or a generic guess when the drivetrain asks for something more specific.