SRAM’s T-Type transmission is a full drivetrain system built around the rear axle, not just a nicer derailleur. That changes how the bike shifts under load, what your frame needs to be compatible, and how much you should budget for the upgrade. In this guide, I break down the parts that matter, the setup traps to avoid, and which version makes the most sense for XC, trail, enduro, and e-MTB riding.
The key things to know before you buy
- It is a system, not a standalone part. Cassette, chain, chainring, derailleur, and frame standard all have to line up.
- Your frame must be UDH-compatible. If the bike was not designed for a hangerless Full Mount interface, stop there.
- Compatibility is strict inside the ecosystem. If a part is marked T-Type, it is meant to work with other T-Type parts.
- Wireless and mechanical both make sense. AXS is cleaner and more expensive, while Eagle 90 and 70 give you cable-actuated options.
- Price spreads are huge. The jump from budget mechanical parts to premium wireless kit is measured in hundreds, sometimes thousands, of pounds.
- On e-MTB, Single Click matters. That is the safer and more appropriate shifter choice for the system.
What this drivetrain actually changes on the bike
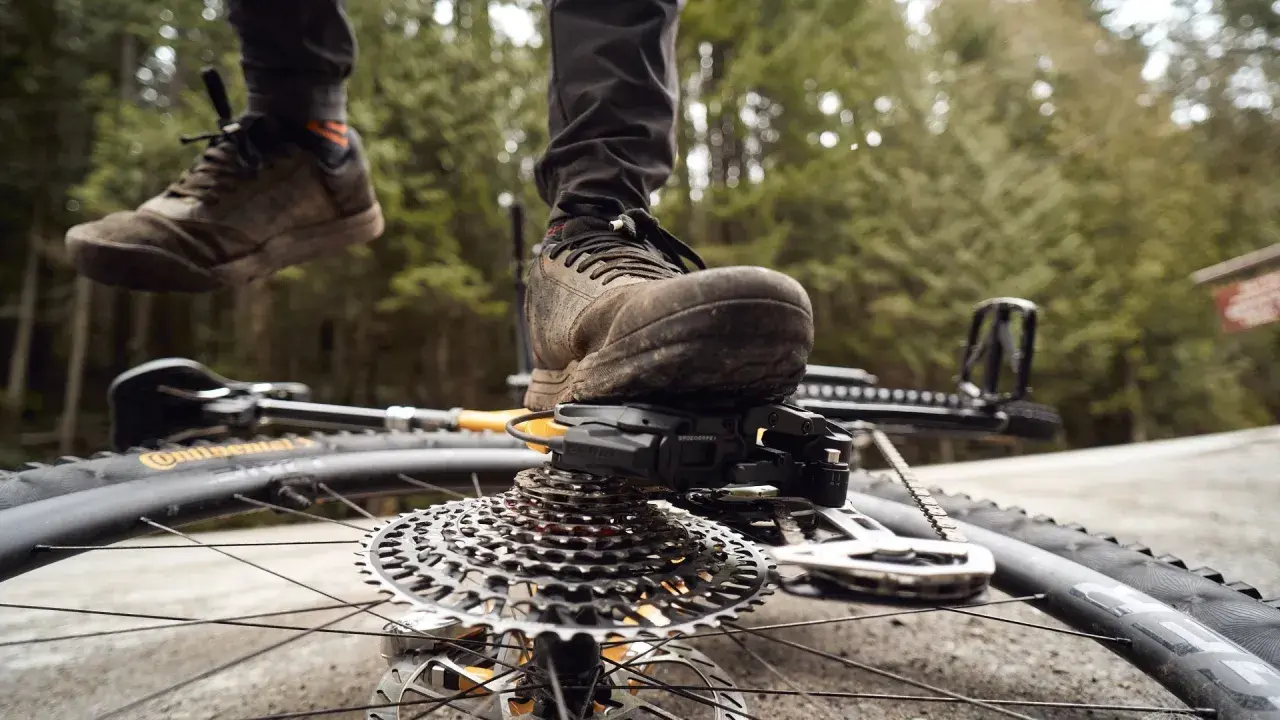
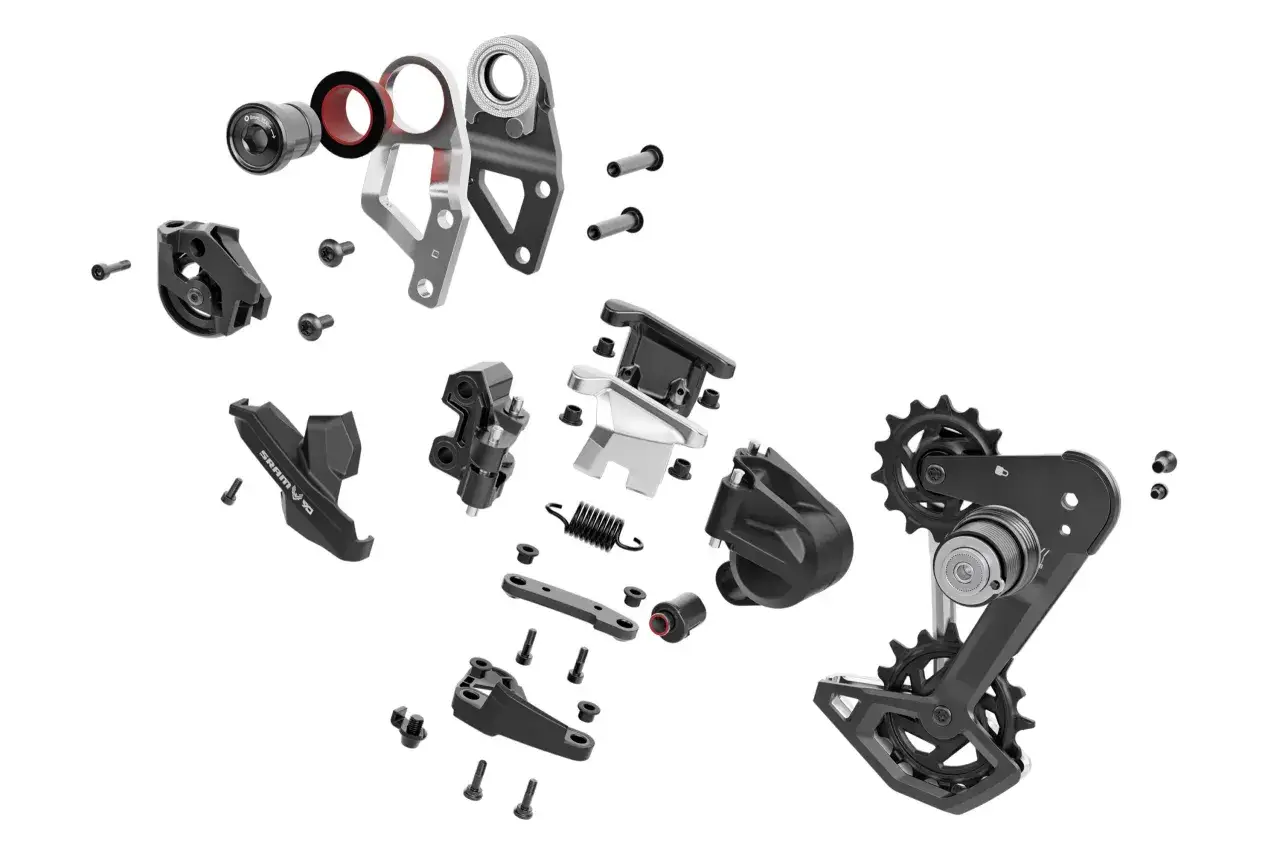
The biggest shift is structural. Traditional MTB drivetrains hang the derailleur from a replaceable hanger, which is useful until it bends or gets knocked out of alignment. This transmission moves to a Full Mount design that locates the derailleur around the axle, so the whole system feels more rigid and far less fussy once it is installed correctly.That rigidity is not just marketing. It is what lets the drivetrain hold its line under hard pedalling, rough landings, and the kind of trail chatter that usually exposes vague shifting. The cassette and derailleur are designed to work as one matched unit, and the range is still proper MTB territory, with 10-52T and a 520% spread on the main Transmission cassettes.
What I like most about this approach is that it reduces the old habit of endlessly chasing hanger alignment and tiny adjustment errors. You set the system up once, then ride it. The trade-off is simple: the bike has to be built to the standard the system expects. That is where compatibility becomes the real question.
What your frame and wheelset need
This is the section I would check before spending any money. OLD means over-locknut dimension, basically the rear end width the frame was designed around. If you get the frame and hub details wrong, the rest of the build becomes irrelevant.
| What to check | Why it matters | What I would look for |
|---|---|---|
| UDH-compatible frame | The system uses a hangerless Full Mount interface, so the frame has to be designed for it. | A UDH-ready frame, not a bike that only uses a traditional hanger. |
| Rear hub driver body | Some T-Type cassettes use XD, while the XS-1270 option works on a splined 8, 9, 10-speed driver body. | Match the cassette to the wheel you already own if you want to avoid changing hubs. |
| Chainline | It sets how straight the chain runs across the cassette. On most modern MTB builds, 55 mm is the common choice. | For some 142 mm OLD frames, SRAM specifies 52 mm with a 168 mm Q-factor crank and a 3 mm offset ring. |
| Chainring | Existing non-T-Type chainrings are not compatible. | Use the correct T-Type ring or the proper direct-mount option. |
| e-MTB shifter mode | Single Click helps protect the system and is the right match for motor-assisted use. | Use Single Click rather than a multi-shift lever on an e-bike. |
For most UK trail bikes, the answer is usually straightforward: UDH frame, 148 Boost rear end, and a 55 mm chainline. If you already own a good wheelset, the driver body matters more than most riders expect, because it decides whether you can keep the wheel or need to rebuild it around a different freehub. Once that is sorted, the choice becomes much easier and more personal.
Which version makes sense for your riding
The cleanest way to think about the lineup is by how you want to ride and how much hardware complexity you are willing to live with. Wireless AXS gives you the tidiest cockpit and the least cable maintenance. Mechanical Eagle 90 gives you the feel of a cable system with Full Mount toughness. Mechanical Eagle 70 is the more accessible route in if you want the system without paying premium money.
| Version | Best for | What stands out | Main compromise |
|---|---|---|---|
| Wireless AXS | Riders who want the cleanest cockpit and a premium feel | No shift cable, quick installation, easy button feel, very tidy bar setup | You are paying more, and you need to manage batteries |
| Eagle 90 mechanical | Trail and enduro riders who want the best mechanical option | Full Mount strength, rebuildable parts, no batteries, very direct shift feel | You still have cable and housing to look after |
| Eagle 70 mechanical | Budget-conscious builds and riders who want a cheaper route into Transmission | Lower entry cost, strong core design, practical maintenance | Less premium feel and fewer high-end materials |
The premium wireless side of the range still splits into real use cases. XX SL is the race-weight choice, X0 is the more abuse-tolerant high-end option, and GX is the sensible value pick if you want AXS without paying for the very top of the ladder. SRAM’s own European pricing shows the spread clearly, with Eagle 70 parts starting around €35 for a shifter and €135 for a derailleur, Eagle 90 around €55 for a shifter and €205 for a derailleur, while complete premium wireless groups move into the low thousands of euros. That is a big gap, so I would only pay for the top end if weight or spec level is genuinely part of the brief.
If I were building a bike for wet British trails, I would usually favour durability and serviceability over the lightest possible spec. That is where Eagle 90 makes a lot of sense, and where GX AXS only wins if the rider really wants wireless. The next question is how hard the installation actually is, because that is where a lot of people either overestimate the pain or underestimate the setup discipline.
How installation and setup differ from a normal drivetrain
The install process is simpler than a traditional derailleur build, but only if you follow the intended steps. SRAM says the AXS version goes on in three basic stages and can take about two minutes once the bike is ready. The mechanical Eagle 90 and 70 versions follow the same prepare, hang, and tighten logic, then add the usual cable and housing work.
- Prepare the frame and confirm UDH compatibility.
- Set chain length with the setup key and the chain-length calculator.
- Mount the derailleur with the Full Mount interface.
- For AXS, pair the controller and battery.
- For mechanical, route and tension the cable correctly.
- Check the setup on the trail before you trust it fully.
The point here is not that the system is magic. The point is that it removes a lot of the old derailleur fiddling and replaces it with a very defined setup sequence. That is good for consistency, but it means guesswork is punished. If the chain length is wrong, the setup key is off, or the wheel is not seated properly, you will feel it immediately.
One useful detail for riders who travel a lot or swap wheels often is that Full Mount derailleurs can be reset after an impact. The derailleur is designed to rotate away from danger in a crash, which is a smart way to save parts, but it also means you should check alignment after a hard hit. That leads directly into the part most riders care about after the first season of use: what it costs to live with.
What it costs to live with it over time
The price of entry is only half the story. The real value question is how the drivetrain ages, what wears out first, and how painful the replacements are. On that front, the system is better than a lot of older MTB setups because several parts are modular and replaceable rather than throwaway.
| Part or tier | Typical price signal | What it means in practice |
|---|---|---|
| Eagle 70 mechanical parts | About €35 for a shifter, €135 for a derailleur, €100 for a crankset | Lowest-cost route into the system, with sensible durability |
| Eagle 90 mechanical parts | About €55 for a shifter, €205 for a derailleur, €170 for a crankset, around €730 for a full groupset | Strong value if you want mechanical shifting without a bargain-bin feel |
| GX Transmission components | About €240 for the XS-1270 cassette or €300 for the GX cassette, around €60 for the chain, around €650 for some upgrade kits | A middle ground that keeps the ecosystem affordable without going ultra-premium |
| X0, XX, XX SL wireless | Roughly €1,900, €2,450 to €2,750, or €2,650 to €3,250 for full groupsets | For riders who care about weight, finish, or top-tier spec more than budget |
For maintenance, the main difference is where the wear happens. Mechanical builds need cable and housing replacement when the action gets sticky. Wireless builds remove that chore, but you now own batteries and a charger. In both cases, I would still budget for chain wear, cassette wear, and the occasional crash part, because wet grit does not care how expensive the drivetrain was on day one.
The good news is that the system is repair-friendly for its class. Skid plates, cages, and smaller service parts are available, so a hard season does not always mean a full replacement. That makes the next section more useful than it first sounds, because the right build depends less on the logo and more on how and where you actually ride.
Which build earns my money on British trails
If I were speccing bikes for UK off-road use, I would keep the recommendation simple.
- XC race bike: XX SL if weight is the priority, GX AXS if I want value without giving up wireless.
- Trail bike: GX AXS or Eagle 90, with a slight lean toward Eagle 90 if I want fewer batteries and a very direct mechanical feel.
- Enduro bike: X0 or Eagle 90, because crash resistance and rebuildability matter more than chasing the lightest complete build.
- e-MTB: Eagle 70 or 90 with Single Click, because that is the most appropriate way to use the system under motor torque.
If the frame is not UDH-compatible, I would not force the upgrade. In that case, the money usually goes further on brakes, wheels, or suspension. If the frame is compatible, though, this drivetrain makes sense when you want shifting that stays precise under load, fewer alignment headaches, and a system built to be repaired rather than constantly re-judged after every muddy ride.