Key fit checks before you touch the crank
- Start with the etched crank family and the frame shell width, not with spacer guesses.
- Standard DUB, DUB Wide, DUB Ai, Super Boost+, DH, and Fat each use different spacer stacks.
- The 73 chain-guide row is only for a 2.5 mm guide behind the BB cup, not an ISCG guide.
- Remove any outer spacers the chart does not call for before tightening the cups.
- After torquing, check for side play, rough bearings, and chainstay clearance.
How to read the chart without guessing
I always begin with two things: the etched crank family on the spindle and the frame shell width. SRAM Service identifies the crank type by that etch, which is the fastest way to tell whether you are dealing with standard DUB, Wide, Ai, SB+, DH, or Fat. Once I have that, the spacer stack becomes a reading exercise instead of a trial-and-error job.
That matters because the same shell width can support different crank families. A 73 mm threaded shell, for example, can be set up as a standard MTB build, a Wide build, a Super Boost+ build, or a chain-guide build. If you skip that distinction, you can end up with a crank that feels close enough in the stand but binds, rubs, or wears bearings too quickly on the trail.
What I check first
| Check | Why it matters | What I look for |
|---|---|---|
| Crank family | Separates standard DUB from Wide, Ai, SB+, DH, and Fat | The spindle etch |
| Shell interface | Decides whether I am dealing with threaded, PressFit, or BB30 style fitment | BSA, PressFit, BB30, or another frame standard |
| Shell width | Controls spacer placement and cup depth | 68, 73, 83, 89.5, 92, 100, 121, and similar widths |
| Hub spacing | Helps confirm the intended chainline | 142, 148, 157, 177, or 197 mm |
I do not trust frame marketing names on their own. “Boost” tells me something useful, but not enough to install a bottom bracket correctly. I still want the shell spec, the hub spacing, and the crank family before I pick up a wrench.
The MTB spacer chart in plain English
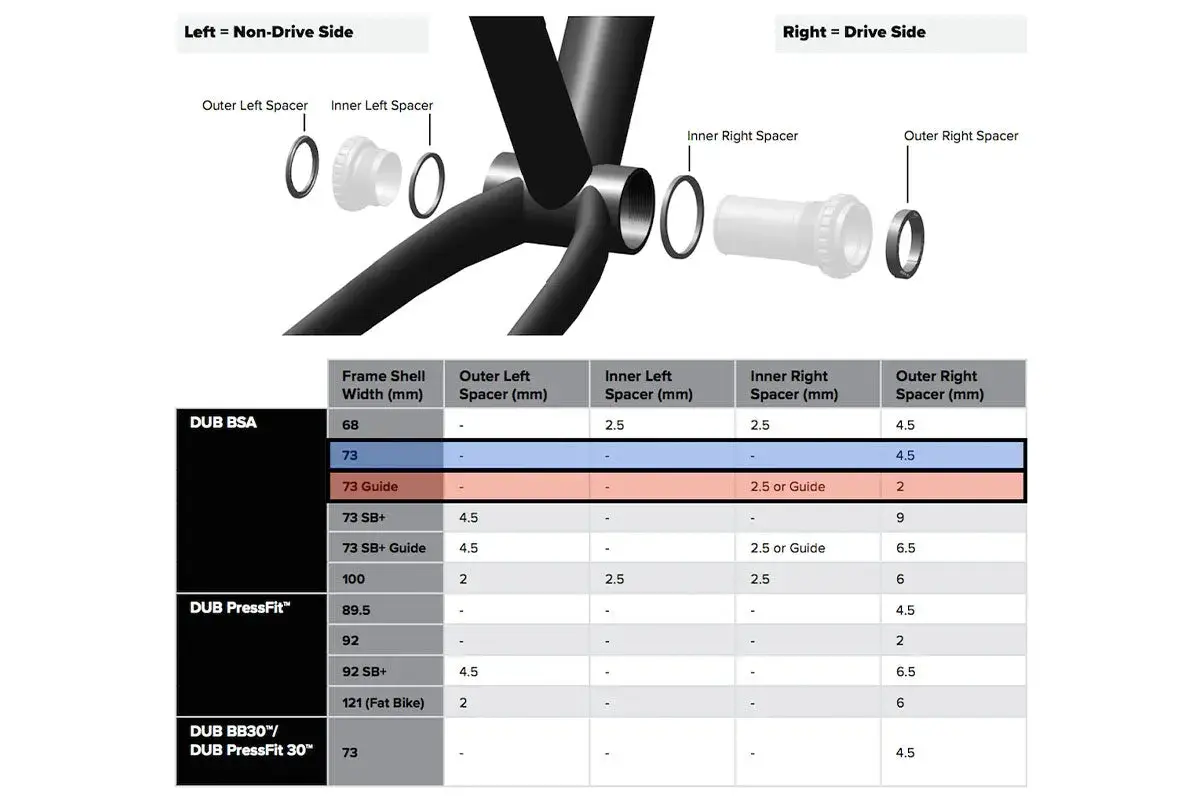
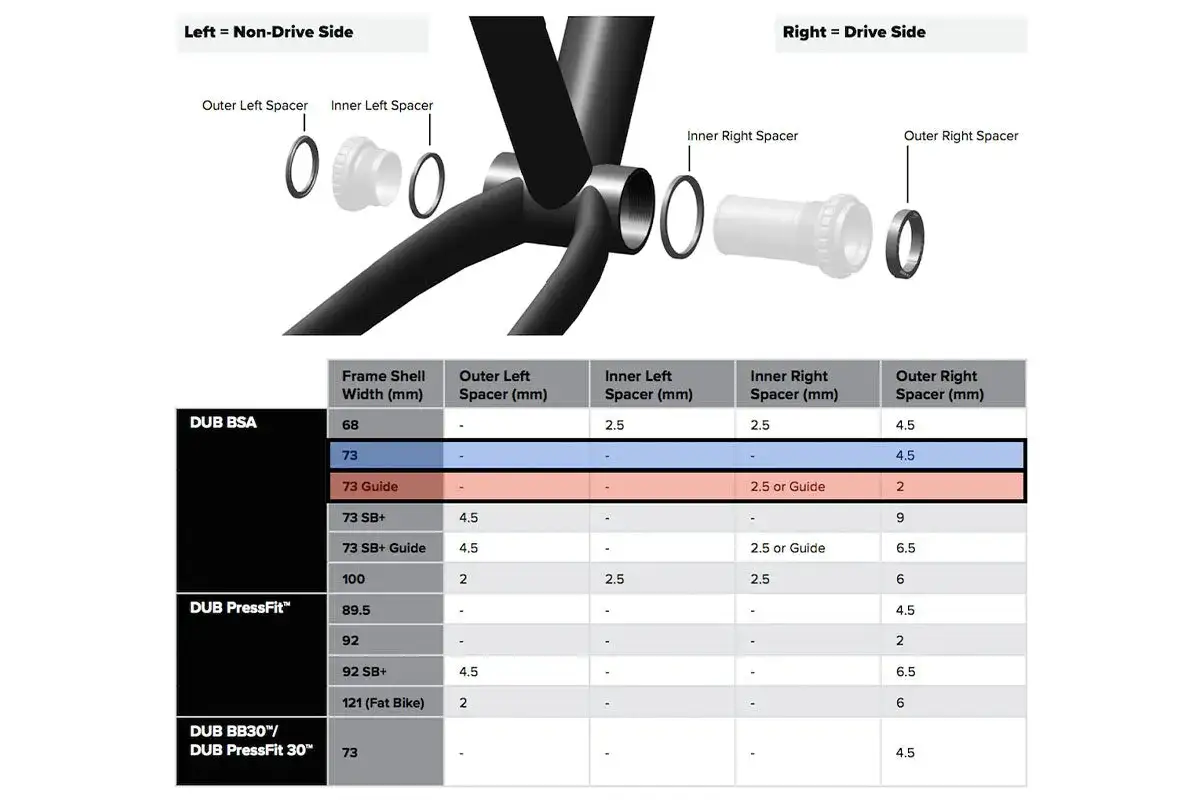
The table below is the practical part of the guide: the spacer stack itself. I have split threaded and press-fit systems so the numbers are easier to scan at the bench. In the chart, outer left means the non-drive side outside the cup, inner left sits inside the non-drive cup, inner right sits inside the drive-side cup, and outer right sits outside the drive-side cup.
Threaded MTB shells
| Frame shell | Crank family | Outer left | Inner left | Inner right | Outer right | Notes |
|---|---|---|---|---|---|---|
| BSA 68 | MTB | - | 2.5 | 2.5 | 4.5 | Standard threaded MTB setup |
| BSA 68 | MTB Wide | 3 | 2.5 | 2.5 | 7.5 | Wider chainline version |
| BSA 73 | MTB | - | - | - | 4.5 | Common 73 mm threaded MTB shell |
| BSA 73 | MTB Wide | 3 | - | - | 7.5 | Wide threaded MTB setup |
| BSA 73 | Super Boost+ | 4.5 | - | - | 9 | For 157 mm rear ends |
| BSA 73 Ai | MTB Ai | 2.5 | 2.5 | - | 10.5 | Asymmetric Ai fit |
| BSA 73 with chain guide | MTB | - | - | Chain guide | 2 | Guide is 2.5 mm wide and sits behind the BB cup |
| BSA 73 with chain guide | MTB Wide | 3 | - | Chain guide | 5 | Same guide rule, different stance |
| BSA 73 with chain guide | Super Boost+ | 4.5 | - | Chain guide | 6.5 | Guide row for SB+ frames |
| BSA 83 | DH | - | 2.5 | 2.5 | 4.5 | Downhill threaded shell |
| BSA 83 Ai | MTB Ai | - | - | - | 5.5 | Ai-specific threaded fit |
| BSA 100 | Fat | 2 | 2.5 | 2.5 | 6 | Fat-bike threaded shell |
Read Also: Hope E4 Brakes - Optimize Your Trail & All-Mountain Ride
Press-fit and BB30 MTB shells
| Frame shell | Crank family | Outer left | Inner left | Inner right | Outer right | Notes |
|---|---|---|---|---|---|---|
| PressFit 89.5 | MTB | - | - | - | 4.5 | Standard press-fit MTB setup |
| PressFit 89.5 | MTB Wide | 3 | - | - | 7.5 | Wide version for this shell |
| PressFit 92 | MTB | - | - | - | 2 | Very short outer right spacer |
| PressFit 92 | MTB Wide | 3 | - | - | 5 | Wide press-fit MTB setup |
| PressFit 92 | Super Boost+ | 4.5 | - | - | 6.5 | Super Boost+ press-fit fit |
| PressFit 104.5 | DH | - | - | - | 4.5 | Downhill press-fit shell |
| PressFit 107 | DH | - | - | - | 2 | Downhill press-fit variant |
| PressFit 121 | Fat | 2 | - | - | 6 | Fat-bike press-fit shell |
| PressFit 30 73 | MTB | - | - | - | 4.5 | PF30 for standard MTB |
| PressFit 30 73 | MTB Wide | 3 | - | - | 7.5 | PF30 wide MTB |
| PressFit 30 83 | MTB Wide | 3 | - | - | 7.5 | PF30 wide on 83 mm shell |
| PressFit 30 83 | DH* | 3 | - | - | 6.5 | Use the DH-marked spindle family |
| PressFit 30 83 Ai | MTB Wide | 3 | - | - | 7.5 | PF30 Ai wide fit |
| PressFit 30 83 Ai | MTB Ai | - | - | - | 5.5 | PF30 Ai standard fit |
| PressFit 30 100 | Fat | 4.5 | - | - | 8.5 | Fat-bike PF30 setup |
| BB30 73 | MTB | - | - | - | 4.5 | Standard BB30 MTB fit |
| BB30 73 | MTB Wide | 3 | - | - | 7.5 | Wide BB30 MTB fit |
| BB30 83 Ai | MTB Ai | - | - | - | 5.5 | BB30 Ai-specific fit |
The two details people miss most often are simple: the chain-guide rows are only for a 2.5 mm guide behind the BB cup, and the crank family must match the frame standard. SRAM’s current chart is very explicit about both points, which is why the table looks fussy but saves time once you are actually installing parts.
How chainline changes the way the bike rides
Spacer placement is not just about clearance. It also sets the chainline, which is the lateral position of the chainring relative to the frame centreline. If the chainline is too far in, the chain can run awkwardly on the larger cassette cogs and sometimes graze the chainstay under load. If it is too far out, the drivetrain can feel strained on the easier gears and the front of the chainline can look visually off even when the crank turns freely.
| Crank family | Chainline | Hub spacing | Chainring offset | My practical read |
|---|---|---|---|---|
| MTB DUB / DUB SL | 49 / 52 / 55 mm | 142 / 148 / 148 mm | 6 / 3 / 0 mm | Standard MTB and XC-style fits |
| MTB Wide DUB WIDE | 52 / 55 mm | 148 mm | 6 / 3 mm | Use when the frame wants the wider DUB stance |
| MTB Ai DUB Ai | 55 mm | 148 mm | 6 mm | Asymmetric frame-specific fit |
| Super Boost+ DUB SB+ | 56.5 mm | 157 mm | 3 mm | Built around the wider rear end |
| DUB DH | 56.5 mm | 148 / 157 mm | 6 mm | Downhill-specific setup only |
| DUB FAT | 66.5 / 76.5 mm | 177 / 197 mm | 6 / -4 mm | Fat-bike specific, not interchangeable with trail cranks |
I treat chainline as the reality check. If the spacer stack is technically correct but the chainring sits in a place that looks wrong against the stays or cassette, I do not convince myself it is fine. I re-check the crank family and the frame standard, because that is usually where the mismatch started.
Installation order that protects the bearings
The safest way to install a DUB crankset is to follow the stack order exactly, not to improvise because the cups look similar. SRAM Service tells you to remove the left-side outer spacer and the right-side outer spacer from the cups before installation, then add only the spacers the chart actually calls for. That sounds obvious until you see how often a leftover spacer causes bearing damage or a preload problem.
- Clean the BB shell thoroughly, check for burrs, and make sure the shell is free of dirt and old grease.
- Confirm the shell specification and crank family again before fitting anything.
- Remove any outer spacers from the cups that the chart does not call for.
- Install the inner non-drive spacer only if the chart asks for it.
- Tighten the non-drive cup with the correct 12-notch bottom bracket tool.
- Add the left outer spacer if the row uses one.
- Install the inner drive-side spacer only if the chart asks for it.
- Tighten the drive-side cup, then fit the right outer spacer if required.
- Install the crank, torque it correctly, and check for smooth rotation with no side play.
I also avoid one shortcut that seems tempting on modern frames: removing the centre tube from the bottom bracket just to make room for internal brake hose routing. The manual says that is not recommended, and in practice it can shorten bottom-bracket life. If a frame needs a different routing approach, I treat that as a frame issue to solve, not a spacer problem to work around.
The mistakes that usually create creaks and premature wear
Most DUB problems are not mysterious. They come from a small number of setup errors that are easy to avoid once you know what to look for.
- Mixing standard and Wide parts - The crank may fit, but the chainline can end up wrong and the front end of the drivetrain can feel off.
- Using the chain-guide row for an ISCG guide - That row is only for a 2.5 mm guide mounted behind the BB cup, not for an ISCG-mounted guide.
- Leaving a spacer in place that the chart does not call for - This is a fast way to damage bearings during tightening.
- Assuming frame marketing names equal the correct stack - Model names help, but shell width and interface still decide the actual fit.
- Ignoring post-install clearance checks - A crank can feel fine by hand and still rub the chainstay under load.
- Skipping shell cleaning and inspection - Dirt, paint, and burrs can create the creak that gets blamed on the crank itself.
My rule is simple: if the crank spins freely but the bike still sounds wrong on the first hard pedal stroke, I go back to the spacer chart before I start chasing noise elsewhere. A bad spacer setup is much more common than a bad spindle.
The five-minute check I use before the bike leaves the stand
Once the crank is torqued, I do one last pass that takes very little time and catches most avoidable errors. First I confirm the etched crank family one more time. Then I compare it with the frame standard and the spacer row I used. After that I spin the crank, shift through the cassette, and watch for side play, drag, or chainstay contact.
- The crank family matches the frame standard.
- Every spacer in the stack is there for a reason.
- No spacer is left over on the bench because I forgot to remove it from the cup.
- The crank rotates smoothly with no tight spot.
- The chain clears the stays and runs cleanly across the cassette.
For most MTB builds, that short routine is enough to separate a clean installation from one that will come back with noise or wear problems. If I had to narrow the whole job down to one habit, it would be this: read the chart once, install exactly what it says, then verify the bike under real torque before calling it done.