The reservoir should be open for the bleed, then sealed again before the bike goes back on the trail
- On most hydraulic MTB brakes, the reservoir cap or cover comes off during bleeding.
- A bleed funnel, syringe, or bleed kit then takes its place so air can escape without making a mess.
- Leaving the cap fully on usually prevents a proper bleed and can trap air in the lever or reservoir.
- Reinstall the cap, bladder, O-ring, or bleed screw exactly as the manufacturer specifies before riding.
- If your exact brake model has a different procedure, follow the brand manual rather than a generic guide.
The short answer I give for most bike brakes
Take the cap off while you bleed, then put it back on when you are done. That is the rule I use on most MTB hydraulic systems, whether I am working on Shimano mineral oil brakes or a SRAM setup that uses a different reservoir design. The cap is part of the sealed riding system, but it is not meant to stay in place while you are purging air.There is one detail worth keeping straight: “off” does not always mean the reservoir is left wide open to the room. On many brakes, the bleed funnel or syringe occupies that opening, so the system is still controlled while air can rise out. Once the fluid is clear and the lever feels solid, I close the system again immediately. From there, the next question is why the reservoir has to be opened in the first place.
Why the reservoir needs to be open during bleeding
The reservoir cap is there to seal the brake for normal use, not to help air leave the system. During a bleed, you need a path for old fluid, bubbles, and any displaced air to move out while fresh fluid moves in. If the cap stays fully on, you are fighting the design of the brake rather than using it properly.
Think of the reservoir as the highest service point in the system. Air wants to rise there, which is exactly why the cap or cover comes off and a bleed tool takes its place. The tool gives the fluid somewhere to expand and gives bubbles a controlled route out. If you leave the brake open for too long, though, dust, moisture, and accidental spills become the next problem, so I keep the open time as short as possible.
For Shimano and SRAM, the principle is the same even though the hardware looks different. Shimano’s dealer manuals use a funnel at the lever end, while SRAM manuals use their own reservoir cap and bladder arrangement, but both are built around the same idea: open for service, sealed for riding. Once that is clear, the actual bleed sequence makes a lot more sense.How I bleed a bike brake without pulling air back in
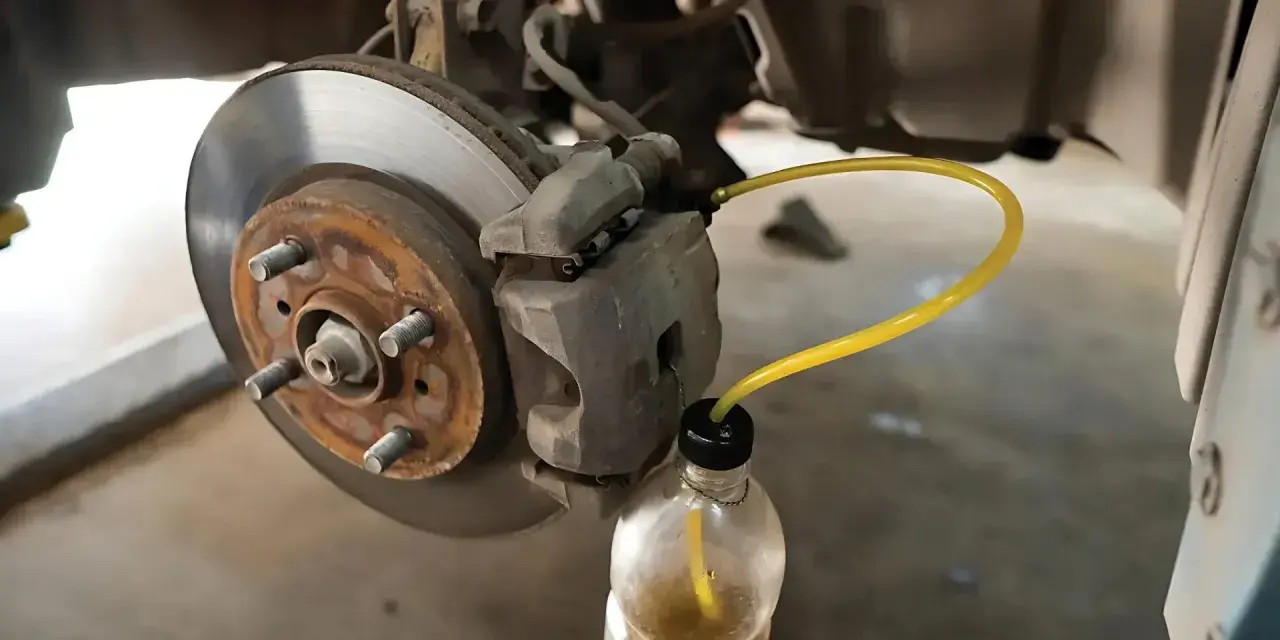
When I do this on a mountain bike, I want a clean path for fluid and no guessing. A bleed block is the spacer that keeps the pistons apart while the wheel and pads are out, and it is worth using every time. It keeps the caliper in the right position and stops you from pushing the pistons too far out while you work.
- Remove the wheel and pads, then install the bleed block so the pistons stay seated.
- Position the lever so the reservoir is level or slightly tilted according to the brake maker’s instructions.
- Remove the reservoir cap, bleed screw, or cover assembly, then fit the funnel, syringe, or service adapter.
- Open the caliper bleed port just enough to move fluid through the system, not enough to create a free-for-all.
- Push fresh fluid slowly until the old fluid is out and the bubbles stop appearing in the funnel or hose.
- Tap the lever body, hose, and caliper to dislodge trapped bubbles, then repeat the flow if the lever still feels soft.
- Close the caliper port, remove the tool in the correct order, and reinstall the cap, bladder, O-ring, or bleed screw.
- Clean any spill immediately, then reinstall the pads and wheel before checking lever feel again.
The key point is pace. A fast bleed often looks efficient, but it is the quickest way to leave micro-bubbles inside the lever or hose. If the lever feels firm in the stand but goes vague after a few squeezes, I assume there is still air trapped somewhere and I go back in rather than pretending it will “settle itself.” That is where brand-specific details start to matter.
Shimano, SRAM and the cap details that differ
Shimano and SRAM both expect the brake to be opened for service, but they do not open it in exactly the same way. Shimano typically uses a bleed funnel at the lever end, with the bleed screw and O-ring removed and refitted at the end. SRAM uses its own reservoir cap and bladder setup, and some models also have a separate bleed port cover at the caliper. The common thread is simple: the brake is open during the bleed and sealed again before you ride.
| System | Cap position during bleed | What takes its place | What I watch most closely |
|---|---|---|---|
| Shimano hydraulic brakes | Off | Bleed funnel and bleed screw/O-ring | Lever angle, soft bleed screws, and a clean seal on reassembly |
| SRAM MTB brakes | Off | Reservoir cap, bladder, and brand-specific bleed kit parts | Correct fluid type and careful refit of the bladder and cap |
| Other hydraulic systems | Off unless the manual says otherwise | The manufacturer’s service adapter | Do not improvise with a generic closed bleed |
The fluid type matters just as much as the cap. Shimano uses mineral oil, while SRAM’s range includes different fluid systems depending on the exact brake model, so I always check the lever and caliper markings before I touch a syringe or funnel. Mix the wrong fluid into the wrong brake and the cap position will be the least of your problems. Once the hardware is matched correctly, the remaining mistakes are usually about technique.
Common mistakes that make the lever feel spongy again
Most poor bleeds come down to a handful of repeat errors, not bad luck. I see the same problems again and again, especially on first DIY attempts.
- Leaving the reservoir too low and letting air get pulled back in.
- Using the wrong fluid for the brake model.
- Skipping the bleed block and letting the pistons move when they should stay fixed.
- Forgetting to level the lever, which leaves air trapped in the highest point of the master cylinder.
- Cross-threading a soft bleed screw or failing to seat the O-ring properly.
- Contaminating pads or the rotor with fluid, then blaming the brake for poor bite.
- Leaving the cap, bladder, or bleed screw loose after the job is finished.
If the lever feels good for the first few pulls and then starts wandering, I do not call that “normal bedding in.” I treat it as a sign that air is still in the system or a seal is not quite right. That is especially true on mountain bikes, where a long descent will expose any small mistake very quickly. Before the bike sees real trail force, I want a final check that proves the bleed is actually finished.
The last checks I make before the bike sees real trail force
- Squeeze the lever 10 to 15 times and make sure the bite point stays consistent.
- Inspect the reservoir, hose fittings, and caliper for any weeping fluid.
- Wipe the rotor and pads carefully if even a trace of fluid touched them.
- Spin the wheel and make sure the pads are not rubbing because the pistons were pushed unevenly.
- Take a short test ride and stop several times before heading into a proper descent.
If that test ride feels clean and the lever stays firm, the job is done the right way: the cap was off for the bleed, the system was sealed again at the end, and the brakes are ready for the trail. If anything still feels vague, I would stop there and trace the air path again rather than trusting the first impression.