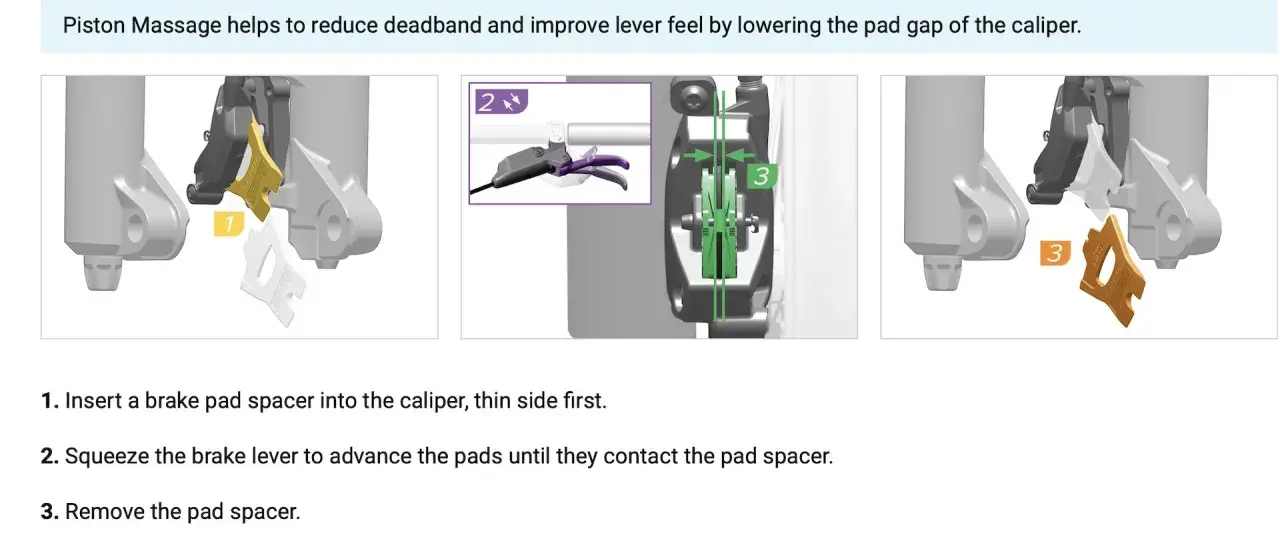
What matters before you touch the caliper
- Pad advancement is a piston reset, not a magic cure for every brake problem.
- It helps when lever throw is too long, the bite point has wandered, or the pistons are moving unevenly.
- Use the correct pad spacer for your exact SRAM caliper and keep the pistons clean and dry.
- If the lever still feels spongy after a few cycles, a bleed is usually the next sensible step.
- When pad material is 3 mm or less, replacement is due, not more pumping.
- After new pads or rotors go in, bed-in needs to be repeated before hard riding.
What the pad reset actually changes
In plain terms, the procedure pushes the caliper pistons forward so the pads sit closer to the rotor again. That reduces excess lever travel and can free up pistons that have started to move unevenly from dirt, dried residue, or long service intervals.
I think of it as a controlled reset rather than an adjustment in the usual sense. You are not making the pads bigger; you are restoring the point where the pads begin to bite, which is why it matters after pad wear, after a reach change, or after a lever has been pulled with the wheel out.
On current SRAM brake guidance, you will also see this idea described as piston massage or trail-side pad advance. The names change a bit, but the job is the same: put the pistons back where the brake can work properly, then check whether the system actually feels better. That distinction matters, because if the brake is weak for a different reason, the reset only hides the symptom for a short time and the next section is where you separate a useful fix from wasted effort.
When it helps and when it does not
| What you feel | What it usually points to | Best next move |
|---|---|---|
| Lever pulls very close to the bar, but there is no visible leak | The pistons may be sitting too far back | Run the pad-advance reset |
| Brake feel is soft after pad wear or a reach tweak | The pistons may need to be brought back into position | Reset the pistons, then re-check caliper alignment |
| One piston moves before the other | This is common during the first reset cycle | Keep pumping until both sides contact the spacer |
| Pads are 3 mm or less, or the rotor is below minimum thickness | Parts are worn out, not just out of position | Replace the pads or rotor instead of chasing lever feel |
| No improvement after a few reset cycles | Air, contamination, or a caliper fault may be present | Bleed the brakes, then service the caliper if needed |
SRAM’s maintenance guidance says to inspect pads every month, or more often in wet, muddy riding. I use that habit to catch problems early, because once the backing plate and pad material are down to 3 mm or less, the brake is telling you it needs new pads. For rotors, the common minimums are 1.55 mm for 1.85 mm rotors and 1.7 mm for 2 mm rotors.
If you have moved the lever reach closer to the bar, rerun the reset afterwards. Reach adjustment changes hand position; it does not put the pistons back where they belong. Once you know the symptoms that fit, the workshop version is straightforward and much less messy than people expect.
How I run the workshop version
- Clamp the bike in a work stand so the caliper stays steady.
- Remove the wheel from the affected brake, then take the pads out. If they are close to the wear limit, replace them now.
- Fit the correct SRAM pad spacer for that caliper. Use the spacer the brake family is designed for; the fit matters.
- Pull the lever several times until both pistons reach the spacer. It is normal for one side to move first.
- Remove the spacer and push the pistons back into the caliper bores with a plastic tyre lever.
- Repeat the advance-and-reset cycle until both pistons move smoothly and with similar speed.
- Reinstall the pads and the wheel.
- Loosen the caliper bolts, squeeze the lever lightly a few times, centre the caliper on the rotor, then tighten the bolts and spin the wheel to check for rub.
Use plastic, not metal, on the pistons. SRAM is clear that grease or brake fluid on the pistons can hurt performance and create rotor rub, so I keep the area clean and dry.
Monoblock calipers need a different reset
If a monoblock caliper was squeezed with no spacer or rotor installed, the pad gap can close up more than usual. SRAM’s reset for that case is specific: use the 3.8 mm side of the spacer first and squeeze the lever hard 5 times at roughly 22 lbs / 10 kg, then switch to the 1.85 mm side and squeeze lightly 5 times at about 4 lbs / 2 kg. Refit the wheel and re-centre the caliper afterwards.
That is not the same as the standard reset loop. It is there to restore pad gap after an accidental squeeze, and it is one of the few cases where spacer thickness really changes the outcome. Once that is clear, the quicker trail-side version makes more sense.
The trail-side version SRAM documents
SRAM’s trail-side fix is deliberately simple: if the lever is coming too far back and you cannot see a fluid leak at the lever, open the reach all the way out, pull the lever hard five times, then set the reach back to where you want it. It is a sensible get-you-home move when the bike has just developed more lever travel than you like.
I would treat that as a temporary reset, not the final answer. If the lever still feels odd, the pistons are not moving evenly, or the wheel starts rubbing again after a short ride, the proper workshop procedure is the better next step. On a long ride, that is often enough to keep the bike rideable; at home, I still prefer the full reset because it gives you more control over the result.
There is one simple rule I keep in mind here: if the issue improves for a few minutes and then comes back, it is probably not just a lever-position problem. That is usually the point where the conversation shifts from quick adjustment to actual brake servicing.
The mistakes that create pad rub or weak braking
- Using the wrong fluid or grease on the pistons. SRAM warns against this during troubleshooting, because it can reduce braking performance and invite rotor rub.
- Lubricating the pistons. That sounds helpful but works against piston return, which is why the lever feel can become inconsistent.
- Pulling the lever without a spacer or rotor in place. That can close the pad gap too far and create a new rubbing problem.
- Stopping after one cycle. If one piston is still lagging, repeat the reset until both move freely.
- Skipping caliper alignment. Even a good piston reset can end with drag if the caliper is not centred afterwards.
- Ignoring worn parts. Pads at 3 mm or less, or rotors below the minimum thickness, need replacement rather than more pumping.
Whenever I fit new pads or rotors, I repeat bed-in before hard riding. That transfer layer on the rotor is what turns a correct mechanical setup into predictable stopping power, and without it the brake can feel underwhelming or noisy. If you are used to setting brakes up and then forgetting about them, this is the bit that keeps the whole system honest.
One more practical detail: if a brake has been contaminated by fluid or oil, I do not try to outwork the problem with more pad movement. Contamination changes the friction behaviour at the pad and rotor, which means the real fix is cleaning, replacement, or both.
What I check before calling the job done
Spin the wheel and listen first. You want no persistent rub, no dead spot at the lever, and no lazy piston that only wakes up after several squeezes. If the lever still pulls excessively after the reset, or if the brake feels spongy again within a short ride, bleed the system before you assume the caliper is ruined.
For SRAM DOT fluid brakes, the maintenance guide suggests a bleed at least once a year; mineral oil systems are typically every two years, with shorter intervals if you ride hard, ride wet, or spend a lot of time in mud. I also check pad wear monthly, because the first sign that a brake needs attention is often simple friction material loss rather than a mysterious lever issue. The useful rule is simple: a clean reset solves position problems, a bleed solves air or fluid problems, and worn parts need replacement. If you keep those three buckets separate, the brake work becomes much easier to diagnose and much less frustrating. When the reset works, the lever feels firmer, the caliper centres more easily, and the bike is ready for the next ride; if you have fitted new pads or rotors, finish with a fresh bed-in before you trust the brakes on a long descent.