
Hydraulic disc brakes are one of the best upgrades on a trail bike, but they only feel right when the system is clean, sealed, and free of air. Is it hard to bleed brakes? For most riders, the answer is no, but it does demand the right fluid, the right kit, and a tidy workspace. The job is less about strength and more about sequence, cleanliness, and patience.
What you need to know before opening the system
- Bleeding bike brakes is usually a moderate DIY job, not a specialist rebuild.
- The hardest part is usually contamination control, not the actual fluid movement.
- Shimano-style and SRAM-style systems use different fluids and different bleed hardware.
- A first home bleed often takes 30 to 60 minutes; once you know the process, it is much faster.
- If the lever is spongy after a hose change or repair, bleeding is usually necessary, not optional.
The short answer is that the job is easier than it looks
If the brake system is healthy and the only problem is trapped air, I would call bleeding a manageable maintenance task. On a scale of difficulty, most riders land somewhere around 3/10 after a bit of practice and closer to 6/10 the first time they do it. That is because hydraulic brakes punish shortcuts: a tiny air bubble, a dirty syringe, or the wrong fluid can undo the whole job.What makes people nervous is not brute force. It is the idea that one mistake can affect braking feel straight away. I think that is fair, but it also means the feedback is immediate. If the lever still feels soft after a careful bleed, you know there is still air, a leak, or another problem worth investigating before you ride hard. That leads straight into the part that changes the difficulty most: the brake system itself.
Why some brake systems feel friendlier than others
| Factor | Why it matters | Effect on difficulty |
|---|---|---|
| Fluid type | Mineral oil and DOT fluid are not interchangeable. | Using the wrong one can damage seals or ruin the brake. |
| Bleed style | Some brakes use a funnel at the lever, others use one or two syringes. | More fittings usually means more chances to trap air if you rush. |
| Hose routing | Internal routing, long rear hoses, and tight frame layouts hold bubbles more easily. | The rear brake is often harder than the front. |
| Brake age | Old seals, dirty fluid, or sticky pistons make the system less predictable. | A simple bleed can turn into troubleshooting. |
In practice, a newer brake on a hardtail is usually straightforward. A full-suspension MTB with a long internally routed rear hose is more annoying, even if the actual bleed steps are the same. I also treat the fluid choice as non-negotiable: Shimano systems use mineral oil, while SRAM and Avid systems use DOT fluid. Get that wrong and the job stops being a maintenance task and becomes a repair problem. Once you understand that, preparation becomes the real advantage.
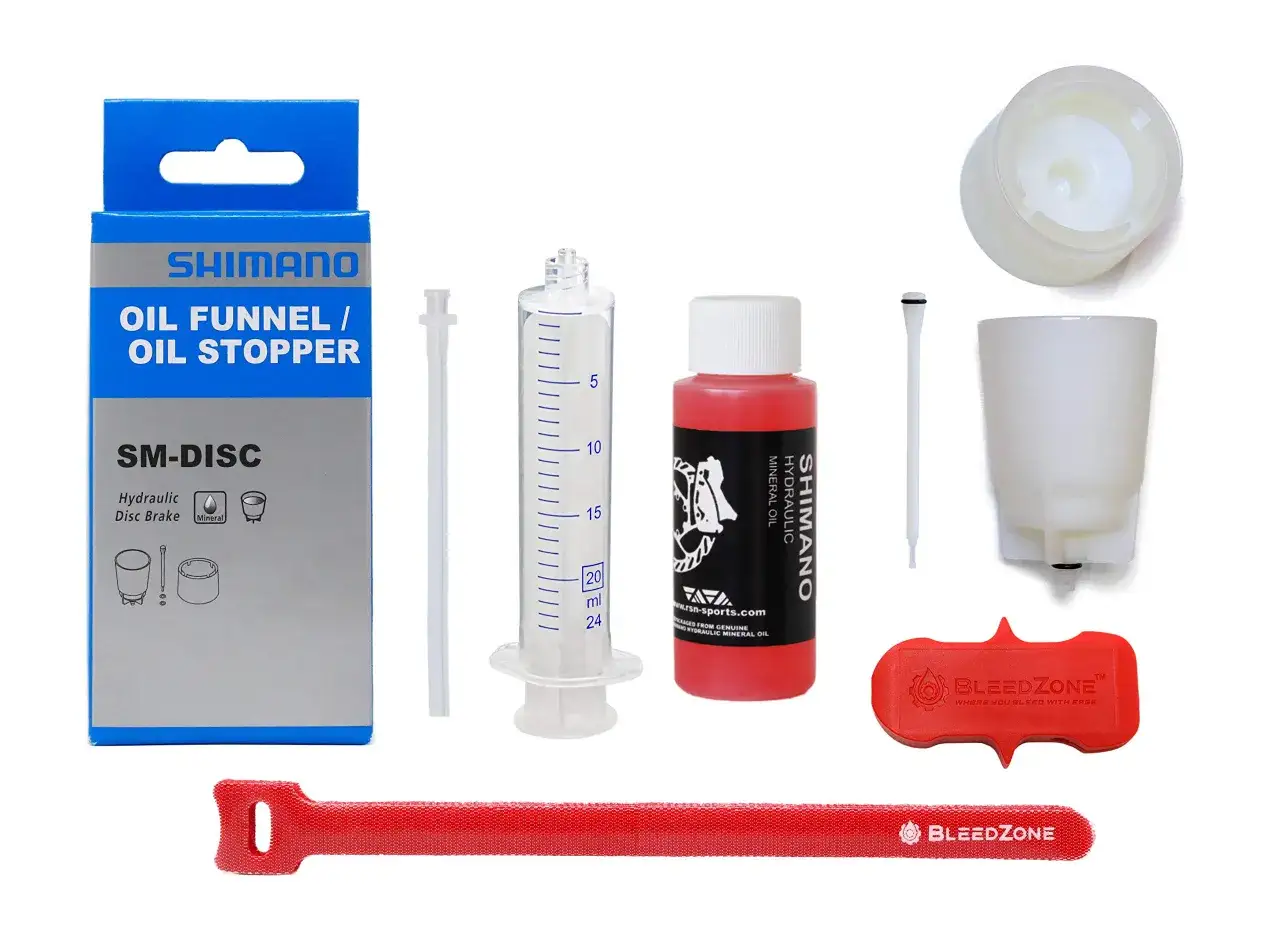
What you need before starting
I would not open a brake system until I had everything on the bench. That saves time, but more importantly it reduces the chance of air getting back into the system halfway through.
- The correct bleed kit for your brake model. A basic universal kit in the UK often starts around £25 to £35, brand-specific kits usually sit around £30 to £65, and workshop-grade kits can be much more.
- The correct fluid. Use only the fluid specified by the brake maker.
- A bleed block, which is a spacer that replaces the pads during service and keeps the pistons apart.
- Nitrile gloves and lint-free rags.
- Isopropyl alcohol for cleaning the caliper, lever, and any accidental spills.
- A torque wrench if you want to put the brake back together properly, not just “tight enough”.
If you only plan to do this once, buying the kit can feel expensive. If you keep two bikes running, or you regularly service your own MTB, the kit pays for itself quickly. For the cost of a single shop visit or two, you own the tools and can bleed again whenever the lever feel starts to fade. With the kit ready, the process itself becomes much less intimidating.
How I would bleed a typical mountain bike brake
- Remove the wheel and pads, then install the bleed block so the pistons cannot close up the caliper.
- Check the model manual and set the lever and caliper in the recommended position. Air rises, so orientation matters.
- Fill the syringe or funnel with the correct fluid and remove as much air from the tool as possible before connecting it.
- Open the bleed ports carefully and move fluid through the system until the bubbles disappear.
- Tap the hose, lever, and caliper gently to free trapped microbubbles. That small step often makes a bigger difference than people expect.
- Close everything up, clean the brake thoroughly, and make sure no fluid remains on the rotor, pads, or frame.
- Reinstall the pads, refit the wheel, and test the lever before riding.
The key point is that a bleed is not just “push fluid through until it looks done.” It is a controlled purge of air from the hose, caliper, and lever. If the lever still feels vague after a proper bleed, I do not keep pumping and hoping. I look for a leak, a bad seal, a contaminated pad set, or a hose fitting that is not seated correctly. That is where most bad jobs go wrong, which is why the next section matters so much.
The mistakes that make a bleed harder than it should be
- Using the wrong fluid. This is the fastest way to ruin a brake system.
- Leaving the pads in place. One spill can contaminate them and make the brake noisy or weak.
- Letting air into the syringe or funnel. A bleed tool full of bubbles just sends the problem back into the brake.
- Skipping the cleanup. Even a tiny smear of DOT fluid or mineral oil on the rotor is enough to change braking feel.
- Assuming every soft lever means air. Sometimes the real issue is a leak, worn seals, or a caliper that needs attention.
- Rushing the final test. A brake can feel okay in the stand and still need a careful check on the trail.
I see a lot of riders get stuck because they want the brake to work immediately after the first attempt, even though the system still has tiny bubbles moving through it. If you are using a well-maintained brake and the fluid is correct, the fix is usually patience rather than force. That said, not every job is worth doing at home, especially once cost and time enter the picture.
DIY or shop service in the UK
As a rough UK benchmark, Halfords lists a hydraulic brake bleed service at £30, and some local workshop pages show similar prices, with per-brake charges in the mid-20s. That is a useful reference point if you are deciding whether to buy tools or book the bike in.
| Option | Typical cost | Best for |
|---|---|---|
| DIY at home | £25 to £65 for a decent starting kit, plus fluid | Riders who will maintain more than one bike or want to learn the skill |
| Local bike shop | About £25 to £30 per brake | One-off bleeds, hose changes, or anyone who wants a guaranteed clean result |
| Full brake service | Higher if hoses, seals, or pads need replacing | Systems with leaks, damaged fittings, or chronic lever problems |
If you are only bleeding one bike once a year, a shop often makes more sense. If you ride hard, service a couple of bikes, or just want the confidence to fix a soft lever before a weekend in the hills, home bleeding is worth learning. Either way, the final check is the same: the lever should feel firm, the brake should bite consistently, and the rotor should stay clean. That is the real sign that the job is finished properly.
The habit that makes the next bleed much easier
The best way to make brake bleeding feel easy is to stop treating it like an emergency repair. I prefer to think of it as part of routine bike care, especially on MTB and off-road bikes that see mud, long descents, and hard braking. If you keep the system clean, note which fluid it uses, and avoid opening hoses unless you need to, the next bleed becomes predictable instead of stressful.For trail riders, the most useful habit is a quick lever check before a big ride. A firm lever, clean pads, and no visible seepage around the fittings tell you a lot before you point the bike down a rough descent. If the lever starts feeling vague again after a careful bleed, stop there and inspect the system instead of hoping it will sort itself out on the trail. That is the difference between a normal maintenance task and a frustrating afternoon in the garage.