
The rear end of a bike’s drivetrain looks simple until shifts get vague, noisy, or unreliable on rough ground. A clear rear derailleur diagram makes the whole mechanism easier to read, because it shows how the hanger, linkage, cage, pulleys, and limit screws work together. In this guide, I break down the parts, explain what each one does, and show how to use that knowledge when you are setting up or troubleshooting a mountain bike rear mech.
The parts that matter most at a glance
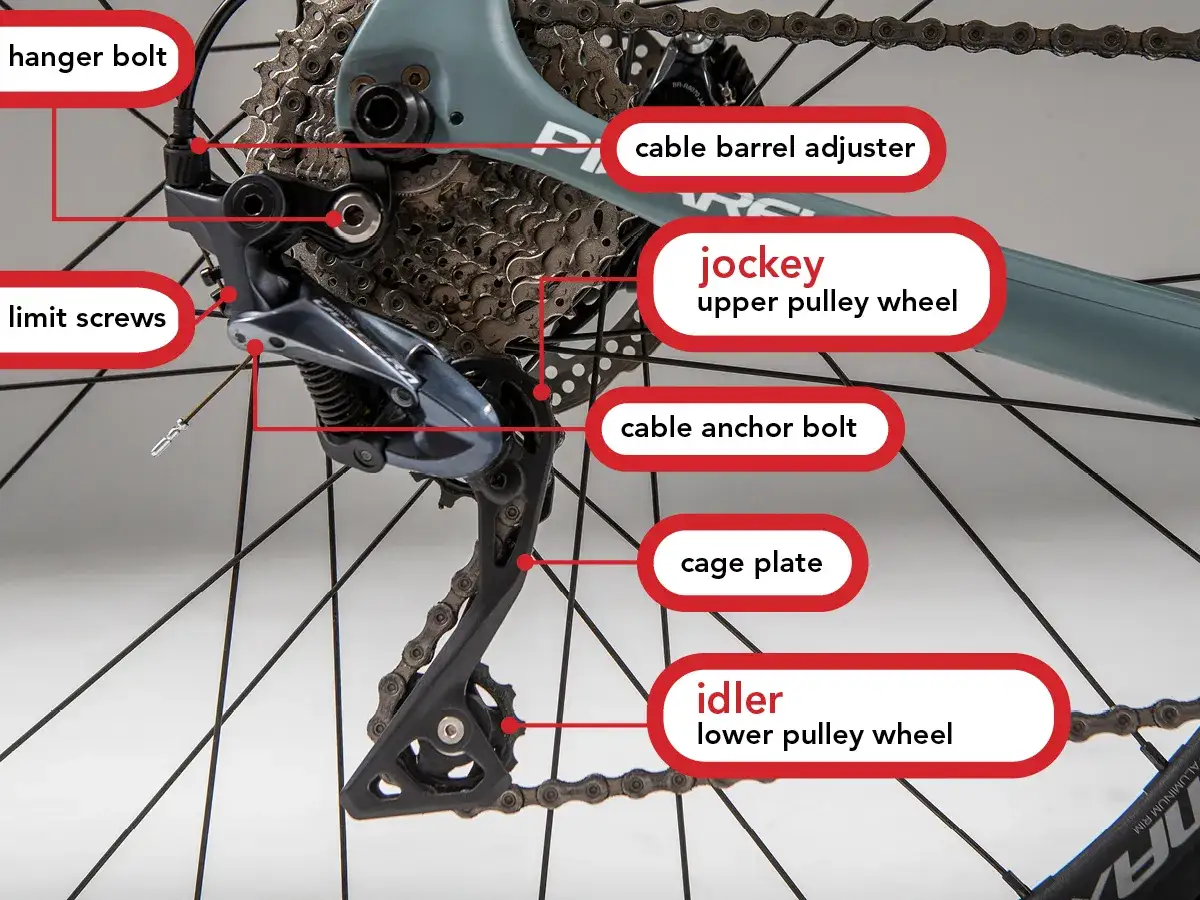
- The derailleur hangs from the frame hanger, then uses a pivoting linkage and cage to move the chain across the cassette.
- The upper pulley guides the chain onto the chosen sprocket, while the lower pulley keeps chain tension under control.
- Limit screws and B-tension are the two adjustments that most directly shape shift range and chain clearance.
- On modern off-road bikes, a clutch and correct hanger alignment usually matter more than tiny cable tweaks.
- If shifting suddenly gets worse after a knock, I check the hanger before I blame the derailleur itself.
How I read the drawing from the hanger outward
When I look at a derailleur drawing, I start at the frame mount and work outward. That keeps the order logical: hanger, body, cage, then pulleys. It also stops you from treating the derailleur like one single part when it is really a chain of small mechanisms.
| Part | What it does | What usually goes wrong |
|---|---|---|
| Hanger and hanger bolt | Connects the derailleur to the frame and lets it pivot in the right position | A bent hanger throws the whole mech out of line and can make good shifting impossible |
| Main body or parallelogram | Moves the derailleur sideways so the chain lines up with each sprocket | Worn pivots create slop, delayed shifts, and inconsistent indexing |
| Cage | Holds the pulley wheels and manages chain wrap | A bent cage adds noise, poor chain retention, and rough shifting under load |
| Guide pulley | Steers the chain onto the selected cog | Worn teeth or gritty bearings make the shift feel dull or hesitant |
| Tension pulley | Takes up slack and keeps the chain under control | Too much play or wear can add slap and inconsistent chain movement |
| Limit screws | Set the outer and inner end stops for the derailleur | Wrong limits can drop the chain off the cassette or into the spokes |
| B-tension adjuster | Sets the distance between the upper pulley and the cassette | Too little or too much gap hurts shifting, especially onto the largest cogs |
| Barrel adjuster and cable anchor | Fine-tune cable tension on mechanical systems | Friction, stretch, or poor routing makes indexing feel vague |
The important thing is that the derailleur is not just one moving piece. It is a stack of small systems, and most shifting problems come from the wrong one being out of line. Once you can name those parts, it becomes much easier to see why one adjustment changes shifting and another does not.
The parts that do the real work
I usually split the rear mech into three jobs: moving sideways, holding chain tension, and stopping the chain from going too far. That sounds obvious, but it is the reason two derailleurs that look similar on the shop wall can behave very differently on the trail.
The linkage and cage
The parallelogram is the moving linkage that lets the derailleur body shift across the cassette while staying controlled. The cage hangs below it and carries the spring tension that keeps the chain tight. On a modern 1x MTB, that cage is doing more work than most riders realise, because it has to manage a wide cassette without help from a front mech.
The pulley wheels
The upper pulley is the guide pulley, and the lower one is the tension pulley. In the UK, riders often call both of them jockey wheels, but they are not identical in function. If the guide pulley is worn or the lower pulley has excessive play, the shift can still “work” while feeling noisy, slow, or vague under pressure.
Read Also: Hope E4 Brakes - Optimize Your Trail & All-Mountain Ride
The screws and adjusters
Limit screws are not performance tuning screws. They are safety stops. The H-screw limits travel towards the smallest sprocket, and the L-screw limits travel towards the largest sprocket and the spokes. B-tension changes how close the upper pulley sits to the cassette, which is why it has such a big effect on wide-range off-road setups. On mechanical systems, the barrel adjuster then trims cable tension so the indexing lands cleanly.
That order matters, because if the linkage or cage is damaged, no amount of perfect cable adjustment will fully hide the problem. From there, the next useful step is understanding what changes on current MTB drivetrains and why the diagram may look slightly different from one bike to another.
Why modern MTB derailleurs look a little different
Off-road bikes have moved towards 1x drivetrains, wide-range cassettes, and stronger chain control. That changes the way the rear mech is drawn and the way it works in the real world. Some parts disappear, some become more important, and some are simply less forgiving than they used to be.
| Setup | What changes in the drawing | Why it matters on the trail |
|---|---|---|
| Mechanical shifting | Cable anchor, cable housing, and barrel adjuster are visible | Friction, stretch, and contamination can affect shift feel, but trail-side adjustment is simple |
| Wireless electronic shifting | No cable anchor; instead you see a motor and battery system | Shifts are very consistent, but battery charge and system compatibility become part of the equation |
| Clutch-equipped cage | An internal clutch sits near the cage pivot | Better chain control, less slap, and fewer dropped chains on rough descents |
| Modern hanger standards | The mount area is more standardised on many bikes, but still frame-specific | Alignment is still critical; a better hanger standard does not rescue a bent hanger |
On many current trail and enduro bikes, the clutch is not a luxury feature. It is one of the reasons the drivetrain survives rough ground without sounding loose and angry. I also think riders sometimes overestimate the value of tiny adjustment changes and underestimate the value of a straight hanger, clean cable routing, and the correct cassette range for the derailleur they are using.
That distinction matters when shifting is off, because the same symptom can come from very different causes. The good news is that the diagram makes those causes easier to sort.
The faults this drawing helps diagnose fast
When a bike shifts badly, I try to match the symptom to the part most likely responsible. That keeps me from chasing the wrong fix for half an hour.
| Symptom | Likely culprit | First check |
|---|---|---|
| Hesitates when shifting to bigger cogs | Low cable tension, housing friction, or B-tension set too close | Check the cable run, then confirm pulley-to-cassette clearance |
| Won’t reach the smallest cog cleanly | H-limit set too tight or hanger alignment off | Check the H-screw and look at the derailleur from behind |
| Chain wants to go into the spokes | L-limit too loose or hanger bent inward | Inspect the L-screw and the hanger first |
| Chain slap and noise on descents | Weak clutch, chain too long, or worn cage pivots | Test cage resistance and check chain length |
| Random skipping under load | Worn chain, worn cassette, pulley wear, or hanger alignment issue | Measure chain wear before blaming the derailleur |
- Check the hanger first if the bike has had a knock, crash, or transport damage.
- Confirm that the limit screws are stopping travel at the correct ends of the cassette.
- Set B-tension before chasing fine indexing, because pulley distance changes how the whole system behaves.
- Then fine-tune cable tension or electronic setup if the derailleur body is straight and the cage is intact.
- If the chain still skips under load, inspect wear on the chain and cassette rather than blaming the mech immediately.
This is where a good diagram earns its keep. It turns a vague complaint like “the gears are off” into a short list of parts I can inspect in order. From there, the final question is whether the derailleur needs adjustment, a small service part, or a full replacement.
What I would inspect before replacing anything
Before I buy a new rear mech, I want to know whether the problem is actually elsewhere. A surprising number of shifting issues come from parts that are cheaper and easier to replace than the derailleur itself.
- Pulley wheels are worth checking first if the teeth are hooked, the bearings feel gritty, or there is obvious side play.
- Cable and housing are the first things I replace on a mechanical setup if shifting feels sticky or inconsistent.
- Hangers should be checked with proper alignment, because a bent hanger can make a good derailleur behave badly.
- The cage can sometimes be replaced on certain models, but if it is badly bent I usually look at the whole unit.
- The body and pivots are the big red flag; if the derailleur has sloppy parallelogram movement, replacement often makes more sense than chasing a temporary fix.
When I choose a replacement, I match speed, mounting standard, cage length, cassette range, and actuation type before I look at anything else. That is the practical value of understanding the diagram: it helps you separate the parts that can be serviced from the parts that need to be matched correctly in the first place. If I had to keep one rule in mind, it would be this: read the hanger and the body before you touch the screws. Most bad shifting is not solved by random tweaking; it is solved by finding the part of the system that is out of line, worn, or incompatible.