A bottom bracket looks small, but it controls how the crankset fits, how smoothly the drivetrain turns, and how easy the bike is to service. A bike bottom bracket diagram is useful when you need to match parts, solve a creak, or understand why one crankset fits and another does not. For MTB and off-road bikes, that matters every time you replace a crank, order bearings, or try to quiet a noisy frame.
The key checks are shell width, shell type, and spindle standard
- Shell width is the first number I match because 68 mm, 73 mm, 89.5/92 mm, and wider shells use different cups and spacers.
- Threaded and press-fit systems may look similar in a drawing, but they rely on different interfaces and tolerances.
- Spindle type still matters: Shimano 24 mm, 30 mm systems, and SRAM DUB do not share the same cups.
- Spacer stacks set chainline and clearance, especially on Boost 148 mm frames.
- Sealing is what keeps mud and wash water out of the bearings, which is where most off-road wear starts.
How the parts fit together
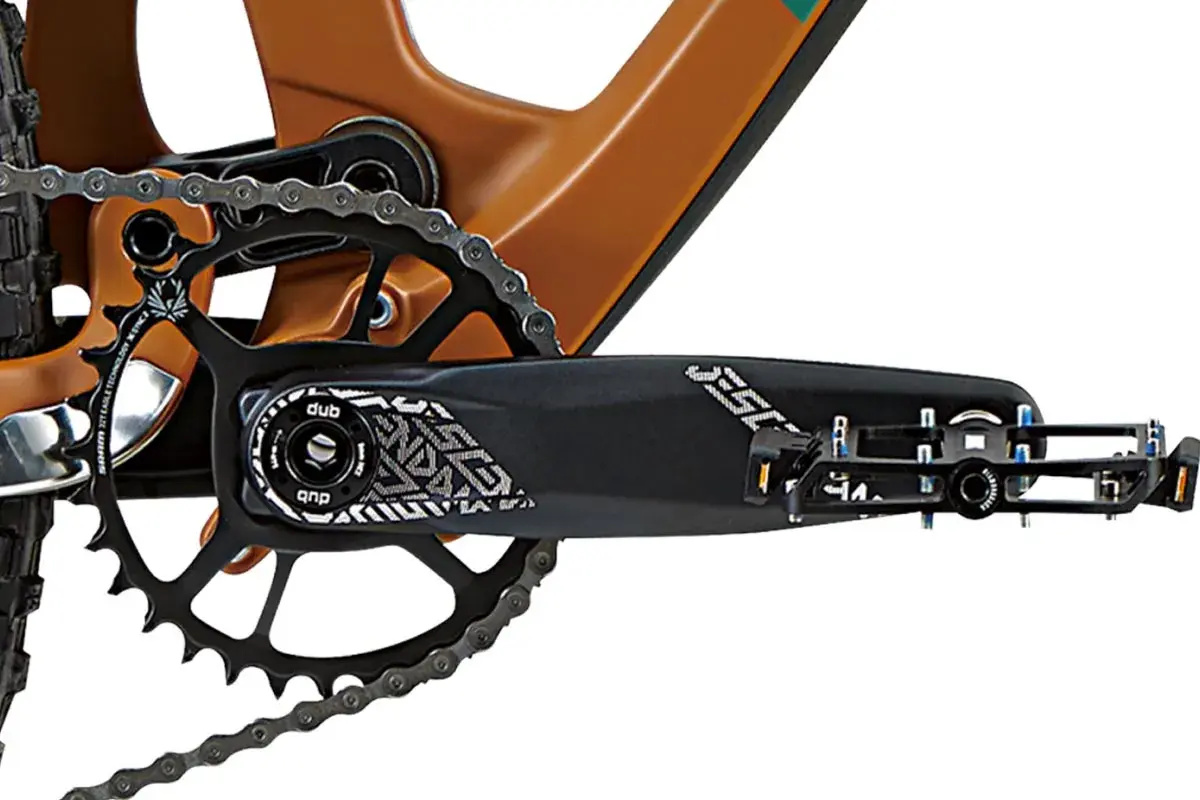
When I read a bottom bracket drawing, I treat it as an exploded view of one working system. The frame’s bottom bracket shell sits in the centre, the cups or bearings sit on either side, the spindle passes through the bearings, and the crank arms attach to the spindle ends. Around that core you’ll usually see seals, spacers, a wave washer or preload adjuster, and sometimes an inner cover that keeps grit away from the moving parts.
- Bottom bracket shell is the frame opening that everything has to match.
- Cups hold the bearings in threaded systems and often carry the bearing races in press-fit systems.
- Bearings let the spindle turn with as little friction as possible.
- Spindle joins both crank arms and transfers pedal force through the BB.
- Spacers move the crankset into the right position and keep the chainline where it should be.
- Seals and covers slow down the ingress of mud, water, and fine grit.
- Preload parts remove side play without clamping the bearings too tightly.
The big visual difference in the diagram is simple: threaded BBs screw into the shell, while press-fit BBs are pushed into a smooth bore. I also check which side is labelled drive side, because the cup orientation and spacer stack are not always symmetrical. Once you can name the parts, the next step is matching the diagram to the standards used on real MTB frames.
The main standards you will see on MTB frames
Shimano’s current MTB documentation still splits the job between 68/73 mm threaded shells and 89.5/92 mm press-fit shells, which is a useful reminder that shell width is not a guess. SRAM’s current MTB compatibility charts go a step further and make you check the frame shell width, inner diameter, crank spindle type, and the right spacer stack before you buy.| Standard | What the diagram usually shows | Typical MTB use | Practical note |
|---|---|---|---|
| BSA / English threaded | 1.37" x 24 TPI threads, usually 68 or 73 mm shell width | Classic trail, XC, and hardtail frames | Easy to service, and the threaded cups make diagnosis straightforward |
| T47 threaded | 47 mm thread diameter with a 1.0 mm pitch | Modern frames that want a large diameter and threaded serviceability | Useful when a brand wants a stiffer-feeling interface without giving up threaded cups |
| PF92 / Shimano press-fit | 89.5/92 mm shell width with a smooth bore | Very common on MTB frames that use 24 mm Shimano-style cranks | Fit quality matters more here; a clean, round shell is everything |
| PF30 | 46 mm shell I.D. with 73 or 83 mm shell width | Seen on some older or wider MTB frames | Still relevant when you are replacing parts on an existing bike rather than buying new |
| BB30 | 42 mm shell I.D. with 73 or 83 mm shell width | Older direct-fit systems and some conversions | Can work well, but it is less forgiving if the shell or bearings are marginal |
The point of the table is not to make the topic feel technical for its own sake. It is to show you that the drawing only becomes useful when you can tie it to a shell width, a thread form, and the spindle family underneath it. That is the bridge from a generic diagram to your own bike.
How to read the diagram for your own bike
My usual workflow is simple and avoids most expensive mistakes. If you follow it in the same order, the diagram stops being a puzzle and starts acting like a checklist.
- Find the shell width first. On a frame diagram, that is the number that decides whether you are dealing with 68 mm, 73 mm, 89.5/92 mm, or another interface.
- Decide whether the shell is threaded or smooth bore. A threaded shell tells you the cups screw in; a smooth bore tells you the cups or bearings press in.
- Identify the crank spindle type. Shimano 24 mm cranks, 30 mm systems, and SRAM DUB setups do not share the same BB parts, even if the frame looks similar.
- Check the spacer stack. Some systems need 2.5 mm spacers, inner covers, or side-specific shims to keep the chainline correct.
- Confirm rear-end spacing and chainline. On MTB, 142 mm and 148 mm rear spacing are common, and a mismatch here can create poor shifting or tyre and chainstay rub.
I also pay attention to the orientation of the drive-side cup and any preload hardware. Some diagrams are drawn from the non-drive side, some from the drive side, and the visual order can be misleading if you do not read the labels. Once the fit is understood, the next questions are usually about noise, play, and wear.
What goes wrong when the fit is off
Most BB problems sound mysterious until you separate the symptoms. In the workshop, I usually start with noise under load, then side play, then roughness when the crank is spun by hand. That order saves time because not every creak is a worn bearing, and not every rough bearing is the real source of the sound.
| Symptom | Likely cause | What I would check first |
|---|---|---|
| Creaking only when pedalling hard | Dry threads, a loose cup, or a poor interface between cup and shell | Thread condition, grease or compound on the interface, and cup torque |
| Side-to-side play | Preload not set correctly, missing spacer, or worn bearings | Spacer stack, preload adjuster, and bearing condition |
| Rough rotation by hand | Contaminated or damaged bearings, or a bent spindle | Seal condition and whether the crank still spins smoothly out of the frame |
| Noise that returns after a fresh install | Wrong interface, shell out of tolerance, or a press-fit that is not seated squarely | Frame spec, cup compatibility, and whether the cups sit flush |
Threaded systems are usually easier to diagnose because the cups lock mechanically into the shell. Press-fit systems can be perfectly reliable too, but they depend more heavily on shell quality, correct tools, and good installation technique. If the frame is out of tolerance, no amount of wishful thinking will turn the wrong BB into the right one. That is why maintenance habits matter so much on off-road bikes.
Maintenance choices that actually make a difference on trails
For MTB use, I care far more about sealing and preparation than about marketing claims. Mud, grit, and repeated washdowns will punish a bottom bracket faster than dry-road riding ever will, which is why I clean and inspect the area before I start blaming the bearings.
- Use the right compound on threaded parts. I usually use grease or anti-seize only where the frame and cup maker recommends it, because the wrong product can hide a bad fit or make removal a nightmare later.
- Keep the shell clean before installation. Dirt in the threads or a film of old sealant can change how a cup seats.
- Do not over-wash the BB area. High-pressure water drives contamination past the seals faster than normal trail splash.
- Replace bearings when roughness appears. A gritty feel under finger spin is usually the point where service stops paying off.
- Treat a persistent creak as a fit problem first. If the noise returns after a proper clean and reinstall, I start checking compatibility rather than assuming the bearings are the only issue.
In wet UK conditions, the useful habit is not waiting for a total failure. I would rather inspect early, replace a tired bearing before it destroys the cup or spindle, and keep the drivetrain quiet when the trail is at its worst. Once you know how the parts behave in service, the last step is making sure you buy the right replacement in the first place.
What I would check before ordering a replacement
Before I order a bottom bracket, I write down five details: shell width, shell type, shell I.D. or thread form, crank spindle standard, and spacer stack. That sounds basic, but it is exactly where most wrong purchases happen. SRAM’s current MTB charts are a good reminder that the frame and the crank have to be chosen together, not separately.
- Frame shell width in millimetres.
- Threaded or press-fit interface.
- Shell I.D. or threadform such as BSA or T47.
- Crankset spindle family such as Shimano 24 mm, 30 mm, or DUB.
- Spacer stack and chainline requirement, especially on Boost or other wide-rear-end frames.
If you keep those details together, the diagram becomes a fit map instead of a guessing game. That is the difference between a quiet, long-lasting drivetrain and a BB swap that needs repeating after the first muddy ride.