An Avid Elixir brake bleed is one of those jobs that rewards patience more than brute force. I’ll show you what the bleed is fixing, which DOT fluid and tools belong on the bench, how to move air out of the lever and caliper, and how to tell whether the brake is actually sorted afterwards. I’ll also point out the small setup mistakes that make older Elixir brakes feel vague even when the fluid change looked tidy.
What matters before you crack the system open
- Use DOT 5.1 or DOT 4 only. Never put mineral oil or DOT 5 in an Avid Elixir system.
- Bleed after any hose change or opening of the system. Once air has entered the line, the job is no longer optional.
- Keep the lever in range. On Reach Adjust models, the lever tip needs to sit about 75-80 mm from the handlebar centreline during the bleed.
- Plan for clean fluid handling. Nitrile gloves, eye protection, and a bleed block make the work cleaner and safer.
- Expect a second pass if the fluid is dark. Severely discoloured DOT usually means a proper flush, not a token top-up.
What the bleed is actually fixing
The whole point of the procedure is simple: remove trapped air and refresh old DOT fluid. Air in a hydraulic brake compresses, so the lever feels soft, the bite point moves around, and power fades when you want the brake to stay consistent. On a trail bike, that is not a small annoyance. It changes how confidently you can brake on wet roots, long descents, and loose UK terrain.
SRAM’s Elixir service manual recommends bleeding at least once a year, and sooner if you ride frequently or aggressively. I treat that as a minimum, not a target. If the fluid in the lever syringe comes out dark or discoloured, I assume the system has been sitting on tired fluid for a while and I plan on a full flush rather than a quick top-off.
There is one important catch: a bad feel is not always just air. Contaminated pads, a leaking fitting, or worn seals can mimic the symptoms of an air pocket. That is why I always start by deciding whether the brake really needs a bleed or whether it needs cleaning or parts. Once that is clear, the actual procedure makes a lot more sense.
The Elixir bleed workflow I trust
When I do this on the bench, I keep the process slower than most people expect. A tidy first bleed usually takes me 30 to 45 minutes per brake, and I leave extra time if the fluid is badly discoloured or if the brake has already been opened for a hose change.
Prepare the bike and the bench
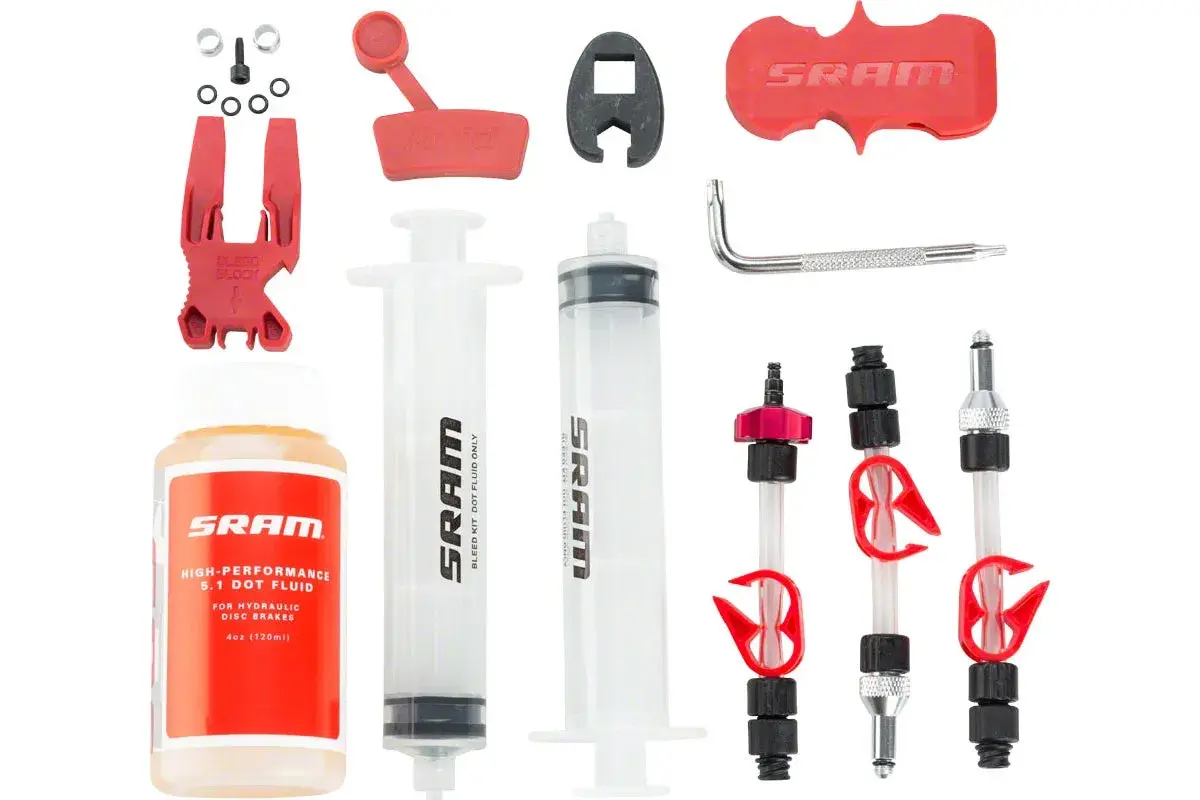
I start with a clean work area because DOT fluid is unforgiving. The parts and tools I want within reach are safety glasses, nitrile gloves, a T10 Torx, isopropyl alcohol, a clean lint-free rag, an Avid bleed kit, a bleed block, 2.5 and 4 mm hex wrenches, a sharp pick, and fresh DOT 5.1 or DOT 4 fluid.
I remove the wheel, then take out the pads and spreader clip before the first syringe goes anywhere near the bike. The bleed block goes into the caliper in place of the rotor and pads. It is just a spacer, but it matters because it keeps the pistons from moving too far and stops fluid from landing on the pads.
Never let DOT fluid touch the pads. If it does, I replace the pads rather than trying to rescue them. That is usually cheaper than chasing poor braking later.
Fill and degas the syringes
The manual calls for one syringe to be about half full and the other about a quarter full. I fill them, point the tips up, tap the sides to bring bubbles to the top, and then slowly push the air out of the tip with a rag wrapped around it. After that, I close the syringe clamp and degas the fluid.
Degassing just means pulling dissolved air out of the fluid before it goes into the brake. I leave the clamp shut, pull the plunger back, watch bubbles form, lightly tap the syringe, then release and push the air out. I repeat that several times. You will never remove every microscopic bubble, but you can get the fluid clean enough that it does not fight the bleed process later.
Move the fluid through the system
- Remove the caliper bleed port screw with the T10 Torx, then thread in the half-full syringe with no air gap at the tip.
- If the brake has Contact Point Adjustment, back the adjuster off so the bleed port sits at its highest point. On fixed-port versions, wind the adjuster back to the stop.
- On Reach Adjust models, set the lever so the tip sits about 75-80 mm from the handlebar centreline. SRAM notes that if the lever sits too far out, bleeding can become impossible.
- Remove the lever bleed port screw and install the quarter-full syringe with no air gap at the tip.
- Hold both syringes upright. Pull the caliper syringe plunger to create a vacuum, then squeeze and release the lever ten times, letting it snap back each time.
- Repeat that cycle until the large bubbles stop appearing.
- Close the caliper syringe clamp, remove the syringe, and reinstall the caliper bleed screw with a clean rag ready for the spill that usually follows.
- Open the lever syringe clamp, pull a vacuum again, gently pressurise the system, and repeat the squeeze-and-release cycle at the lever until the bubble stream stops.
- Close the lever syringe, remove it, reinstall the bleed screw, and wipe every trace of fluid from the lever and caliper.
I do not yank the plunger hard. If you pull too aggressively, you can suck air past the syringe seal and create more bubbles than you started with. That is one of those mistakes that turns a simple bleed into an afternoon.
Read Also: Trail Bike Service Cost UK - What You Really Pay
Finish with a hard test
Once both ends are sealed, I reinstall the pads and wheel, then pull the lever hard several times. I check the compression nut on the lever and the banjo bolt on the caliper for any sign of wetness. If the fluid that came out was badly dark, I am happy to repeat the whole process once more rather than pretending a single pass was enough.
That leaves you with a brake that is closed up properly and ready to be judged on feel, not just on the stand. The next step is knowing which mistakes undo that work.
The mistakes that make the lever feel worse
Most poor bleeds are not mysterious. They are usually just one small process error repeated at the wrong moment. I see the same handful of problems again and again, especially on older Elixir brakes that have spent years on wet or gritty bikes.
| Problem | Why it matters | What I do instead |
|---|---|---|
| Using the wrong fluid | Mineral oil and DOT 5 are not compatible with this brake system. | I use only Avid High-Performance 5.1 DOT fluid, or DOT 4 if that is the only safe option available. |
| Leaving air in the syringe tip | That air travels straight into the brake and shows up as a soft lever later. | I push the fluid to the tip until there is no gap, then tap out the bubbles before connecting the syringe. |
| Skipping the bleed block | The pistons can move too far and contaminate the pads or overfill the system. | I always fit the correct bleed block before the system opens. |
| Pulling the plunger too hard | Air can be drawn past the syringe seal, which creates more bubbles instead of fewer. | I use a light vacuum and repeat the cycle patiently. |
| Bleeding with the lever too far out | The system can trap air in a high spot, making the bleed frustrating or impossible. | I keep Reach Adjust within the 75-80 mm window before I start. |
| Ignoring contamination | DOT on the pads or rotor can make the brake feel weak even if the bleed was technically clean. | I clean the rotor immediately and replace pads that have been contaminated. |
If I had to name the single most common workshop failure, it would be rushing the syringe prep. A neat bleed starts before the syringes ever touch the bike. Once the system is clean and correctly set up, the result is much easier to judge.
How I judge the result on the stand and on the trail
I never trust lever feel alone after the bike is still on the stand. A brake can feel acceptable in the workshop and then reveal a problem the first time you load it on a descent. So I check three things: lever firmness, leak-free fittings, and repeatability under load.
- Firmness - The lever should feel consistent from the first squeeze to the tenth. If it firms up only after several pumps, there is still air somewhere.
- Return - The lever should snap back cleanly. Slow return can point to contamination, a sticky lever pivot, or a deeper internal issue.
- Power - The brake should bite with the same feel each time, not wander from firm to vague and back again.
- Dry fittings - The lever body, compression nut, hose, and caliper should stay dry after repeated hard pulls.
After that, I take the bike for a short test ride and use the brake the way I actually ride it: short grabs, hard stops, then a longer descent if the terrain allows it. If the brake stays consistent, the bleed worked. If the lever slowly changes feel again, the next section is where I look.
When a bleed is not enough and parts need attention
There is a point where another bleed stops being the right answer. On older Elixir brakes, I am comfortable doing one careful second pass if the fluid was filthy or if I clearly saw bubbles moving through the system. After that, I start looking for wear, leaks, and contamination instead of just repeating the same job.
| Symptom after bleeding | Likely cause | Next move |
|---|---|---|
| Lever firms up, then fades again | Residual air or a tiny leak | Repeat the bleed once, then inspect the lever and caliper fittings carefully. |
| Fluid weeps around the banjo or compression nut | Damaged seal, poor hose cut, or loose assembly | Rebuild the connection and check the o-rings before bleeding again. |
| Lever feels firm but braking power is poor | Contaminated pads or rotor | Clean the rotor and replace the pads if DOT fluid touched them. |
| Brake needs constant pumping to feel normal | Internal wear in the lever or caliper | Stop chasing air and inspect the hydraulic parts for wear or seal failure. |
| Brake cannot be bled cleanly even with the lever adjusted correctly | Age-related wear or a setup problem | Recheck lever position, then decide whether the brake is worth rebuilding or replacing. |
On a bike that has spent years in British mud and winter wet, I am less sentimental about tired hydraulic parts than I used to be. If the brake is leaking, inconsistent, or clearly beyond a clean bleed, I would rather fix the root problem than keep flushing fluid through a system that is already telling me it is worn out.
The small habits that keep Elixirs predictable on muddy UK rides
Once the brake is working properly, the best maintenance is boring. That is usually a good sign. I keep a few habits in place so the next bleed is easier and the brake behaves the same way when the weather turns ugly.
- I bleed the brakes at least once a year, and more often if the bike sees regular wet or aggressive riding.
- I keep DOT fluid sealed and fresh, because old fluid absorbs moisture and behaves worse than it should.
- I clean any spill immediately with isopropyl alcohol and a lint-free rag, especially around the frame and lever body.
- I do not leave the syringe hose clamps closed after the job, because that can damage the tubing.
- I never reuse DOT fluid, and I dispose of used fluid through proper hazardous-waste channels.
- I replace pads immediately if there is any doubt about contamination, then bed them in again before a big ride.
That routine does not just keep the brake working; it keeps the next service predictable. If I had to choose one thing to remember, it is this: a clean bleed is mostly a contamination-control job, and the bikes that feel best on the trail are usually the ones that were treated carefully long before the lever ever went soft.