Hydraulic brake fluid looks like a small maintenance detail, but in a mountain bike it can quietly affect power, lever feel, paint, and long-term reliability. The reason it behaves so aggressively is a mix of chemistry and contamination risk: some fluids absorb moisture, some attack paint and seals, and the wrong fluid in the wrong system can cause real damage. In this guide I’ll break down what makes it corrosive, how that shows up on a bike, and what I would do to prevent expensive problems.
The practical answer in a few points
- Most DOT 3, DOT 4, and DOT 5.1 fluids are glycol-based, which means they absorb moisture over time.
- Moisture lowers boiling point and raises the risk of internal corrosion in calipers, pistons, fittings, and bleed hardware.
- Brake fluid can damage paint, decals, and some plastics fast enough that spills should be cleaned immediately.
- Shimano, Magura, and TRP-style systems usually use mineral oil, while Hope and Hayes use DOT fluid, so the fluid type must match the brake.
- If the lever feels spongy, the fluid looks dark, or the bike has been serviced badly, I treat that as a maintenance warning, not a cosmetic issue.
What makes brake fluid aggressive
The word “corrosive” gets used loosely here, so I like to separate the chemistry from the workshop damage. Fresh brake fluid is not a random acid, but many brake fluids, especially DOT fluids, are designed with solvents and additives that interact badly with moisture, coatings, and incompatible rubber. That is why they can protect a braking system in one sense and still damage it in another.
Glycol-based fluids pull in moisture
DOT 3, DOT 4, and DOT 5.1 fluids are usually glycol based, and hygroscopic, which means they absorb water from the air. In a sealed brake system that is still enough to matter, because hoses, seals, and bleed points are never perfectly invisible to moisture over time.
Water is the real enemy inside the system
Once water is in the fluid, the boiling point drops and corrosion becomes much easier to start. Castrol notes that as little as 3.5% water can reduce brake-fluid effectiveness by up to 40%, which is a good reminder that age matters even if the reservoir still looks full. On a bike, that moisture ends up concentrating at the places you least want it, such as pistons, bleed screws, and banjo fittings.
Read Also: Hydraulic Bike Brakes - Top-Up or Bleed?
Paint, plastics, and seals are vulnerable too
Brake fluid can also soften or stain paintwork, and it may swell the wrong seals if a system is filled with the wrong chemistry. I treat that as a separate problem from corrosion inside the brake itself, but in practice the rider experiences both together: ugly marks on the frame and a brake that feels wrong.
That chemistry is the reason a tiny spill can turn into a bigger maintenance issue, which is why the bike-specific consequences matter next.
Why it matters on a mountain bike
On a trail bike, brake fluid has less room to hide than it does in a car. It can drip onto a matte frame, creep into a rotor or pad, and stay trapped around a lever clamp or caliper piston where dirt and moisture keep working on it. In wet UK conditions, that matters even more because bikes are washed, ridden through grit, and stored cold and damp far more often than many riders realise.
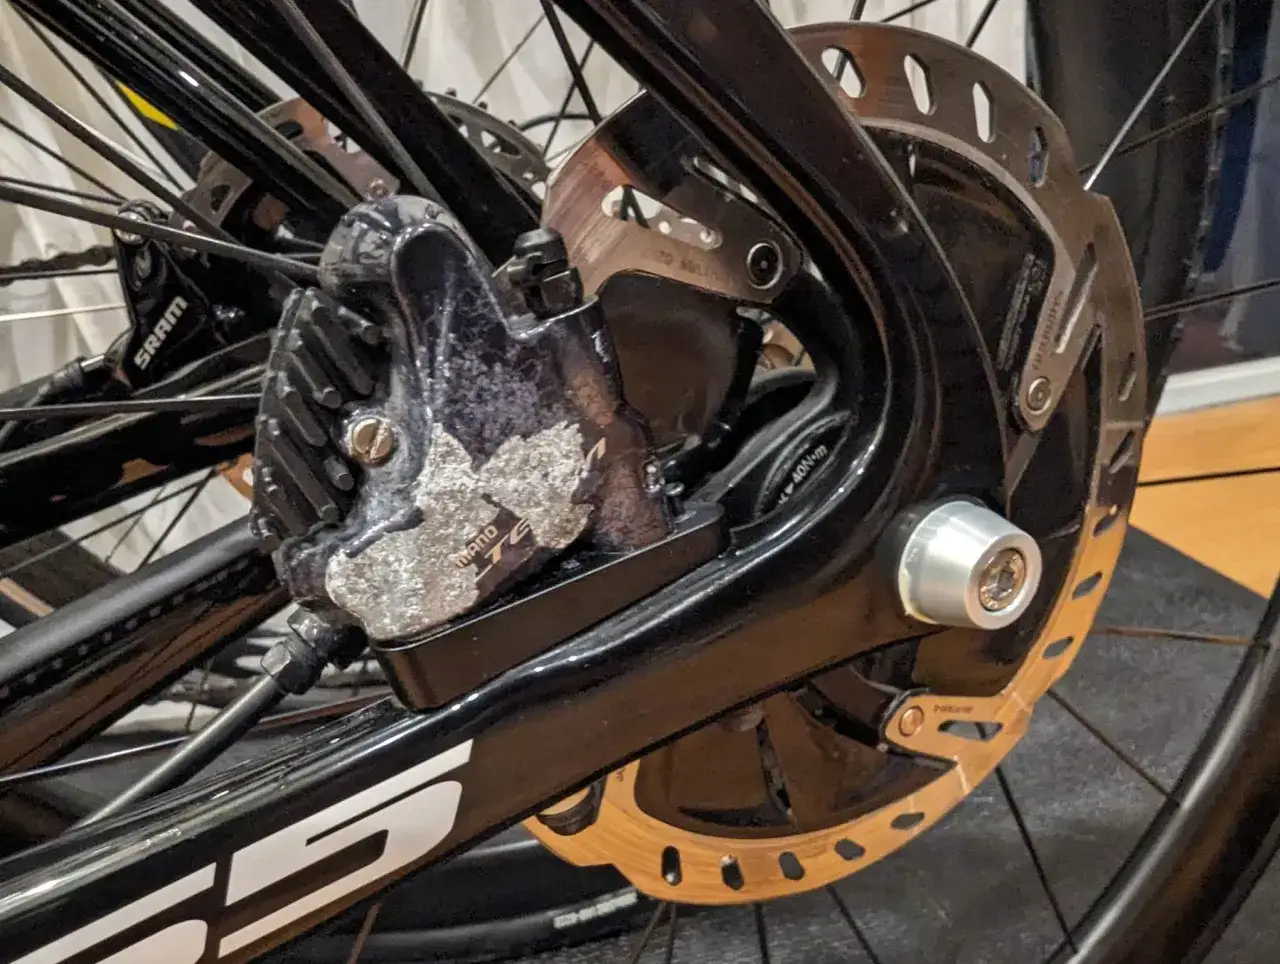
The visible damage is usually the easiest to spot. Fluid on paint can leave dull patches or lifted clear coat, and fluid on pads or rotors can create squeal, weak initial bite, and that annoying feeling that one brake is always behind the other. The hidden damage is slower: moisture-laden fluid can encourage rust inside steel hardware and make pistons move less freely.
I also see riders underestimate how quickly contaminated pads can ruin a good setup. Once brake fluid has soaked into pad material, you are usually dealing with a replacement, not a clean-up job. That is one of those moments where trying to save a few pounds costs more time and frustration later.
So the next question is not just “what is brake fluid”, but “which fluid does this brake actually need?”
DOT fluid and mineral oil are not the same thing
Bike brakes fall into two broad families, and they are not interchangeable. Shimano hydraulic systems use mineral oil, which Shimano describes as gentler on frame paint than DOT fluid. By contrast, brands such as Hope and Hayes build around DOT fluid. The wrong choice does not give you a slightly different lever feel. It can damage seals or leave you with a brake that needs a full strip-down.
| Fluid family | Common bike examples | What it does well | Where the risk comes in |
|---|---|---|---|
| DOT 4 / DOT 5.1 | Hope, Hayes, some older or performance-focused systems | Strong high-temperature performance and wide availability | Absorbs moisture, can mark paint, and needs perfectly compatible seals |
| Mineral oil | Shimano, Magura, TRP/Tektro | Usually gentler on paint and easier to handle in a home workshop | Brand-specific, still must match the exact brake system |
| DOT 5 silicone | Rare in bicycles | Not commonly used where bike systems are specified around other fluids | Do not assume compatibility just because the number is higher |
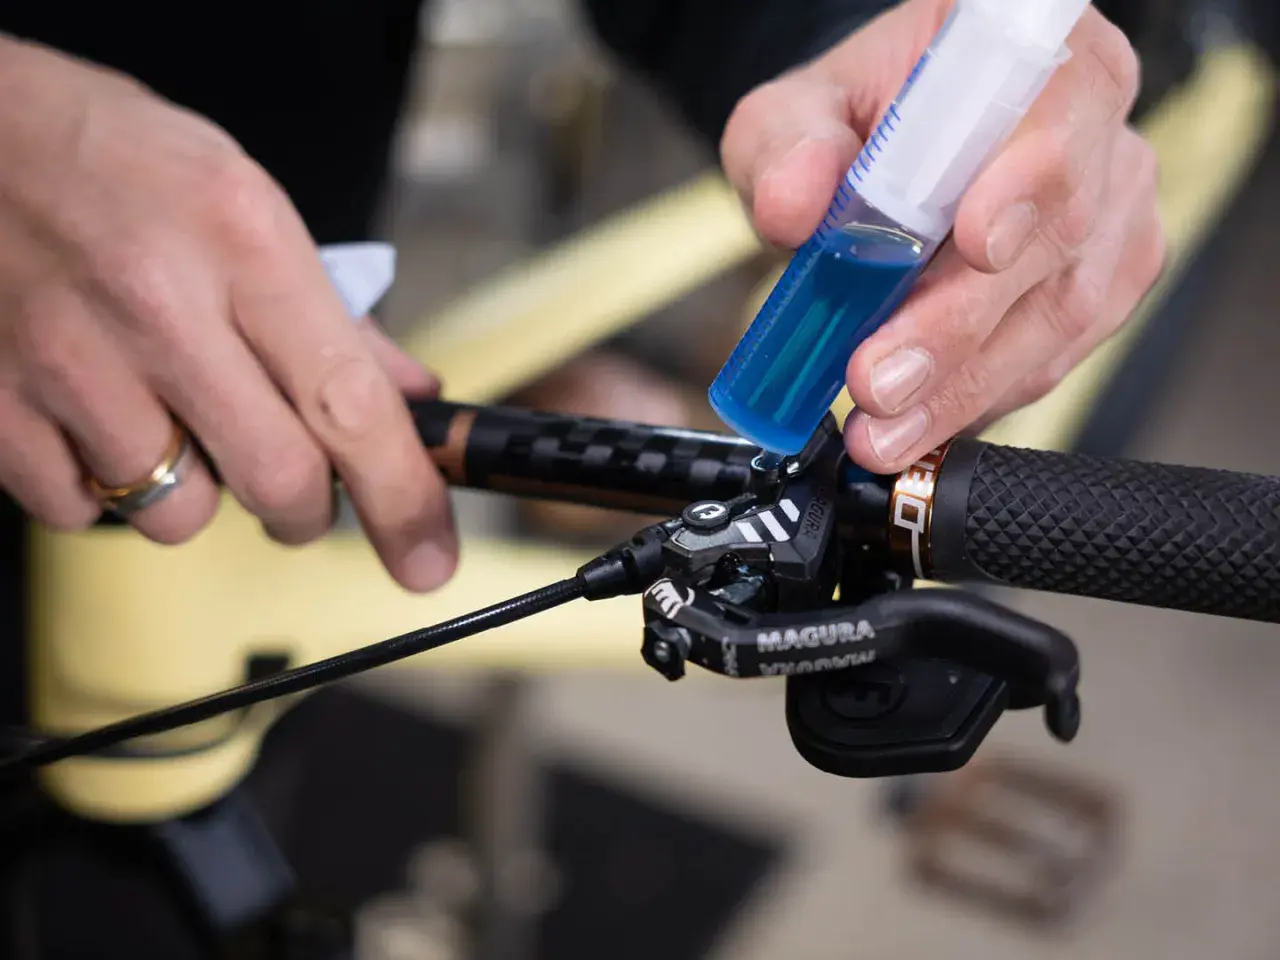
The simple rule I use is this: read the reservoir cap, the manual, or the lever body before opening anything. If the brake was built for mineral oil, I do not pour in DOT fluid. If it was built for DOT, I do not “upgrade” it with mineral oil. That mistake is one of the fastest ways to turn a maintenance job into a repair bill.
Once you know the fluid type, the warning signs become much easier to read.
How to spot early damage before it turns into a bigger repair
Brake fluid problems rarely appear as one dramatic failure. They usually start with small clues that riders ignore because the bike still stops, just not quite as crisply as before. I watch for a few patterns.- Dark or cloudy fluid, which often suggests age, contamination, or moisture pickup.
- Spongy lever feel, especially after a long descent or a few muddy rides.
- Sticky pistons, where the pads do not reset evenly after you release the lever.
- Paint dulling around the lever or caliper, which can point to repeated spills or poor cleaning.
- Brake squeal that started after a bleed, which often means the fluid reached the rotor or pads.
- Rust or crust around bleed screws and fittings, especially on bikes stored through a wet winter.
When I see two or more of those together, I stop treating the brake as routine maintenance and start treating it as a system check. That usually means inspecting the seals, checking for contamination, and deciding whether a bleed, a pad change, or a full service is the sensible move.
The good news is that most of this is avoidable if you handle the fluid properly in the first place.
How I would handle spills and protect the system
Clean handling matters more than fancy tools. Brake fluid is one of those workshop liquids that rewards slow, tidy work and punishes shortcuts, so I keep the process simple.
- Protect the frame first. I drape a clean rag over paint, especially near the caliper, hose routing, and lever clamp.
- Use the correct fluid only. I keep the bottle sealed until needed and never mix fluid types.
- Wipe spills immediately. I rinse glycol-based brake fluid off paintwork with water straight away rather than leaving it to sit.
- Keep fluid off pads and rotors. If contamination reaches the pads, I usually replace them rather than gambling on a rescue.
- Bleed at the right interval. Shimano says annual brake bleeds help keep hydraulic brakes feeling fresh and powerful, and that is a good baseline for hard-used mountain bikes.
- Dispose of waste fluid properly. I take old fluid to a suitable recycling or hazardous-waste facility, not down a drain.
I am also careful with storage. An open bottle does not stay “good” forever, and in a damp garage that matters more than people expect. If the fluid has been open for a while, or the cap is suspect, I would rather replace the bottle than trust it on a brake I rely on downhill.
Those habits lead naturally to the bigger point: the most reliable brake is usually the one that gets boring, regular attention.
The maintenance habits I’d keep through a wet UK season
For a trail bike that sees mud, rain, and occasional pressure washing, I would keep three rules in mind. First, identify the fluid type before every bleed. Second, treat any spill as immediate cleanup, not a later tidy-up. Third, do not wait for complete failure before servicing a brake that feels vague, noisy, or inconsistent.
If I were looking after my own MTB through winter, I would check lever feel after messy rides, inspect the hose joins and caliper for residue, and look closely at the paint around the brake hardware every few washes. If the brake is DOT-based, I would be more cautious about age and moisture, because that chemistry is what drives the corrosive behaviour in the first place. If the brake is mineral-oil based, I would still keep it clean, because the system is safer only when the correct fluid is used and contamination is controlled.
The practical answer is simple: brake fluid feels like a small detail until it touches paint, pads, seals, or old moisture inside a brake. If you match the fluid to the system, keep it sealed, and service it before the lever starts lying to you, the whole brake stays calmer, cleaner, and far less expensive to live with.