A grip damper is really about taking the edge off the constant chatter that climbs through the bars on rough trails. On an XC hardtail, a wet rooty descent or a long braking-bump section can make the difference between relaxed hands and a death-grip by the end of the run. In this guide I look at what the part actually changes, when it is worth paying for, and how it compares with better grips, bar choice and suspension-based cockpit upgrades.
The fastest wins usually come before the expensive parts
- Tyre pressure and tyre choice usually change hand comfort more than a cockpit part swap.
- Thicker, softer grips are the cheapest place to start on harsh bikes.
- Compliant bars and suspension stems can help, but the effect is usually subtle rather than dramatic.
- Floating or suspension grips tend to give the most direct hand comfort, but they cost more.
- Fit matters as much as hardware, especially bar roll, lever angle and grip diameter.
What it actually changes on the trail
The real job of a cockpit comfort part is not to swallow big hits like a fork. It is to reduce the small, rapid vibration that reaches your hands when the trail turns into washboard, broken rock, braking bumps or endless chatter. That is where compliance matters, meaning how readily a part flexes under load, and damping, meaning how much of that motion gets absorbed instead of bounced straight back into your hands.
On a mountain bike, that difference is easiest to feel on long descents, rough UK trail-centre lines and hardtail rides where the front end does most of the work. You are not buying suspension travel for your hands. You are buying a smoother interface between you and the bike, so your grip stays lighter and your forearms do not tense up as quickly.
That distinction matters, because once you understand it, it becomes much easier to judge which upgrade is worth trying first.
Why some riders feel a big change and others barely notice
I see the same pattern over and over: one rider swears a cockpit upgrade transformed the bike, while another says it barely moved the needle. Both can be telling the truth. The difference is usually not the part alone, but the whole system around it.
Tyre pressure is the obvious example. If the front tyre is too hard, the bars will feel busy no matter what grips you run. Rider weight matters too, because a lighter rider may not load the bars enough to notice small changes, while a heavier or more aggressive rider can feel every extra degree of flex. Hand sensitivity matters as well. Some riders mainly feel palm buzz, others feel it in the wrists or elbows, and some only notice it once arm pump has already started.
Bike layout changes the picture too. A full-suspension bike already removes a lot of harshness before it reaches the cockpit, so the gains from a comfort part are often smaller. A hardtail or downcountry bike, by contrast, leaves more work for the front end, which is why comfort upgrades can feel more obvious there. That leads neatly into the question of which part actually does the most useful work.
The main comfort options and how they compare
When people talk about handlebar comfort, they usually mean one of four things: softer grips, more compliant bars, a stem that moves a little, or a fully floating grip system. I treat them as different tools, not as competing miracles. Each one changes the ride in a different way.
| Option | What it changes | Where it works best | What to watch |
|---|---|---|---|
| Softer or thicker grips | Adds more rubber between your hand and the bar | Everyday trail riding, XC, hardtails, long days | Too much squish can reduce precision and tire smaller hands |
| Floating or suspension grips | Lets the grip move on an elastomer or spring | Riders who mainly feel hand buzz and arm pump | More expensive and more complex to set up |
| Compliant bars | Uses shape, layup or material to flex more under load | Riders who want subtle comfort without changing the cockpit feel too much | The difference can be smaller than the marketing suggests |
| Suspension stem | Adds a small amount of vertical movement before vibration reaches the bars | Rough hardtails, gravel-style off-road riding, long chatter-heavy rides | Heavier, pricier and not always needed on full-suspension bikes |
For context, recent UK grip reviews have put good comfort grips around the £20 to £28 mark, while suspension stems I found were closer to £180 to £295 depending on design and spec. That gap matters. A cheaper comfort upgrade is often the smarter first move unless you already know that the cockpit is your main problem.
My rule is simple: if you want the most direct sensation of comfort at the hands, start with grips. If you want a more engineered fix and you ride rough terrain for long periods, then a stem or suspension-grip system starts to make sense.
How I would choose it for XC, trail and long rough rides
For XC racing or fast marathon riding, I would keep the setup light and precise. That usually means a grip that suits your hand size, a bar shape that does not twist your wrists, and tyre pressure set low enough to take the sting out without feeling vague. In this case, I would only move to a more involved comfort part if my hands were still getting battered on rough descents or long stints of repeated chatter.For trail riding, I would be more open to a compliant bar or a suspension stem, especially on a hardtail. The reason is simple: trail riding often mixes climbing, sprinting and rough descending, so you need comfort without losing steering accuracy. A stem that softens repeated hits can be a good compromise, because it changes the feel without making the bike feel like it is wandering under load.
For long off-road rides, bikepacking or rough gravel-to-trail hybrids, I would value all-day fatigue reduction over razor-sharp feedback. That is where a floating grip system or a stem with some vertical movement can earn its keep. The longer the ride and the rougher the surface, the more comfort starts to matter in plain performance terms, not just in feel.
In other words, I would not spend like a racer if the bike is being used like an all-day explorer. Match the part to the ride, not to the label on the packaging.
The setup details that matter more than most people think
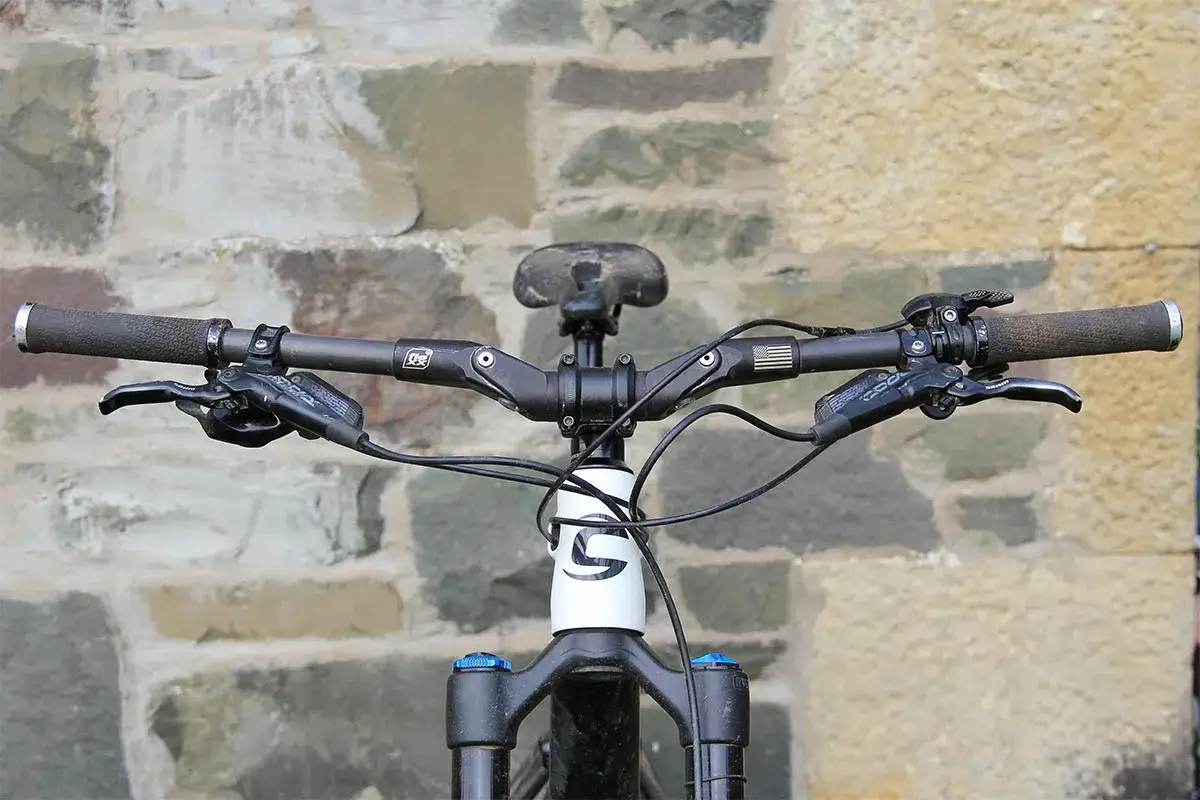
Before buying anything, I always check the parts that influence comfort for free. A small tweak in bar roll, lever angle or grip diameter can change how much pressure sits in your palms and wrists. If the brake levers are too high or too low, your hand is forced into a shape that makes every bump feel worse. If the bar is rolled too far forward, the wrist angle can get harsh even if the bars themselves are decent.
Grip size is another one people underestimate. Mountain bike grips commonly sit around 30 to 32 mm in diameter, with the broader market stretching roughly from 25 to 40 mm. Thicker grips can feel more plush and calm down vibration, but they can also demand more squeeze, which is tiring over time. Narrower grips feel more precise, but they usually pass more trail feel straight through to your hands.
I also pay attention to gloves and tyre pressure because they change the result quickly. Padded gloves can help, but they should not be used to hide a badly set up cockpit. Tyre pressure is even more important. If the front wheel is overinflated, the bars will feel sharp and nervous no matter how clever the grip system is.
There is a reason I treat this as a tuning process rather than a shopping list. The part that feels amazing on one bike can feel pointless on another if the bar position, hand size or pressure is off. Get the basics right first, then judge the upgrade properly.
Mistakes that waste money and hide the real problem
The biggest mistake is buying the most elaborate option first. A rider with badly set tyre pressure, a poor bar angle and worn-out grips can spend a lot of money and still end up with the same numb hands. Another common error is assuming that more flex automatically means more comfort. It does not. Too much movement can make the front end vague, which then forces you to grip harder and cancels out part of the benefit.
I also see people focus too much on material and not enough on shape. Carbon bars often test well for vibration control, but price is not a guarantee of comfort, and the geometry of the bar can matter as much as the layup. A well-shaped alloy bar with the right sweep can feel better than an expensive carbon option that simply does not suit your position.
The last trap is expecting a cockpit part to solve every kind of harshness. Small, high-frequency chatter is one thing. Square-edge impacts and poor suspension setup are another. If your fork is too harsh, too slow to rebound or badly sprung for your weight, a comfort grip will only mask part of the problem.
When I see a rider blaming the wrong component, it is usually because the bike needs a system-wide fix, not a single boutique upgrade.
What I would test first on a harsh front end
If I were building this from scratch, I would work in a strict order. First, I would set tyre pressure for the terrain and rider weight. Second, I would fit a grip that matches the hand size and the kind of feedback I want. Third, I would get the bar roll and lever angle right, because that changes wrist comfort more than most riders expect. Only after that would I move to a more expensive cockpit part.
- For the cheapest improvement, start with pressure and grips.
- For a balanced XC or trail bike, choose a bar shape and grip diameter that reduce squeeze without deadening the steering.
- For a hardtail on rough trails, consider a compliant bar or suspension stem if hand fatigue still shows up.
- For long mixed-surface rides, a more involved comfort system can make sense, but only after fit and pressure are sorted.
That is the way I would approach it on a real bike: not as a magic fix, but as a careful progression from free adjustments to targeted hardware. If the front end is already close to right, the correct comfort part can take the sting out of a ride in a way you feel immediately. If the setup is poor, no amount of rubber or elastomer will hide that for long.