
This guide breaks down what the chip actually changes, how the high and low positions feel, which setting makes sense on UK trails, and when the feature is genuinely useful rather than just another bit of marketing.
What matters most when a bike can change its own geometry
- Most chips change head angle, seat angle, bottom bracket height, and sometimes wheelbase or suspension behaviour.
- High and steep usually favour climbing and pedal clearance; low and slack usually favour descending stability.
- On British trails, wet roots, punchy climbs, and slow technical sections make the choice more noticeable.
- The chip is most useful when you actually switch terrain or wheel size; otherwise tyre choice, sag, and cockpit fit may matter more.
- Set it up carefully and compare it on the same loop before deciding whether the change is real.
What a flip chip actually changes
I usually think of a flip chip as a reversible insert or offset plate that changes frame position without changing the frame itself. Depending on where it sits, it can affect geometry, wheel placement, and sometimes suspension behaviour, which is why two bikes with the same frame can feel surprisingly different in the saddle.
| Chip location | What it usually changes | What you feel on the trail |
|---|---|---|
| Shock mount or linkage | Head angle, seat angle, bottom bracket height, and sometimes leverage rate | More climbing efficiency in one position, more descending stability in the other |
| Rear dropout or axle insert | Wheelbase, chainstay length, and bottom bracket height | Quicker handling or more planted tracking, depending on the setting |
| Wheel-size chip | 29er or mullet compatibility | More rear-end agility or more rollover and stability, depending on the build |
On some frames, the chip also influences leverage rate, which is how much suspension movement you get for a given amount of shock travel, and anti-squat, which is the suspension’s resistance to bobbing under pedalling load. That is the drivetrain side of the story: the geometry does not just steer the bike, it also changes how it responds when you are putting power through the pedals.
The important part is scale. Most systems move the bike by a modest amount, often around half a degree to 1 degree plus roughly 5 to 10 mm at the bottom bracket, but that small shift can be enough to change how the bike behaves in slow corners, steep climbs, and rough descents. That leads straight into the next question: what do those positions actually feel like?
Why small geometry changes feel bigger on the trail
Numbers on a chart can look trivial. On trail, the difference is easier to notice because the chip changes where your weight sits, how much room you have before pedal strikes, and how confidently the front wheel tracks when things get steep.
| Setting | Typical feel | Best for | Common trade-off |
|---|---|---|---|
| High / steep | Quicker to tip into turns, easier to pedal uphill, more ground clearance | Climbs, technical XC, mixed trail rides, wet or rooty ground | Less calm on steep descents, slightly less “in” the bike |
| Low / slack | More stable at speed, more confidence on steep or rough descents | Enduro stages, bike park laps, aggressive trail riding | More pedal strikes, slightly slower steering, less lively climbing feel |
That high-versus-low split is the simple version, but it is still the right place to start. The low position usually drops the bottom bracket and slackens the angles, so the bike feels calmer when the trail gets fast and rough. The high position does the opposite, giving you more clearance and a slightly more upright climbing posture.
In practice, I would rather have a chip that changes the bike by a modest amount than one that tries to do too much. A dramatic swing often sounds clever and ends up making the bike feel compromised in both settings. Once you know how the two positions feel, the next step is matching them to the terrain you actually ride.
Which setting fits UK trails best
British terrain tends to reward balance more than extremes. A lot of rides mix wet roots, short steep climbs, tighter natural singletrack, and occasional fast descents, so the “best” chip position is often the one that avoids the worst compromise for your local loop.
- Wet, rooty woodland trails: I often lean toward the high setting because pedal clearance matters more when the ground is slippery and unpredictable.
- Short, punchy climbs: A steeper front end can help keep the front wheel down and make the bike feel less effortful between bursts.
- Trail centres and mixed loops: The middle or stock setting is usually the safest starting point if the bike offers one.
- Bike park laps and steep descents: The low setting usually earns its keep here because stability and confidence matter more than quick steering.
- Long XC-style rides: A higher BB and steeper posture can reduce fatigue, especially if the route has many climbs and not many very steep descents.
If I were choosing for a typical UK all-rounder, I would usually start in the setting that prioritises clearance and climbing balance rather than going straight to the slackest option. British trails often punish lazy pedal timing more than they reward extra stability. That does not mean low is wrong, only that it is easier to justify when the day is steep, fast, or shuttled.
That also explains why the chip is more useful on some bikes than others. The next section is the honest one: where it genuinely matters, and where it barely moves the needle.
Where the chip matters most and where it barely does
Some riders buy a bike for one kind of trail and never touch the adjustment again. Others use one frame for everything from local loops to park days. The value of the chip depends less on the marketing language and more on how often your riding actually changes.
| Situation | How useful the chip is | Why |
|---|---|---|
| One bike for mixed terrain | Very useful | You can bias the bike toward climbing or descending without buying a second frame. |
| Bike that switches between 29er and mullet | Very useful | The chip helps preserve balanced handling when the rear wheel size changes. |
| Trail bike near the edge of pedal-strike clearance | Useful | A few millimetres of BB height can be the difference between clean riding and constant clanks. |
| Bike with a tiny adjustment range | Less useful | If the change is barely noticeable, it will not fix a fundamentally wrong fit or style choice. |
| Bike where cockpit fit is already wrong | Not a fix | Stem length, bar rise, reach, and frame size matter more than a small geometry tweak. |
This is where I see a lot of riders overestimate the feature. A chip is not a cure for poor fit, and it will not magically turn a short frame into a long one or make the bike climb like a hardtail. If the cockpit is wrong, the suspension setup is wrong, or the tyres are badly chosen, those issues will dwarf the chip’s effect.
On the other hand, when the adjustment is well designed, it can be a genuinely smart bit of versatility. That is why the next thing I care about is not the existence of the chip, but how easy it is to use without introducing mistakes.
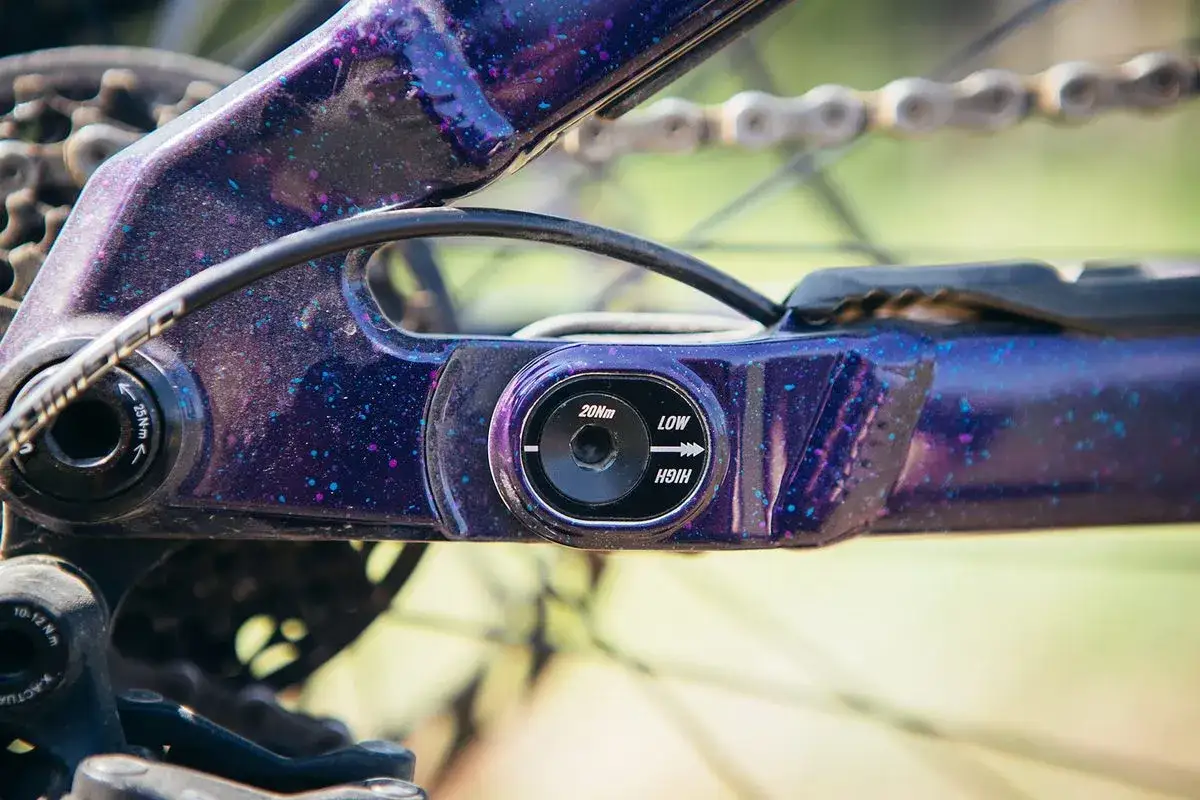
How to change it safely and compare the results
The safest way to judge a geometry chip is to treat it like a controlled test, not a random tweak. If you change the setting, the tyres, the sag, and the bar position all at once, you will never know what actually made the bike feel different.
- Record the current setting before touching anything, including the chip position and the torque values listed by the frame maker.
- Set tyre pressure and suspension sag first, because those changes often matter more than the chip itself.
- Flip only one setting at a time, then ride the same loop again so the comparison stays fair.
- Check pedal clearance, tyre clearance, and chainring clearance before the first proper descent.
- Use a torque wrench and the correct hardware order, because many chips rely on precise clamping to stay quiet and secure.
If the frame supports a wheel-size conversion, test the standard wheel setup first before changing the rear end. A mullet conversion can make a bike feel more playful, but it also changes the balance of the bike in a way that is bigger than a simple angle tweak. I would never make that judgment on a parking-lot bounce test alone.
The key discipline is consistency. If you ride the same loop, at the same pressures, with the same suspension setup, the difference becomes much clearer. That leads to the question most buyers really care about: is it worth paying for this feature at all?
Whether I would pay extra for one
I would pay for a well-executed chip on a trail or enduro bike if I regularly ride different terrain and actually use the adjustment. I would be much less enthusiastic if the range is tiny, the hardware is awkward, or the bike already fits and handles exactly as I want.
- Worth it: you ride steep descents one day and long pedally loops the next.
- Worth it: you are deciding between two wheel setups and want the frame to support both properly.
- Worth it: the bike sits right on the edge between stable and too slack, so a small adjustment solves a real problem.
- Less worth it: you ride the same local loop every week and never touch the stock setting.
- Less worth it: the adjustment sounds impressive, but the actual numbers are too small to change your riding.
My own bias is simple: I prefer a chip that is easy to reach, clearly marked, and backed by a meaningful difference in feel. If the bike designer has done the work properly, the feature adds range without making the frame awkward. If the adjustment feels like a checkbox, I would rather have a cleaner frame design and better suspension tune.
That is also why the final setup choice should be boringly practical rather than dramatic. Start from the setting that matches most of your riding, then only move away from it if the trail tells you to.
The first setup I would try on a mixed-terrain bike
For a mixed UK trail bike, I would usually start with the stock or higher setting, especially if the rides include wet ground, slow technical climbing, or a lot of pedal time. It keeps the bike more forgiving on clearance and usually gives the most neutral baseline for a first test ride.
- If the front wheel feels nervous on steep descents, I would try the lower setting next.
- If I am clipping pedals too often, I would stay high unless the bike is only used for descending.
- If the bike can run both 29er and mullet, I would compare wheel setups before chasing the smallest angle change.
- If the frame already feels balanced, I would leave it alone and spend time on tyre choice, suspension support, and cockpit fit instead.
The best use of this adjustment is not to chase the most aggressive-looking number. It is to make the bike suit the majority of your rides with the fewest compromises. When the chip is well chosen, you notice the trail more and the frame less, and that is usually the right outcome.