
Adding sealant is the small tubeless job that prevents bigger problems later. I’m going to show how to add sealant to tubeless tires without making a mess, how much to pour into different tyre sizes, when to refresh it, and what to check if the wheel still loses air after the top-up. For MTB and gravel bikes, this is one of the simplest ways to keep the setup reliable on rough trails.
The fast version for a clean, reliable sealant top-up
- Use a valve core remover and injector for the cleanest refill on a mounted wheel.
- Match the sealant amount to tyre volume, not just wheel diameter.
- Spin and bounce the wheel after inflation so the liquid coats the bead and casing.
- Check sealant every few months, sooner in hot, dry, or high-use conditions.
- If the tyre still leaks, inspect the valve core, rim tape, and bead seating before adding more sealant.
What you need before you start
I always begin by checking one thing: whether the valve core is removable. On most tubeless MTB and gravel wheels it is, and that matters because it lets the sealant flow through the valve stem instead of forcing me to break the bead. If the setup is already tubeless-ready and holding air, this is usually a quick maintenance job, not a full workshop project.
- Valve core remover, which unscrews the removable insert inside a Presta valve.
- Sealant injector or syringe, so I can measure the liquid and keep the job tidy.
- Fresh tubeless sealant, matched to the tyre size and type.
- Track pump or compressor, especially if the bead needs help seating again.
- Clean rag and gloves, because sealant on hands and rims is easier to deal with immediately.
- Soapy water, useful if I need a little help popping the bead back into place.
If the rim tape is damaged, the valve feels loose, or the tyre is not actually set up tubeless, I stop there. Sealant can seal small punctures, but it will not rescue a bad tape job or the wrong hardware. Once the kit is ready, the actual refill is straightforward.
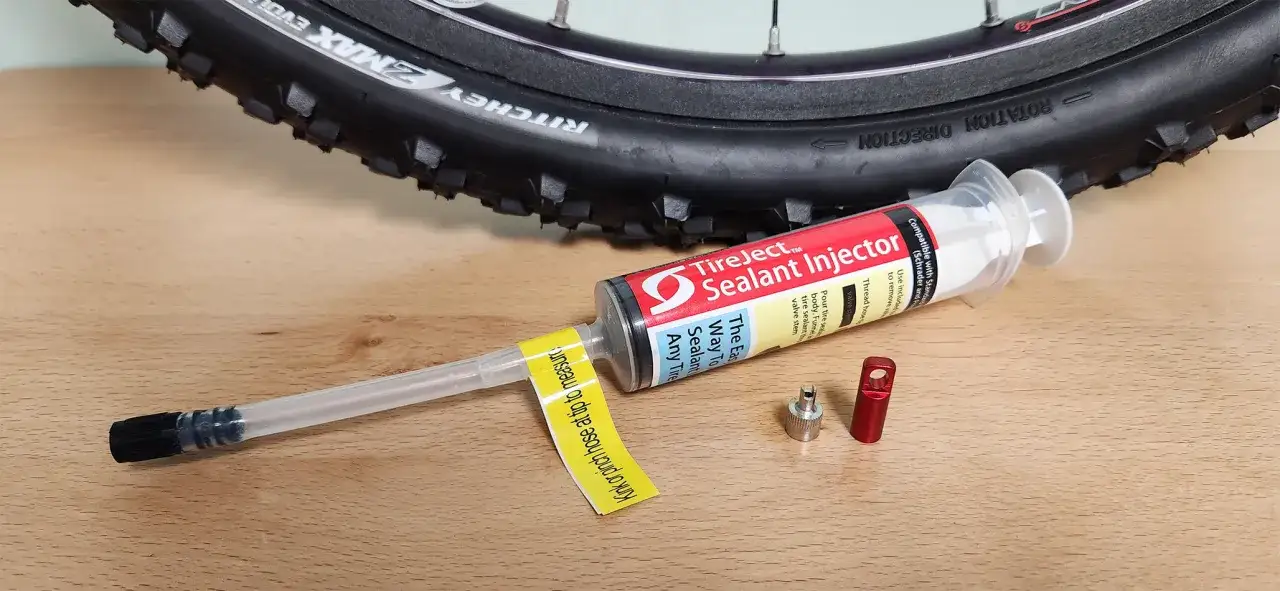
The cleanest way to add sealant through the valve
For a tyre that is already mounted, I prefer the valve method every time. It is cleaner, faster, and usually means I do not have to unseat the bead. The basic idea is simple: remove air, remove the valve core, inject the measured sealant, then reinflate and spread it around the casing.
- Deflate the tyre completely so there is no pressure fighting the valve core.
- Remove the valve core with a proper tool and keep it somewhere clean.
- Measure the sealant before you pour it; guessing is where messes start.
- Attach the injector or syringe to the valve and push the liquid in slowly.
- Refit the valve core, then inflate to your normal riding pressure.
- Spin the wheel several times and bounce it lightly so the sealant coats the inside evenly.
If the sealant will not pass through the valve cleanly, I do not force it. A clogged core or a narrow injector is usually the problem, and forcing liquid through only makes the job dirtier. In stubborn cases, I unseat one bead just enough to pour the sealant directly into the tyre, then reseat it and inflate. That is the backup method, not the first choice. Next comes the part most riders get wrong: how much to use in the first place.
How much sealant to use for MTB, gravel, and road tyres
I do not guess here. Tyre volume matters more than wheel diameter alone, and a big-volume 29er wants far more sealant than a narrow gravel or road tyre. I start with the lower end of the range for a tight, modern casing and move upward if the tyre is porous, the trails are rough, or I know the bike will spend time in dry storage.
| Tyre type | Typical starting amount | What I use it for |
|---|---|---|
| 700c road, 28-32 mm | 50-60 ml | Light volume and efficient rolling |
| 700c gravel, 35-45 mm | 60-75 ml | General gravel use and mixed terrain |
| 27.5 x 2.3-2.5 MTB | 100-110 ml | Typical trail and all-round off-road riding |
| 29 x 2.3-2.5 MTB | 105-125 ml | Most common XC and trail wheel sizes |
| 29+ or downhill volumes | 140-205 ml | Large air chambers and very demanding terrain |
As a practical example, a 29 x 2.3 tyre usually sits around 105 ml, while a 29 x 2.5 often needs about 125 ml. A 700 x 35 gravel tyre can be perfectly happy with roughly 60 ml. If I am working on a very light casing or riding sharp, rocky lines, I would rather be slightly generous than underfill the tyre and wonder why it keeps weeping air. The other half of the job is timing, because sealant does not stay fresh forever.
When to top it up again
Sealant is not a fit-and-forget fluid. Heat, dry air, long storage, and frequent riding all change how quickly it dries out, so I treat top-ups as routine maintenance rather than a repair that only happens after a puncture. Muc-Off recommends checking and topping up every 6 months, while Stan's says its standard sealant can stay liquid for 2-7 months depending on climate.
- Check it sooner if the bike sits unused for long periods.
- Inspect it earlier after a dry spell, hot summer rides, or repeated pressure loss.
- Refresh it sooner if the tyre casing is porous or the sidewall looks dusty with dried residue.
- Use the sealant bottle instructions if you are running a fast-drying race formula.
My rule is simple: if the wheel sounds almost dry when I shake it, I check it before the next ride. That habit takes a few minutes and saves a lot of roadside frustration. If the tyre still refuses to hold air after a fresh top-up, the issue is usually somewhere else in the system.
The mistakes that waste sealant and still leave you with leaks
The most common mistake is adding liquid without asking why the tyre lost air in the first place. I see the same problems again and again, and most of them are avoidable.
- Using too little sealant for the tyre volume, especially on large 29er or plus-size casings.
- Pouring through a clogged valve core, which slows the fill and can leave the tyre underdosed.
- Ignoring a loose valve nut, which lets air escape even when the sealant level is fine.
- Skipping rim tape checks when the leak is actually coming from the rim bed.
- Expecting sealant to fix major damage, such as a large sidewall cut or a torn bead area.
In practice, I check the whole system before I blame the sealant itself. A clean valve core, tight valve hardware, and sound rim tape solve more “mystery leaks” than people expect. Once you understand that, troubleshooting becomes much quicker.
A quick troubleshooting routine when the tyre still won’t hold air
- Inflate the tyre and listen for hissing around the valve and bead.
- Spin the wheel, then bounce it lightly so the sealant reaches the whole casing.
- If the valve is suspect, remove the core and clean or replace it.
- If air still disappears at the rim, inspect the tape and retape the wheel if needed.
- If small punctures keep reopening, add a little more sealant rather than a full second dose.
- If the cut is larger than sealant can manage, use a plug or replace the tyre.
A little wetness on the sidewall after a fresh setup is not always a failure. Porous casings can weep slightly before the sealant finishes coating the fibres, and that often settles after a ride or two. What I do not ignore is a bead that never fully seated or air escaping from the valve area, because those are setup problems, not sealant problems. Once the wheel behaves properly, the real win is keeping it that way with a simple maintenance habit.
The maintenance habit that keeps the setup reliable
My own routine is boring, and that is exactly why it works. I note the date of the last top-up, carry a small valve core tool on longer rides, and check the tyre before bigger trail days or races. If the bike has spent time in hot storage, or if I have been riding in dry, dusty conditions, I inspect the sealant sooner rather than later.
- Keep a small sealant pouch in the ride pack for long days away from home.
- Wipe dried residue from the valve before it turns into a clog.
- Check pressure and sealant before remote rides, not after the first puncture.
- Revisit the sealant sooner if the bike has been unused through a long stretch of bad weather.
Once that rhythm is in place, tubeless stops feeling fussy and starts doing what it should do: seal quickly, hold air, and keep you riding instead of stopping to fix flats.