The fastest way to get close before the first ride
- Start with a tubeless 29er baseline, then change pressure in 1 psi steps.
- Run the rear tyre 1-3 psi higher than the front on most bikes.
- Heavier riders, narrower tyres, and rougher trails all push pressure up.
- Wider rims, wider tyres, and tubeless setups usually let you run lower.
- Check pressure with a gauge at least monthly, and before every ride if you use latex tubes.
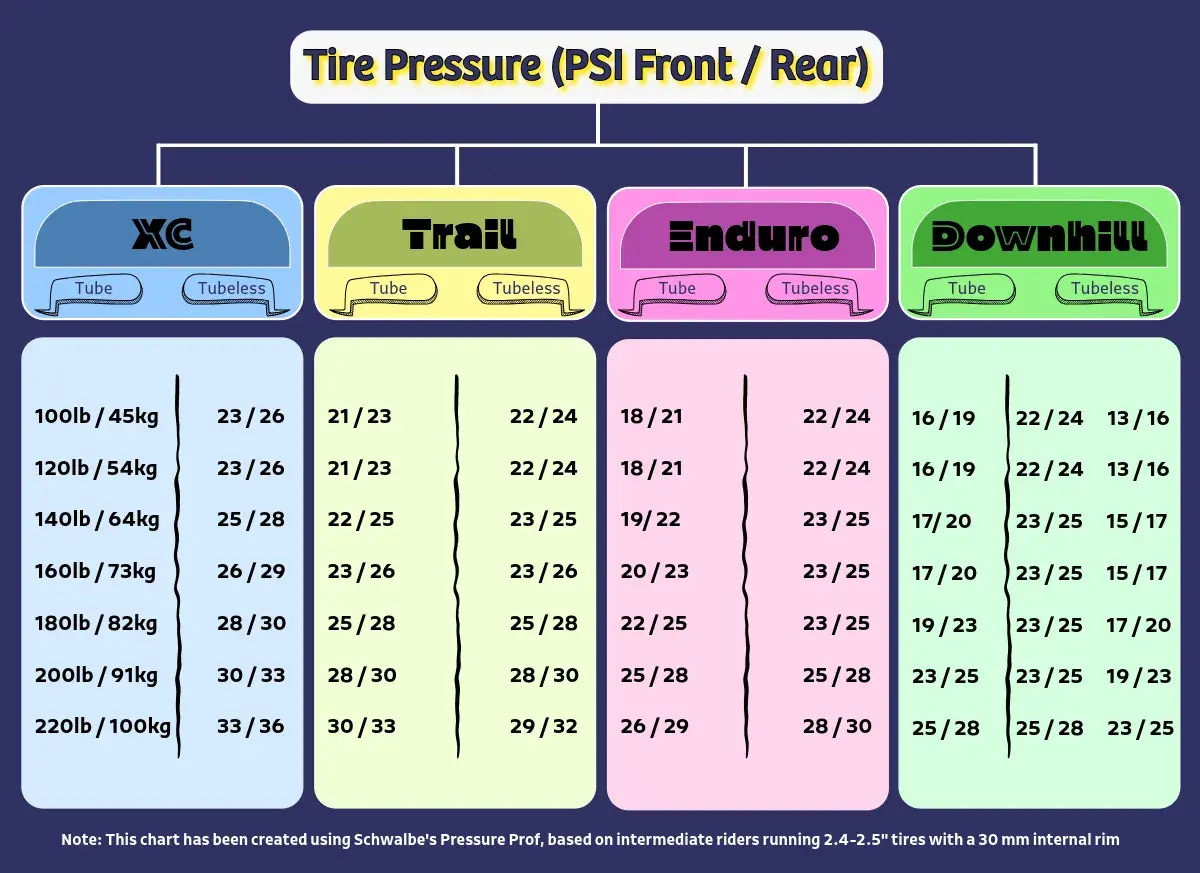
What the chart is actually for
I treat a 29er pressure chart as a baseline, not a rule. The real job of the chart is to get you into the right neighbourhood fast, so you can spend your time fine-tuning grip, support, and rim protection instead of starting from a random number. A 29er wheel does not have one magic pressure setting; the tyre is carrying the load, and the load changes with the rider, the terrain, and the build.
That is why the same bike can feel underinflated on a rocky trail centre and perfect on a wet XC loop in the woods. The goal is not the highest pressure that still rolls well, but the lowest pressure that keeps the bike supported and predictable. Once you think about it that way, the chart becomes much easier to use. The next step is putting useful numbers on the page.
A practical chart for UK riders
This is the starting point I would use for a modern 29er with tubeless tyres, sensible casing support, and a trail or XC rim. It is deliberately conservative enough for UK mixed conditions, where damp roots, cambers, and occasional rock hits punish a setup that is too soft. If you ride with tubes, add about 3-5 psi to both tyres.
| Rider weight | Front tyre | Rear tyre | Best starting point |
|---|---|---|---|
| 45-55 kg | 1.2-1.4 bar (17-20 psi) | 1.3-1.5 bar (19-22 psi) | Light XC, smooth or mixed terrain |
| 55-70 kg | 1.3-1.5 bar (19-22 psi) | 1.4-1.7 bar (21-24 psi) | Fast XC and light trail riding |
| 70-85 kg | 1.5-1.7 bar (22-24 psi) | 1.6-1.9 bar (23-27 psi) | Strong all-round 29er setup |
| 85-100 kg | 1.6-1.9 bar (23-27 psi) | 1.8-2.1 bar (26-30 psi) | Heavier riders or rougher trails |
| 100+ kg | 1.8-2.1 bar (26-30 psi) | 1.9-2.3 bar (28-34 psi) | Aggressive riding and rim protection |
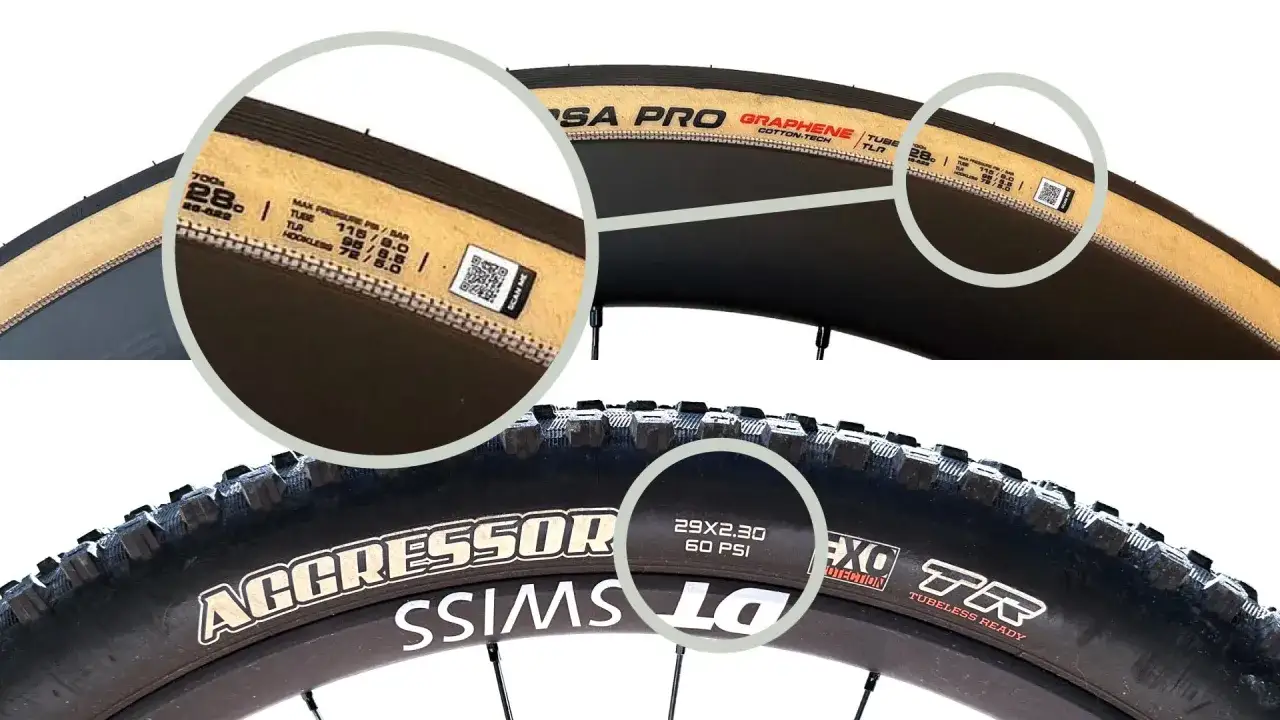
If you run a narrower 2.1-2.2in XC tyre, start near the top of each range. If you are on a 2.4-2.6in tyre with a wider modern rim, start near the bottom and work up only if the tyre feels vague or you hit the rim. Maxxis is very clear that published pressure figures are only a starting point, and Schwalbe makes the same point in its own guidance. Both brands are basically saying the same thing: the chart gets you close, but the trail makes the final decision.
Once you have a usable number, the real refinement comes from treating the front and rear tyres differently.
Why the front and rear numbers should differ
I almost never set a 29er to the same pressure front and rear. The rear wheel carries more of the rider’s weight, deals with pedalling force, and on a hardtail it also absorbs more of the trail impacts. The front tyre, meanwhile, does the steering and a large share of the braking, so it needs enough pressure to stay precise without feeling nervous.
- Front tyre: slightly lower pressure usually improves grip and steering confidence.
- Rear tyre: slightly higher pressure usually improves support and rim protection.
- Typical gap: 1-3 psi, with the larger gap making more sense for heavier riders and rougher trails.
That small split matters more than most riders expect. On wet UK roots, too much pressure up front can make the bike skate across the trail instead of biting into it, while too little pressure at the back can make the tyre wallow under load. From there, the next variable is not rider weight so much as the rest of the setup.
What changes the pressure beyond rider weight
Weight gives you a starting point, but the tyre and wheel system decides how much of that pressure you can actually use. A wide rim supports the sidewall better than a narrow one, a tubeless setup usually allows a little less pressure than tubes, and a reinforced casing can handle a lower number without feeling floppy. Wider tyres also carry the load with less air pressure because they have more volume.| Factor | What it changes | My usual adjustment |
|---|---|---|
| Tubeless vs tubes | Tubeless is more forgiving and usually rolls better at lower pressure. | Drop 3-5 psi compared with a tube setup. |
| Rim width | Wider rims hold the tyre shape better and reduce squirm. | Go 1-2 psi lower on a wider rim. |
| Tyre width | More volume means more support from the air inside the tyre. | 2.4-2.6in tyres can usually start 1-2 psi lower than 2.2in tyres. |
| Terrain | Sharp rocks and square edges punish a soft setup. | Add 1-3 psi for rocky trails; reduce 1 psi for grip on slick roots. |
| Casing and inserts | Stiffer casing and inserts improve support and protect the rim. | Keep the pressure lower end if the tyre still feels stable. |
One practical detail matters here. Schwalbe points out that a bike tyre can lose around 1 bar a month, which is enough to move a carefully tuned setup out of its sweet spot. That is why I prefer a floor pump with a gauge and a proper pressure check rather than guessing by feel. Once the hardware is understood, dialling pressure becomes a short process instead of a guessing game.
How I tune pressure on the trail
The easiest way to get this right is to change one variable at a time. I start with the chart number, ride a familiar loop, and make tiny adjustments until the bike feels stable without losing grip. Big jumps hide the real result, which is why most pressure mistakes happen when riders chase a dramatic change instead of a small correction.
- Set both tyres cold with a proper gauge.
- Ride a trail you know well, ideally with a mix of braking bumps, corners, and a few rough hits.
- If the front washes out, drops off cambers, or feels vague, reduce it by 1 psi.
- If the rear feels harsh, skips on roots, or hits the rim, add 1 psi.
- Repeat until the bike feels planted without feeling dead.
I usually stop when the tyre disappears under me in the good sense: I still feel the ground, but the bike is not fighting me. If that process sounds simple, it is because it should be. The real problems come from the mistakes that make even a good number feel wrong.
Common mistakes that make a good setup feel bad
Most pressure complaints are not really tyre problems. They are usually measurement problems, setup mismatches, or a pressure choice that was fine for one trail and wrong for another. The fix is usually boring, but boring works.
- Using the thumb test instead of a gauge.
- Changing pressure in big steps, which makes it hard to know what helped.
- Ignoring trail type and running the same pressure all year.
- Forgetting that cold mornings can read lower than warm garage checks.
- Running a tube-style pressure with tubeless tyres, or vice versa.
- Overlooking rim and tyre limits, especially on hookless or very light casings.
For UK riding, the biggest issue I see is riders leaving the same pressure in place from summer to winter. Wet roots, softer ground, and colder air all change the way the bike feels, so a number that worked in July can feel harsh or vague by November. That is why I like to keep one simple baseline for the season, then adjust it around conditions instead of rebuilding it from scratch every time.
What I would keep on the pump gauge through a UK season
If I were setting up a normal 29er for mixed UK riding, I would keep one dry-weather number and one wet-weather number in mind. For a mid-weight rider on a 29 x 2.3 to 2.4in tubeless setup, that often means something like 1.5-1.7 bar up front and 1.6-1.9 bar at the rear for general use, then dropping a touch when the trail is greasy and adding a touch when the ride turns rocky or fast. I would not go lower just to chase grip if the tyre starts squirming in corners.
The best pressure is the one that matches your weight, your rim, your tyre, and the terrain you actually ride. If you keep a short note of your front and rear numbers after a few rides, you will build a better chart for your bike than any generic table can give you. That is the part most riders skip, and it is usually the part that makes the biggest difference.